Delay
![]() How does this activity look in the Designer Pane?
How does this activity look in the Designer Pane?
To add this activity to a workflow definition
- Drag it from the Toolbox Pane and drop it in the Designer Pane.
To configure this activity
Select the activity in the Designer Pane to configure the following property boxes.
-
 Activity Name
Once added to a workflow definition, the default name of an activity can be changed. Providing a custom name for an activity helps you remember the role it plays.
To name an activity
- Add an activity to your workflow by dragging it from the Toolbox Pane and dropping it in the Designer Pane.
- Select the activity in the Designer Pane.
- Under
 Activity Name in the Properties Pane,
replace the default name.
Note: Activity names cannot be the same as any other activity name in the workflow, they cannot be the same as the workflow's name, they must be less than 100 characters, they must contain at least one alphanumeric character, they cannot be "Name," and they cannot be the same as the activity's runtime type (which is usually only an issue with custom activities).
-
 Activity Description
Use the Activity Description to provide descriptive text to help you remember the role that the activity plays in the workflow. All activities contain a default description that you can modify while constructing your workflow.
To modify an activity description
- Add an activity to your workflow by dragging it from the Toolbox Pane and dropping it in the Designer Pane.
- Select the activity in the Designer Pane.
- Under
 Activity Description in the Properties Pane, replace the default description.
-
 Delay Duration
This property box defines the delay duration for the Delay activity.
To configure Delay Duration
- Add the Delay activity to your workflow definition by dragging it from the Toolbox Pane and dropping it in the Designer Pane.
- Select the activity in the Designer Pane.
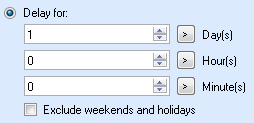
- Under Delay Duration in the Properties Pane, choose whether the deadline should time out after a specified length of time or at a particular day and time:
- To configure the workflow to delay for a specified length of time, select
 Delay for and define the branch's timeout duration in days, hours and minutes. Click the Token button (right arrow)
  to use tokens to specify the delay time.
To count only business days, select Exclude weekends and holidays.
 - To configure the workflow to delay until a specific day and time, select
 Delay until and define the day and time the delay should end. Click the Token button (right arrow)
  to use tokens to specify the end day and time.
Click the calendar icon
  to pick a date from the calendar.


