Form Data
This property box lets you specify what field values you want the HTTP Form Post activity to post to a web form.
To configure form data
- Add the HTTP Form Post activity to your workflow definition by dragging it from the Toolbox Pane and dropping it in the Designer Pane.
- Select the activity.
- Click in the Form Data property box to open the
 Configure Form Data dialog box.
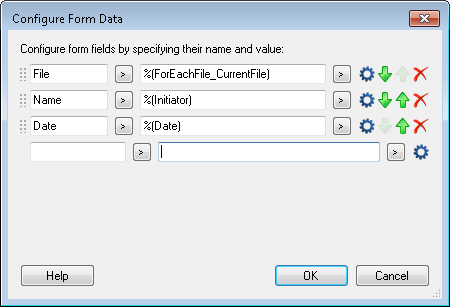
 - Provide a name and value for each form field you want this activity to fill out. Click the Token button (right arrow)
 to use tokens.
 - Optional: Click the Advanced button
 next to any name value pair to open the Configure Fields dialog box.
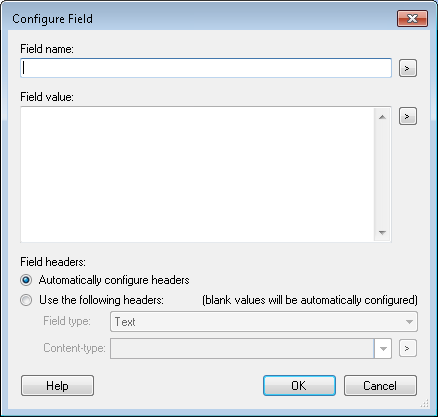
 - In the Configure Field dialog box, provide a field name and value if you hadn't already in the Configure Form Data dialog box.
- By default, this activity will automatically configure headers for each field. If you are inserting a file, html, or css, you may want to select Use the following headers to provide custom header values. If you specify that the field type is Text, specify which type of text field with the Content-type drop down menu. If you specify that the field type is File, specify the type of file, how it is encoded (if at all), and the file's name. If you leave any headers blank, they will automatically be filled when the activity runs.
- Click OK.
Tip: If you want to upload a file to Web Service through a form, place the HTTP Form Post activity inside a For Each File activity, and use the CurrentFile token.
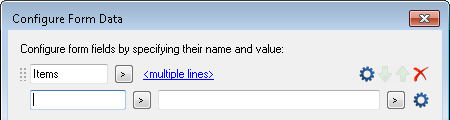
Note: If you enter field values on separate lines in the Field value text box, the field will have multiple values that can only be edited in this dialog box. In the Configure Form Data dialog box, multi-value fields will appear with a <multiple lines> link that opens the Configure Fields dialog box. ![]() Show me what this looks like.
Show me what this looks like.