Schedule OCR
Images that contain clearly printed or typed information can have their text extracted (and, thus, made searchable) through a process called OCR (Optical Character Recognition). This activity schedules an OCR task using Laserfiche Distributed Computing Cluster. See the tokens this activity produces.
![]() How does this activity look in the Designer Pane?
How does this activity look in the Designer Pane?
- Drag it from the Toolbox Pane and drop it in the Designer Pane.
To configure this activity
Select the activity in the Designer Pane to configure the following property boxes in the Properties Pane.
-
 Activity Name
Once added to a workflow definition, the default name of an activity can be changed. Providing a custom name for an activity helps you remember the role it plays.
To name an activity
- Add an activity to your workflow by dragging it from the Toolbox Pane and dropping it in the Designer Pane.
- Select the activity in the Designer Pane.
- Under
 Activity Name in the Properties Pane,
replace the default name.
Note: Activity names cannot be the same as any other activity name in the workflow, they cannot be the same as the workflow's name, they must be less than 100 characters, they must contain at least one alphanumeric character, they cannot be "Name," and they cannot be the same as the activity's runtime type (which is usually only an issue with custom activities).
-
 Activity Description
Use the Activity Description to provide descriptive text to help you remember the role that the activity plays in the workflow. All activities contain a default description that you can modify while constructing your workflow.
To modify an activity description
- Add an activity to your workflow by dragging it from the Toolbox Pane and dropping it in the Designer Pane.
- Select the activity in the Designer Pane.
- Under
 Activity Description in the Properties Pane, replace the default description.
-
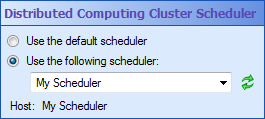
 Distributed Computing Cluster Scheduler
This property box lets you specify which Distributed Computing Cluster Scheduler will schedule the OCR tasks configured in the Schedule OCR activity. In a group of Laserfiche Distributed Computing Cluster machines, the scheduler machine divides OCR projects among the worker machines.
To specify a Distributed Computing Cluster Scheduler
- Add the Schedule OCR activity to your workflow definition by dragging it from the Toolbox Pane and dropping it in the Designer Pane.
- Select the activity in the Designer Pane.
- Under
 Distributed Computing Cluster Scheduler in the Properties Pane, either:
 - Use the default scheduler as specified in the Distributed Computing Cluster node of the Workflow Administration Console.
- Choose a scheduler from the drop down menu. To add or manage schedulers, select Manage schedulers from the drop-down menu. Learn more.
-
 Documents to OCR
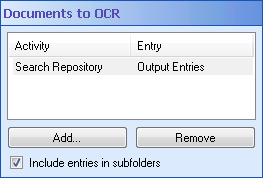
This property box for the Schedule OCR activity lets you add documents to the OCR queue. The documents specified here are sent as a single job to the Distributed Computing Cluster Scheduler.
Tip: In general, having your Distributed Computing Cluster Scheduler run fewer, larger jobs will be faster than having many, smaller jobs. However, for the best results, we recommend not sending more than 10,000 entries at once to the Distributed Computing Cluster Scheduler.
To select documents to OCR
- Add the Schedule OCR activity to your workflow definition by dragging it from the Toolbox Pane and dropping it in the Designer Pane.
- Select the activity in the Designer Pane.
- Under
 Documents to OCR in the Properties Pane, click Add to select documents.
 - Choose an entry from the Select Entry dialog box. Repeat steps 3 and 4 to continue to add documents to OCR.
- Optional: To remove documents from this list, select the document you want to remove and click Remove in the Documents to OCR property box.
- Select the Include entries in subfolders check box to OCR the contents of any folders specified in the Documents to OCR property box. Note that this will OCR the contents of the folder's subfolders, all the way down the folder tree.
Note: If the selected entry is a Laserfiche folder, the Distributed Computing Cluster Scheduler will OCR all documents contained within the selected folder, including documents in subfolders.
-
 OCR Settings
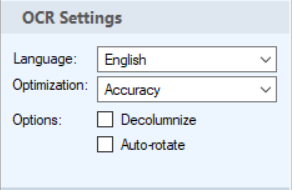
This property box lets you configure the OCR settings that will be applied to the documents chosen in the Schedule OCR activity's Documents to OCR property box.
To configure OCR settings
- Add the Schedule OCR activity to your workflow definition by dragging it from the Toolbox Pane and dropping it in the Designer Pane.
- Select the activity in the Designer Pane.
- Under
 OCR Settings in the Properties Pane, select a language to help optimize the character recognition using the Language drop-down menu.
 - Next to Optimization, select an optimization style. There is generally a trade-off between speed and accuracy.
- Speed: Reduces the amount of time it takes to OCR. Generated text may be less accurate. Choose this option if you are more concerned about the speed of your OCRing process than about having a few errors in the generated text.
- Standard: Neither optimum speed nor optimum accuracy, but a balanced between the two. Choose this option if you want the generated text to be fairly accurate, but you prefer the OCRing process not take the maximum amount of time to run.
- Accuracy: Increases OCR quality. Processing time will also be increased. Choose this option if you must have the most accurate text possible and are not concerned about how long it takes to run the OCRing process.
- Next to Options, select or clear the following options:
- Decolumnize: Select Decolumnize to convert multiple columns of generated text into a single column. Clearing the checkbox will preserve column formatting in the OCRed text, even if that separates words and sentences.
- Auto-rotate: Enable Auto-rotate to temporarily rotate images to an orientation suitable for OCR. If your images are skewed, select this option to ensure they are OCRed as correctly as possible. After the OCR process is performed, the image will return to its original orientation. If your images are all oriented correctly, clear this option.
-
 Additional Options
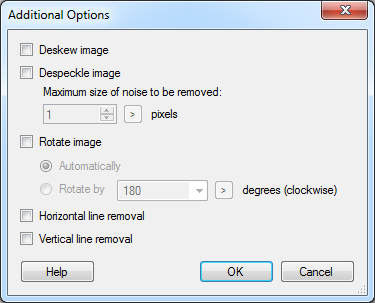
This property box lets you configure temporary image processing options that can help with OCR quality.
- Add the Schedule OCR activity to your workflow definition by dragging it from the Toolbox Pane and dropping it in the Designer Pane.
- Select the activity in the Designer Pane.
- Click the area under
 Additional Options in the Properties Pane to load the Additional Options dialog box.
 - Select from the following types of temporary image processing:
- Deskew image: Straighten crooked images,
- Despeckle image:Remove undesired noise from an image. Specify a maximum size of the noise to remove. Size is specified as both width and height. For example, setting this option to 2 will remove all noise that is equal to or smaller than a 2 pixel x 2 pixel square.
- Rotate image: Automatically or manually rotate an image.
- Horizontal line removal:Remove horizontal lines from the image.
- Vertical line removal: Remove vertical lines from the image.
-
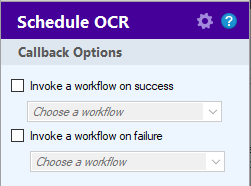
 Advanced: Callback Options
Callbacks allow the activity to start a workflow for either additional processing once the OCR has been completed on a file, or to handle information on files that were unable to be processed.
When the OCR operation completes successfully, it can trigger a workflow sending the entry as the starting entry for the workflow through the Invoke a workflow on success option. If multiple files are processed, the callback workflow will be called for each success.
If the OCR operation encounters an error in processing, the Invoke a workflow on failure option can be called. For multiple failures, the activity will bundle all the failures and send only one notification. The result will be passed to the callback workflow in a parameter named "Errors". The error parameter will be in json and contains a list of the Document IDs that failed generation.
Example error message:
[{"docId":2986794,"error":"Invalid password","isCritical":false},{"docId":2988296,"error":"Wrong format of page's contents","isCritical":false}]To enable callbacks:
- Click the Advanced button
 at the top of the Properties pane.
 - Mark the boxes for either on success, on failure, or both.
- Select the workflow to be invoked.
- When finished, click the Advanced button to return to the properties panel.
Example: If OCR processing runs on a folder with 10 documents, 5 fail generation and 5 succeed, and both callback types are set, expect 6 total workflows to be invoked: 5 separate calls for the successes and 1 call for the 5 failures.
- Click the Advanced button


