Business Process Notifications
notifications notifications notifications notifications notifications
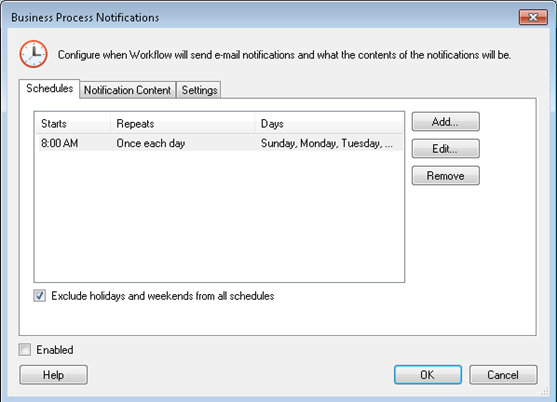
This dialog box, accessed from the Server Timers node in the Workflow Administration Console, allows you to configure Workflow's server timers. Server timers control the frequency that e-mail notifications are sent, what templates e-mails will use, and who e-mails will be sent from. The Workflow Notification System uses the default e-mail server. Learn more about the Workflow Notification System.
Configure Business Process Notifications
- In the center Details Pane of the Server Timers node in the Workflow Administration Console, select the Notification Timer. Click Properties in the Actions Pane, or right-click the Notification Timer and select Properties. Alternatively, double-click the Notification Timers.
-
In the
 Business Process Notification dialog box,
enable or disable the Notification Timer by selecting or clearing Enabled (located at the bottom of the dialog box).
- Configure the Workflow notifications by configuring the following tabs:
- Schedules: This tab lets you specify the time and frequency the Notification Timer will run. Each time the Notification Timer runs, it sends e-mail notifications for each active Business Process Step that has a role that is configured to receive notifications.
- Define a new schedule for the Workflow Notification Timer by clicking Add, or select a schedule from the list in the Schedules tab and click Edit. This will open the
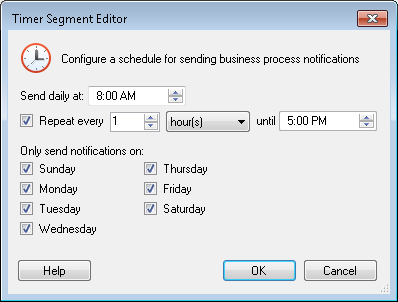
 Timer Segment Editor dialog box.
 - In the Timer Segment Editor, specify the time of day the timer should start sending notifications. Then, define the frequency that notifications should be sent by configuring the Repeat every ___ option. Determine which days of the week notifications should be sent on by selecting their corresponding checkboxes. Click OK when finished.
- Select Exclude holidays and weekends from all schedules to prevent e-mail notifications from being sent during Holidays and Weekends.
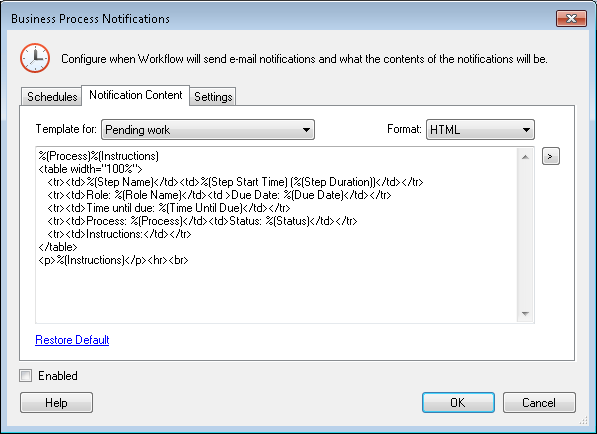
- Notification Content: The Template for drop-down in the
 Notification Content tab displays three e-mail notification templates: Pending work, Work at risk of being overdue, and Overdue work. The "Work at risk of being overdue" and the "Overdue work" templates will only be sent if the Business Process Step activity is configured with a Due Date.
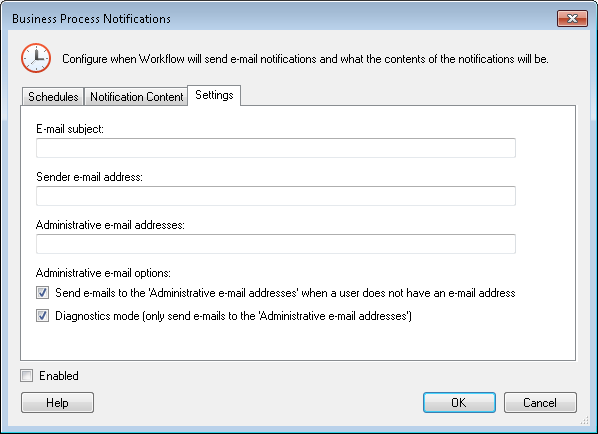
 - Settings: From the
 Settings tab, define the subject of the e-mail, who the e-mail notification will be sent from (sender), an administrative e-mail address, and administrative e-mail options. You can configure the following administrative e-mail options:
 - Send e-mails to the 'Administrative e-mail addresses' when a user does not have an e-mail address: If a step participant does not have an e-mail address saved in the Trustee Directory, e-mail notifications will be sent to the e-mail address(es) configured as the administrative e-mail address.
- Diagnostics mode: Send all notification e-mails to the administrative e-mail addresses. This option allows you to test your business process notification system before making it live.
- Click OK when finished.
![]() See a video about scheduling Workflow notifications
See a video about scheduling Workflow notifications
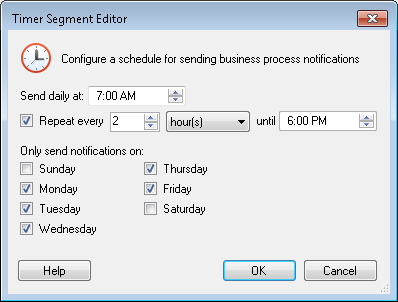
Example: Gawain wants notifications to be sent to his business process participants during weekdays and only during working hours. During working hours, Gawain wants notifications to be sent at an interval of once every two hours. ![]() Show me Gawain's Timer Segment.
Show me Gawain's Timer Segment.
![]() See a video about configuring notification content and settings
See a video about configuring notification content and settings
Note: Business process steps that are considered "at risk" are defined as being within 10 percent of the time specified in their Due Date.
Each template corresponds to the notification options selected in the Role Editor. Templates are pre-configured to include tokens whose values will be filled when the business process instance runs. However, you may edit the template from the text box if appropriate. To reset the notification template to its default, click the Restore Default link. To use tokens (learn about business process tokens), click the Token button (right arrow) . When you click OK, your changes will be saved.
Tip: You can view the contents of either the HTML notification or the text notification by selecting the respective option from the Format drop-down menu.
Related Topics
Business Process Notifications Overview
Participants
