Paper Jams
In the event of a paper jam, resolve the jam then select Resume Scanning under File in the menu bar. Scanning will begin processing at the point it left off.
Error Log Pane
Note: Data displayed in this pane does not represent errors associated with image scanning or storage. This information is displayed in the Output Log Pane.
Error Log Toolbar
The ![]() toolbar in the top left corner of the Error Log Pane contains three buttons.
toolbar in the top left corner of the Error Log Pane contains three buttons.
| Button | Description |
|---|---|
| Clear All | Clears all errors. |
| Sends an email containing one or all errors. | |
| Details | Reveals additional information about the selected error. |
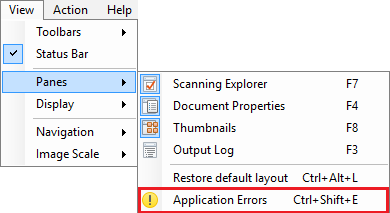
To open/close the Error Log Pane
- Select View from the menu bar.
- Point to Panes.
- Select
 Application Errors.
Tip: Press Control+Shift+E to open/close this pane.
Email Error Details
You can email the details of an application error to your Laserfiche support provider to help with troubleshooting.
Note:You may need to work with your organization's Laserfiche administrator or technical support personnel to configure the settings that will enable you to email the error details directly from Laserfiche Scanning. Another option is to copy the text of the error details from this dialog box and paste it into your usual email application, or another application such as Notepad.
To open the Email Error Details dialog
- In the Error Log Pane, select an error message.
- Click the E-mail button.
To configure Laserfiche Scanning to email error messages
- Click Configure E-mail Server.
- In the Configure E-mail Server dialog box, specify an SMTP server and port. You may need to ask your organization's systems administrator for this information.
- Click OK.
- Replace the default From email address with the address you want the email to be sent from. This address needs to correspond with the server and port specified.
- Specify an address or addresses where the error message should be sent. This might be your organization's Laserfiche administrator, systems administrator, or Laserfiche reseller.
- Optional: You can change the subject line.
- Optional: You can include your own comments. A description of what you were doing when the error occurred will usually be helpful.
- Specify which error messages to append:
- Append the selected exception will send the error message that was selected when you clicked the email button.
- Append all exceptions will send all the error messages currently displayed in the Error Log Pane.
- Click Send.
Output Log
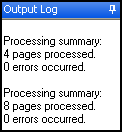
The output log pane displays information regarding the processing and storage of images. By default, it will remain hidden until an error is encountered.

Processing summaries
After image processes and/or enhancements are performed, the output log displays a processing summary.

Storage summaries
After scanned documents are stored in a Laserfiche repository, the output log will display a storage summary.

To open/close the Output Log Pane
- Select View from the menu bar.
- Point to Panes,
- Select Output Log.
Tip: Press F3 to open/close this pane.
You can color code different types of data in the Output Log Pane, making the log easier to read.
There are two types of data displayed:
- Errors: Events which prevent processing or storage of documents. By default, error text is red.

- Messages: Information regarding the processing and storage of images. By default, message text is black.

Customize Log Colors
- Right-click inside the Output Log Pane.
- Point to Customize colors.
- Select Errors or Messages.
- Select a standard color or click Define Custom Colors.
Clearing the Output Log
The Output Log Pane retains image processing and storage information until you do one of the following:
- Close Laserfiche Scanning.
- Manually clear the data.
To clear the Output Log Pane
- Right-click inside the Output Log Pane.
- Select Clear All.
Exporting Output Log Data
Data listed in the Output Log Pane can be exported to a text file.
To export data
- Right-click inside the Output Log Pane.
- Select Save to Text file.
- Next to Save as type, select the export format: Rich Text Format (.rtf) or Text file (.txt).
- Browse to a storage location.
- Name the file.
- Click Save.
Temporary Location for Scanned Documents
Scanned images are stored in a temporary location until they are sent to a Laserfiche repository either manually or by the Store Immediately feature.
- The default temporary location is C:\Users\<username>\AppData\Local\Temp\Laserfiche Scanning.
With default Windows settings, these folders are hidden.
- To show hidden files in Windows 8 and 10: In Windows Explorer, from the View toolbar, select Show hidden files.
- To show hidden files in Windows 7: In Windows Explorer, from the Organize menu, select Folder and search options. In the View tab of the Folder Options dialog box, select Show hidden files, folders, and drives.
Tip: You can modify the temporary location for Standard Mode in the Options dialog box.

