Signing Documents with DocuSign
Note: The DocuSign integration is only used with the Laserfiche web client. It is not supported with the Laserfiche Windows client.
To send documents to DocuSign
- Select one or more documents in the folder browser.
- Click the Request Signature (
 )toolbar button or use the Request Signature with DocuSign option in the Tasks menu to load the
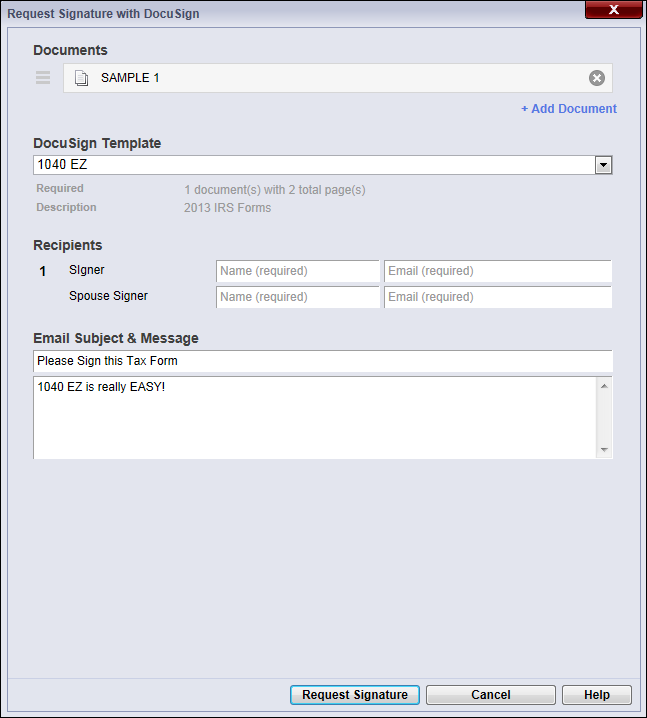
  Request Signature with DocuSign dialog box.
 - In the Documents section, you will see a list of the documents you want to send to DocuSign. Click + Add Document to append additional documents to the DocuSign envelope. When you have multiple documents, reorder documents by dragging and dropping the (
 ) icon.
 - To remove documents from the envelope, hover over a document and click the red x (
 ).
). - In the DocuSign Template drop-down list, select the appropriate DocuSign template. DocuSign templates define signing instructions for specific sets of documents.
- The Recipients section will contain one or more rows. Specify the name and email address of each person from whom you want to request a signature. The Laserfiche web client can access your DocuSign Address book to facilitate auto-completion of names and email addresses.
- Customize the contents of the email notification. A default subject and message may be associated with the template.
- Click Request Signature to send the selected documents to DocuSign. Designated recipients will receive an email message from DocuSign asking them to review and sign the submitted documents.
Note: You can multi-select documents within the same folder in the Select Document dialog box.
Note: Make sure that the number of selected documents and document order is compatible with the desired DocuSign template.
Note: Depending on the selected DocuSign template, some recipients can be left blank. Required recipients are marked and must be filled in before sending to DocuSign.
Related Topics
