Services
The Services section on the Configuration page lets you configure Microsoft Office options to edit Office documents in the app, import options to import documents from OneDrive and Google Drive, and map options to use the map feature in the app.
Office Online Server

The Laserfiche Document Co-Authoring Host for Microsoft Office provides an integration point with Microsoft Office Online Server to support simultaneous editing of Microsoft Office documents in a repository. To enable simultaneous co-authoring of Microsoft Office documents, you must have access to an Office Online Server, and you must also install the Laserfiche Document Co-Authoring Host for Microsoft Office. Once you have done so, you can enable and configure co-authoring on the web client and/or mobile server configuration pages.
Important: Simultaneous co-authoring applies to all Microsoft Office documents in the repository. When this is enabled and multiple users are editing a document, auditing and version control will not be able to correctly attribute edits to specific users. If you have a restrictive auditing policy, you should not enable this option.
To configure the Document Co-Authoring Host
- Open the Laserfiche Document Co-Authoring Host configuration page. By default, this located at the following URL:
http://localhost/LFWOPIHost/Configure/Index
- Under Office Online Server URL, specify the location of the Microsoft Office Online Server or Microsoft Office Web Apps Server installation.
- Click Save to complete the configuration.
To enable co-authoring for the Laserfiche App
- Open the Laserfiche Mobile Server Configuration page. By default, this is located at the following URL:
http://LaserficheAppServerMachine/mobile
- Select the Services tab.
- Under Office Online Server, select Use Office Online Server.
- In the Laserfiche Document Co-Authoring Server option, specify the server name of your Laserfiche Document Co-Authoring Host for Microsoft Office.
- Click Save to save your changes.
Import Services

To allow users to import directly from OneDrive or Google Drive, an administrator will need to configure the Cloud Services URI. In most cases, this will be https://LaserficheMobileServer/CloudImportServices. For your Laserfiche Mobile Server name, you should provide the fully-qualified domain name. Once configured, you can choose to enable OneDrive or Google Drive.
To enable import from OneDrive, you will need to register and configure your application in the Microsoft account Developer Center, and then enable and configure OneDrive on the Laserfiche Mobile Configuration page. You must have a Windows Live account to configure OneDrive.
To enable importing from OneDrive
- Navigate to the My Applications page in Microsoft account Developer Center. If you are not already signed into your Windows Live account, you will be prompted to sign in.
- Select Add an app.
- In the New Application Registration option, provide a name for your application. The application registration page will open.
- Copy the value under Application Id and save it to a secure place. You will need to add this value in later steps.
- In the Application Secrets section, select Generate New Password. Copy this password and save it to a secure place, as you will need to use it in later steps.
- In the Platforms option, select Add Platform and then select Web.
- Ensure that the Allow Implicit Flow option is selected.
- The Cloud Import Server must be installed on the same machine as the Laserfiche Mobile Server. Specify your Redirect URI. In most cases, this will be https://LaserficheMobileServer/CloudImportServices/Account/OneDriveCallback.Note that you must specify the fully-qualified domain name of your Laserfiche Mobile Server.
- Optional: If you want users to automatically be redirected to the sign in page when they sign out, click Add URL and add >https://LaserficheMobileServer/CloudImportServices/home/OneDrive. Note that you must specify the fully-qualified domain name of your Laserfiche Mobile Server.
- Optional: In the Profile section, under Logo, upload a logo.
- All other settings can be left at their default values.
- Click Save.
- Select the checkbox next to OneDrive on the Laserfiche Mobile Server Configuration page.
- In the Application ID option, specify the Application ID you copied from your app configuration.
- In the Password option, specify the password you copied from your app configuration.
- Click Save. Users will now be provided with the option to import files directly from OneDrive from the app when adding new files.
To enable importing from Google Drive
To enable import from Google Drive, you will need to register and configure your application in Google Developer Center, and then enable and configure Google Drive on the Laserfiche Mobile Configuration page. You must have a Google account to configure Google Drive.
- Sign in to Google Developers Console.
- Select Create project.
- Specify a project name and click Create.
- Select Use Google APIs.
- Under Google Apps APIs, click Google+ API, then select Enable API. Select the back button to return to Google APIs.
- Under Social APIs, click Google+ API, then click the back button to return to Google APIs.
- In the left menu, click Credentials.
- Select the OAuth consent screen tab.
- Specify the product name in the Product name shown to users option. Click Save.
- In the Credentials tab, select New credentials and then select OAuth Client ID.
- Select Web application.
- Specify a name for your application.
- In the Authorized JavaScript origins option, specify the URL of your Laserfiche Mobile Server. This must be a fully-qualified domain name.
- Note: Do not specify the full path to the Laserfiche Mobile Server, just the URL of the server. For example, if the Laserfiche Mobile Server URL was http://www.example.com/mobile, you would specify only http://www.example.com in this option.
- Specify your Authorized redirect URI. In most cases, this will be https://LaserficheMobileServer/CloudImportServices/Account/GoogleDriveCallback. This URI is case sensitive. Note that you must specify the fully-qualified domain name of your Laserfiche Mobile Server.
- Click Create.
- Copy the Client ID and Client secret and store them; you will provide them in later steps.
- On the Laserfiche Mobile Server Configuration page, select the checkbox next to Google Drive.
- In the Client ID option, specify the Client ID you copied from your app configuration in Developers Console.
- In the App key option, specify the client secret you copied from your app configuration in Developers Console.
- Click Save. Users will now be provided with the option to import files directly from Google Drive from the app when adding new files.
Note: When upgrading to Laserfiche Mobile Server 10.3, you must also install Cloud Import Services 10.3, which is an independent install, for import services to work correctly. Cloud Import Services 10.2.1 will not work with the Laserfiche Mobile Server 10.3.
Map Settings

The Maps feature lets users view and search for documents by location. For example, a police department can search for all restraining orders pertaining to a certain park. Organizations must have the Laserfiche Server, the Laserfiche Mobile Server, and the Laserfiche app version 10.3 and later to use the Maps feature.
By default, Maps will be available on iOS and Android devices using the platform's map provider. (i.e., iOS uses Apple Maps and Android uses Google Maps) without any configuration. An administrator needs to obtain a Bing Maps API Key from Microsoft and enter the key next to Bing Maps API key on the Laserfiche Mobile Server Configuration page in order to use Bing Maps in the Laserfiche app on Windows.
If you want to use a map outside the default map provider for a specific platform (i.e., using Google Maps on iOS), you will need to configure an appropriate API key in the correct section on the Laserfiche Mobile Server Configuration page for the map you want to use. Depending on the platform, you can add API restrictions to secure and enable full map functionality. Not enabling certain APIs will disable the following features:
Android - Place this API key next to Google Maps API key on the Laserfiche Mobile Server Configuration page.
- Maps SDK for Android: map rendering
- Geocoding API: geocoding/reverse geocoding search
- Places SDK for Android: autocomplete suggestions
iOS - Place this API key next to Google Maps API key for iOS on the Laserfiche Mobile Server Configuration page.
- Maps SDK for iOS: map rendering
- Geocoding API: geocoding/reverse geocoding search
- Places SDK for iOS: autocomplete suggestions
Windows - Place this API key next to Google Maps API key for Javascript on the Laserfiche Mobile Server Configuration page.
- Maps Javascript API: map rendering
- Geocoding API: geocoding/reverse geocoding search
- Places API: autocomplete suggestions
For more information, see the Get API key and Google Maps Geocoding API Usage Limits documentation.
Administrators must migrate prior geolocation data stored in Geotag fields to a new dedicated SQL table for the old geolocation data to be searchable using the new geography related searches in Maps. See Migrating Geolocation Data for more information.
Esri Maps
If your organization uses Esri ArcGIS, providing information about your Esri server will allow users to view and interact with their maps in the Laserfiche app, just as they would other maps in the Laserfiche app (searching by location, etc.).
To enable and configure Esri Maps
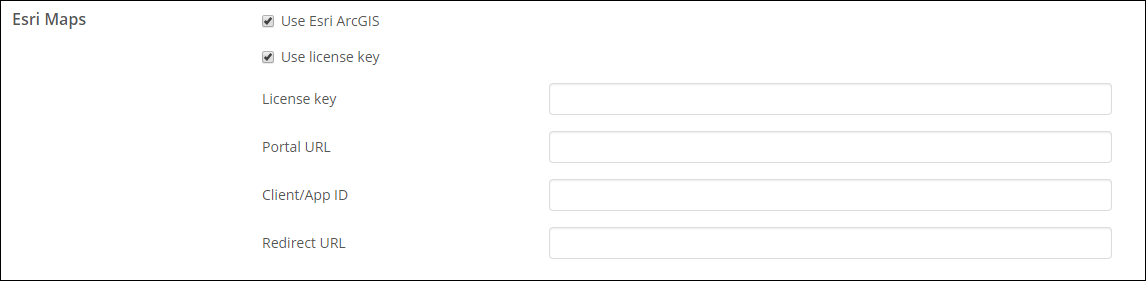
- Select the checkbox next to Use Esri ArcGIS.
- A license key must be provided for Esri to be fully functional and render maps successfully. There are two ways to provide a license key.
- First, you can select the checkbox next to Use license key and enter a license key in the License key box. With this method, users will be able to open Maps in the Laserfiche app and start using them immediately without having to provide credentials. This is the recommended method.
- Second, you can leave this checkbox blank and rely on the user to provide credentials when accessing Maps in the Laserfiche app. A license will be extracted from the user's Named User Esri credentials once the user signs in.
Note: If the license key entered on this page is incorrect, or if a user cancels their option to sign in when accessing Maps, the Google or Bing Maps configured here will be used instead (Esri will be used first, then Google Maps, then Bing Maps). If no maps are configured, the Maps feature will be disabled. See the Licensing Your ArcGIS Runtime App article for more information.
- Next to Portal URL, enter the URL of your ArcGIS portal, where you access and share your maps and layers.
- ArcGIS Online: https://www.arcgis.com
- ArcGIS Enterprise: http://servername.domainname.com/arcgis. Make sure to not enter your portal homepage, i.e., http://servername.domainname.com/arcgis/home.
- Next to Client/App ID and Redirect URL, you will need to enter the Client ID and Redirect URL obtained when creating an application in either the ArcGIS Developer Dashboard (for ArcGIS Online) or your portal (for ArcGIS Enterprise).
To create an application for ArcGIS Online
- Navigate to https://developers.arcgis.com/dashboard, create an application and give it any name and description.
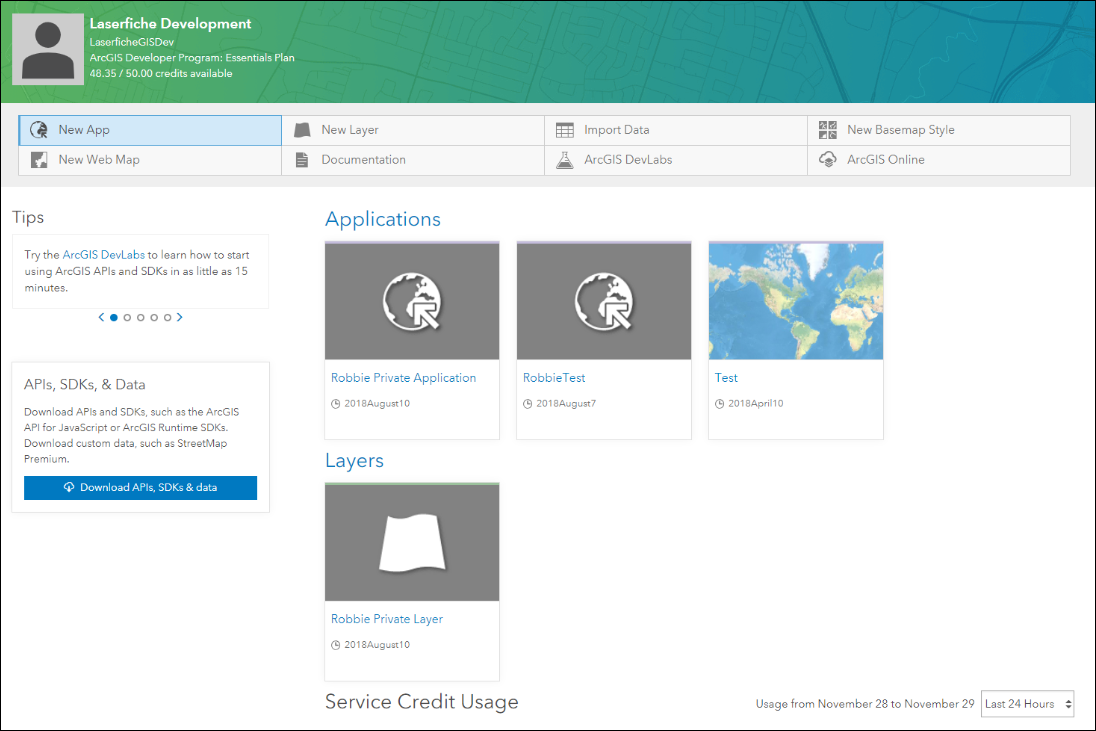
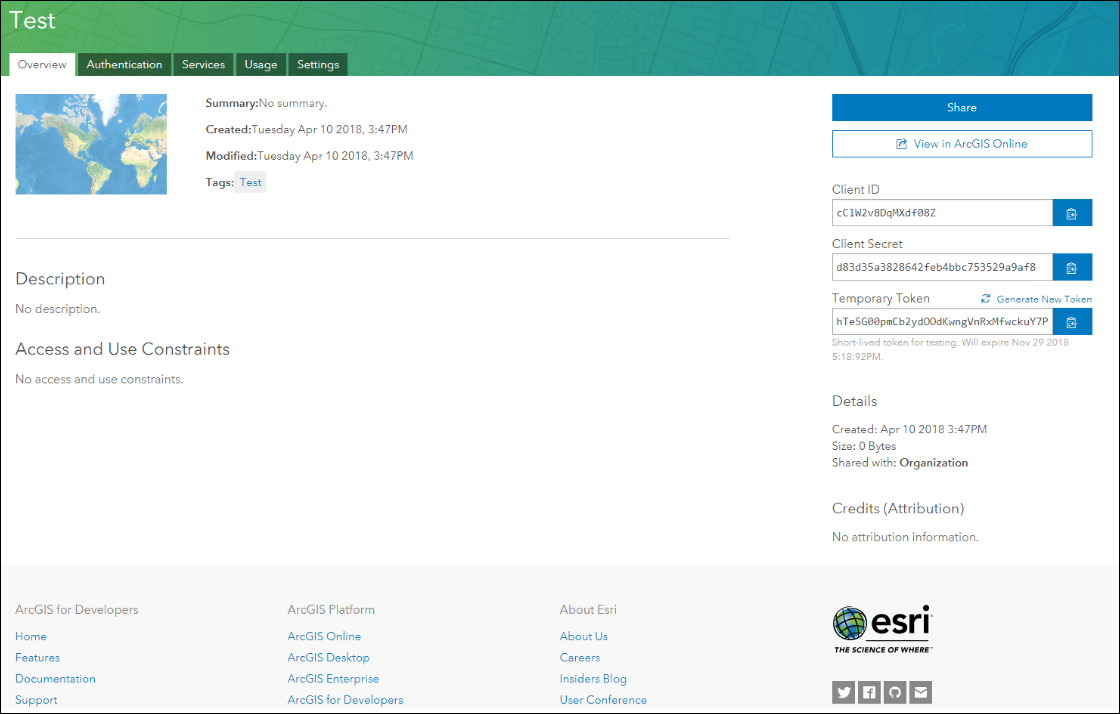
- Once the application is created, click on it in the Developer Dashboard, copy your Client ID on the right, and paste it into the Client/App ID box on the Laserfiche Mobile Configuration page.
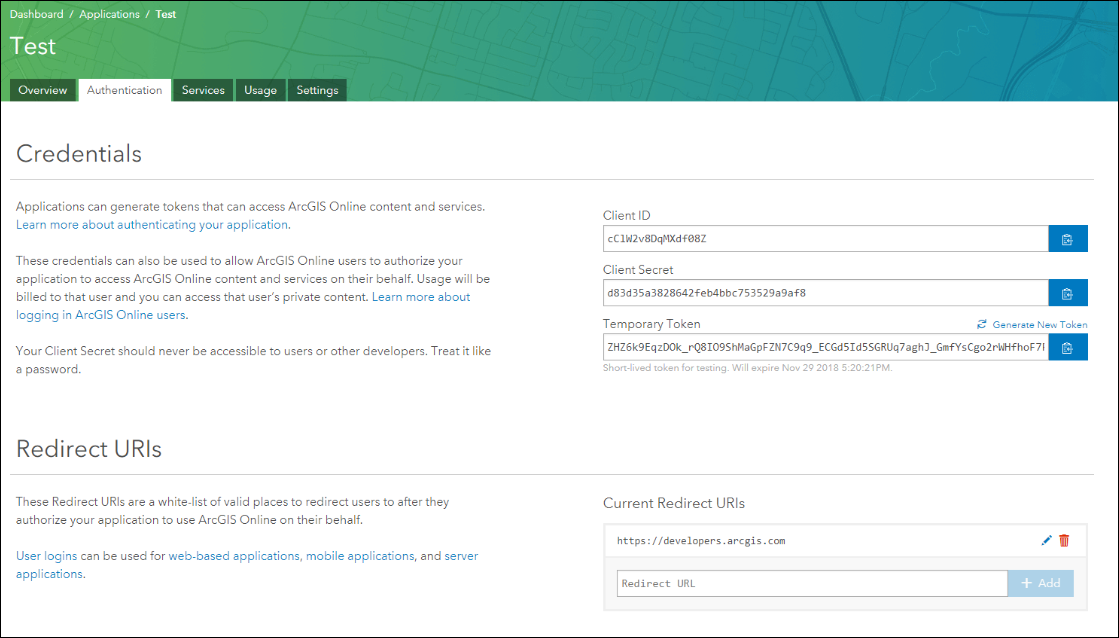
- Click on the Authentication tab and enter an arbitrary redirect URL. You must set a redirect URL or the feature will not function properly. Then, enter this same redirect URL next to Redirect URL on the Laserfiche Mobile Configuration page.
To create an application for ArcGIS Enterprise
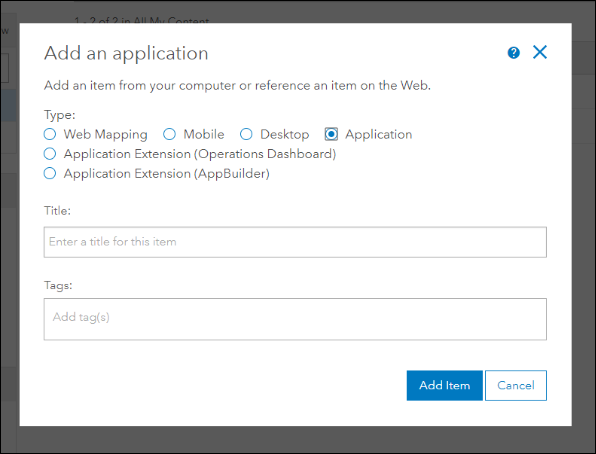
- Navigate to your portal and click the Content tab. Click Add Item, then select An application.
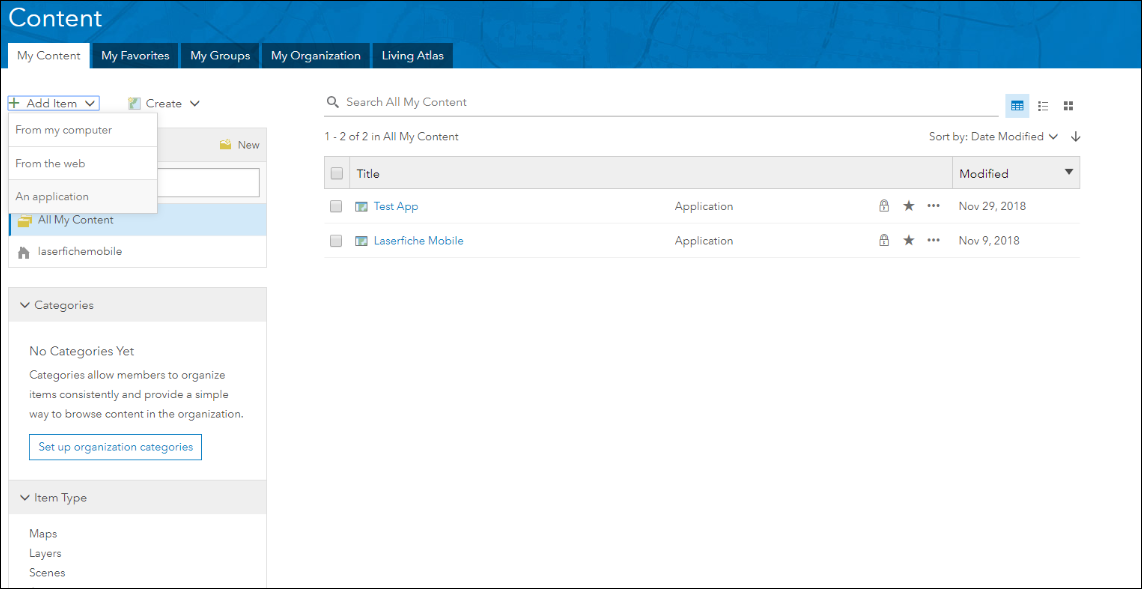
- Select the Application option, enter an appropriate title and tags, then click Add Item to create the application.
- After the application is created, you will be redirected to the application's page. Click the Settings tab and copy your App ID and Redirect URI at the bottom of the page. Paste these values next to Client/App ID and Redirect URL on the Laserfiche Mobile Configuration page.

- Navigate to https://developers.arcgis.com/dashboard, create an application and give it any name and description.