Setting up Table Mail Merge
Table mail merges can be used to populate a table in a Microsoft Word document with data from a data source. The data source can come from a SQL database, an Excel spreadsheet, or another location where your data is stored.
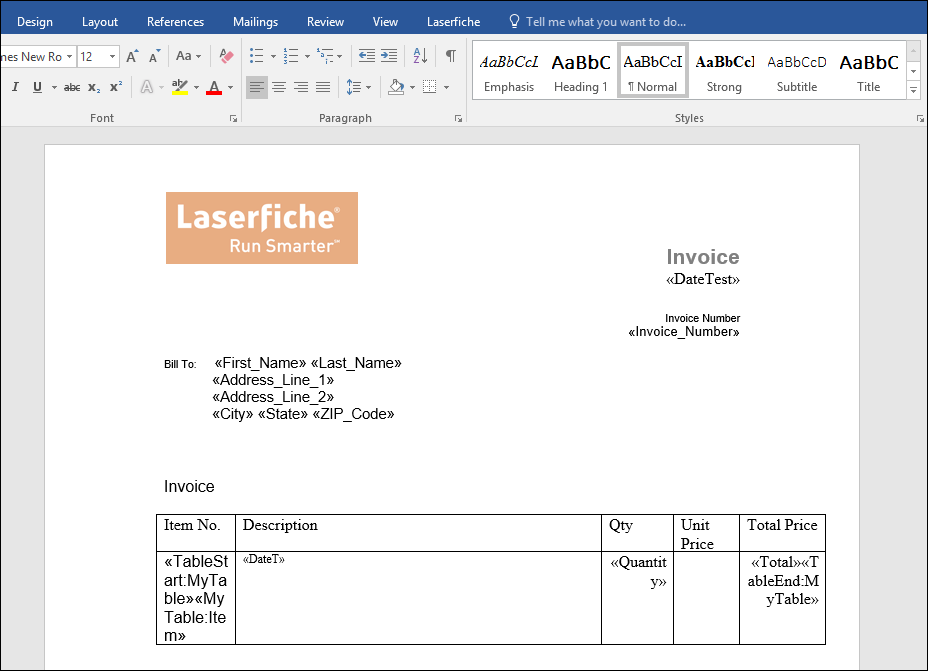
Example: You have a data source that contains the item number, description, quantity, price, and total price of ten different items. You want to put that information into a Word document. That word document already contains a template of the headers "Item No.," "Description," "Qty," "Unit Price," and "Total Price," as in the image below. Use the Update Word Document activity to populate that template with the data in the data source into the corresponding headers.

Note: If you just want to put the data into the Word document and do not care if it goes into a table, use a simple field merge as in the Bill To area in the image above.
To setup a table mail merge
- Select the Update Word Document activity, and in the Properties Pane, select New under Modifications.
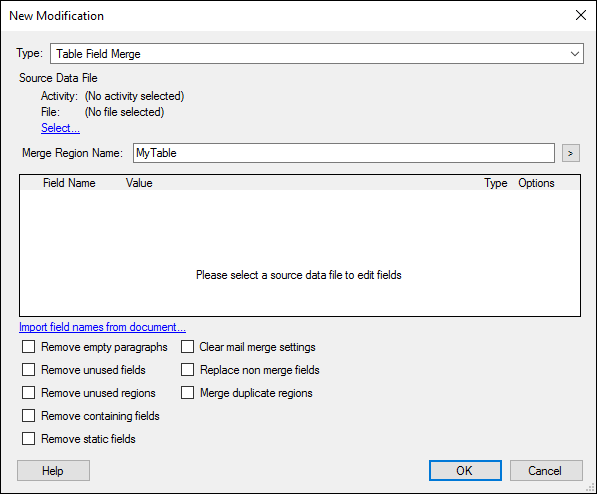
- In the New Modification dialog box, select Table Field Merge from the Type drop-down menu.

- Under Source Data File, click the Select link. Choose Results from the Query Data or Custom Query activity that performs the database lookup for the values you want to insert into the Word table.
- Next to Merge Region Name, insert the name of the region that corresponds to the Word table. This region is the name you included in your Word table along with the TableStart and TableEnd fields. For example, in the image at the top, the table uses the name "MyTable" in <<TableStart:MyTable>> and <<TableEnd:MyTable>> to indicate the name of the table. This is also the name you must include in Merge Region Name.
- While you can manually input the names of the merge field columns from your Word table, it is more efficient to click the Import field names from document link below the table. Clicking this list automatically populates the table with all the merge fields Workflow can interact with. If Workflow doesn't find any merge fields, then it will prompt you to import other types of fields from the document. If you click Yes at this prompt, any items in the document that are wrapped in double curly brackets {{ }} will be returned.
- In the Value column, choose a value from the drop-down. The field will be replaced with this value when the workflow runs.
- In the Type column, choose the type of data that will be entered into the field. Setting the type is important if you are inserting a token whose value could be one of multiple types (e.g., it could be interpreted as a string or a number), and you want to ensure Word interprets the token correctly. In most cases, leaving Default in this column is sufficient.
- In the Options column, click Default to provide custom formatting for the field. You have the option to use the default formatting, render the field as a checkbox, or render it as a barcode. You can also define custom properties for barcodes not listed in the Barcode Type drop-down menu by writing "TYPE=barcode_format", where you replace the word barcode_format with a barcode property. Use the drop-down below for a list of barcode-property options.
- To add more fields to the table in the New Modification dialog box, start typing in the last row. To delete a field, click the gray space to the left of the field's row and press the Delete key.
- Below the table of fields are several options for cleaning up the Word document after the merge runs. Select the checkbox next to
- Remove empty paragraphs to remove empty paragraphs created by the merge.
- Remove unused fields to remove fields that weren't specified in the merge.
- Remove unused regions to remove regions that weren't specified in the merge.
- Remove containing fields to remove fields that contain other fields.
- Remove static fields to remove fields that remain the same upon any document changes.
- Clear mail merge settings to remove existing mail merge settings.
- Replace non merge fields to merge other types of fields.
- Merge duplicate regions to merge multiple duplicate table fields.
- Click OK.
Note: You must mark the beginning of a row of the table with "TableStart" along with a name that corresponds to the title of the table that you will use for Merge Region Name. You must also mark the end of the same row of the table with "TableEnd" along with the same name. If you do not include the TableStart and TableEnd fields, it is treated as a simple merge.
| Barcode Property | Description |
| Codabar | This consists of characters 0-9, letters A-D, and symbols -, ., $, /, +. |
| Code 39 | This is designed for character self-checking. |
| Code 93 | This usually consists of characters 0-9, the space character and symbols /, +, %, -, ., $. |
| Code 128 | Character set A allows for uppercase characters, punctuation, numbers and special functions like return or tab. Character set B allows for upper- and lower-case letters, punctuation, numbers, and a few selection functions. |
| EAN-8 | The European Article Numbering System that consists of 8 digits for small packages. |
| EAN-13 |
The European Article Numbering System that consists of 13 digits. |
| Interleaved 2 of 5 | Also known as ITF, this is used as a numeric-only barcode for encoding pairs of numbers in a high-density barcode format. |
| POSTNET | The Postal Numeric Encoding Technique barcode is a barcode from the US Post Office to encode zip-code information. |
| UPC-A | This Universal Product Code is used in the retail industry and consists of 12 numbers. |
| UPC-E | This Universal Product Code consists of 12 numbers that are compressed into 8 numbers for small packages. |