Prepopulating Fields
Structure of URL
Suppose you want two fields to be prefilled through URL parameters. The format of the URL you will use to prefill the parameters will be as follows:
baseURL?variable1=value1&variable2=value2This URL prepopulates only two fields, but you can prepopulate as many as you want. Each field is separated by an ampersand, &, and baseURL is always followed by a ?.
variable1 and variable2 are the variable names of the fields. You can find out the variable name for a field by clicking Edit on the field in the Layout page, and noting the name listed under Variable.
Note: A field's variable name is often not the same as the field label. Make sure to obtain use the variable name in the URL, not the field label.
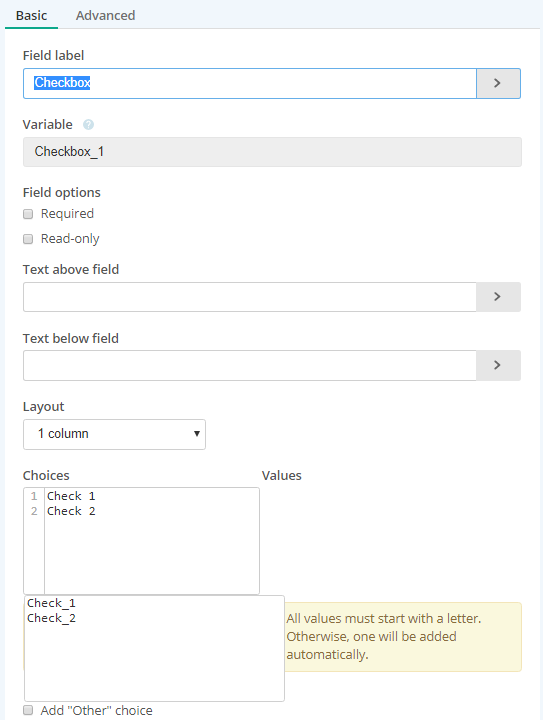
value1 and value2 are the values you want prefilled for the fields. For text boxes, this would be the strings that should prefill the respective fields. For radio buttons or checkboxes, the values are listed in the Values table when you click Edit on the field. The Values table is either beside or under the Choices table. In the following screenshot, we can see that to prefill the field with "Check 2" selected, we should specify the value Check_2 for the variable Checkbox_1.

The strings listed in the Values table are not always the same as those listed in the Choices table, so be careful to take your values from the correct table.
Prefilling Multiple Options in a Field
For checkbox fields, it is possible for more than one option to be selected. We can also prefill more than one option in a single checkbox field by using commas to separate the options that we want pre-selected. Using the example of the checkbox field above, we can pre-select both "Check 1" and "Check 2" by using the following URL:
baseURL?Checkbox_1=Check_1,Check_2Using a comma in the URL does not prevent you from prepopulating more fields. For example, I can prefill the two checkboxes above, in addition to other fields, as follows:
baseURL?Checkbox_1=Check_1,Check_2&AnotherFieldVariable=value3&YetAnotherFieldVariable=value4Lookup Rules on Prepopulated Fields
If lookup rules are associated with fields that you prepopulate using URL parameters, the lookups will have to be activated upon the fields being prepopulated. You can do this by triggering a change event on the prepopulated fields with some custom JavaScript. The following JavaScript snippet triggers a change event on the input box with id Field4:
$(document).ready(function() {
				$('#Field4').trigger('change');
		})
You should repeat this line, replacing the input box id as necessary, for each field that affects lookups that run when the page loads.
Completing a Message Start Event using HTTP POST
You can modify the following example code in an external resource to load the form you enter in url and complete the form with the data in data.
The following image shows how the example code completes the form:
