Laserfiche Connector Tokens
A token is a bit of text that is automatically replaced with actual values when a Laserfiche Connector profile runs. Tokens allow you to get up-to-date information every time the profile runs, such as the current time, the user who ran the profile, and all the most recent information from the target application.
Tokens in Laserfiche Connector
Tokens are available in several places in the Profile Creation Wizard, depending on which action you configured for your profile
- If you are gathering information from another application, you can create tokens in the Get Information step of the Profile Creation wizard. On this page, tokens are created for all the controls you capture and for all the zones you OCR in the application.
- If you are writing information to an application from the Laserfiche Repository Windows Client, Laserfiche Connector provides tokens for the Laserfiche entry's creator, ID, name, path, template, and volume. Additionally, if you chose to retrieve fields from a Laserfiche repository, all the fields from that repository will be available as tokens.
- If Laserfiche Connector is going to assign metadata to a document, the Laserfiche Repository Windows Client and Laserfiche Repository Web Client recognize these tokens.
Laserfiche Connector also provides some system tokens automatically:
- %(Date), %(Time), and %(DateTime) They return the date, time, and the date and time, the action runs. These tokens are only available for Laserfiche-related actions.
- %(LFCWindowsAccount) This token returns the Windows account user name of the user who runs the completed profile.
- %(FileName) and %(FilePath) If you are importing a document, these tokens return the document's original name and path.
- %(WindowTitle) and %(WindowUrl) These tokens return the title and URL of the window you are retrieving values from or a taking a screenshot of.
Tip: Laserfiche Connector has a slightly different syntax from other Laserfiche tokens. Laserfiche Connector requires a semi-colon to separate the token name and the formatting option: %(token;expression). To format date, time, or number tokens, use ICU formatting for dates and times or ICU formatting for numbers. Additionally, Laserfiche Connector needs to escape the characters: / and # wherever they appear in the token text with an extra forward slash. E.g., a token named "My/Slash/Token" with a regular expression "/+" would need to be formatted like: %(My//Slash//Token;#<//+>#). More advanced token options.
Using Tokens
Token can be used any place where the token button ![]() appears next to a text box. Click the button, and select a token from the list that appears.
appears next to a text box. Click the button, and select a token from the list that appears.
Editing Tokens
If you only want to use part of the value returned in a token, you can use regular expressions to extract just the information you need.
<div><iframe width="100%" height="557" src="https://doc.laserfiche.com/laserfiche.documentation/english/videos/Editing-Tokens-in-Laserfiche-Connector/Editing-Tokens-in-Laserfiche-Connector.html" name="Editing Tokens"></iframe>
</div>
- Locate the token you want to edit, and click the token button
 next to the text box it's in.
 - Select Token Dialog.
- In the token dialog box, you will see the tokens in the text box as underlined text. Click the token you want to edit.
- If the token is a multi-value token and you only want to return a specific value from that token, enter the index number of that value next to Apply index. Indexing starts at zero, so the first value in the token has an index of 0.
- Next to Regular expression, insert the regular expression to edit the token. The regular expression button has common character classes, character escapes, grouping constructs, and more that you can use to a build an expression. Place parentheses around the data you want to use from the token. Learn more about regular expressions.
- As you enter your regular expression, you will see the regular expression applied to the token as well as the value the token will return. This value is based on the information gathered as you've configured the profile and will changed based on the information available each time the profile runs.
- Click the Show tokens as plain text option at the top of the dialog box to see the formatted token and to see the results of your expression in the context of the entire contents of the text box. This option is especially helpful if you're editing multiple tokens in the same text box.

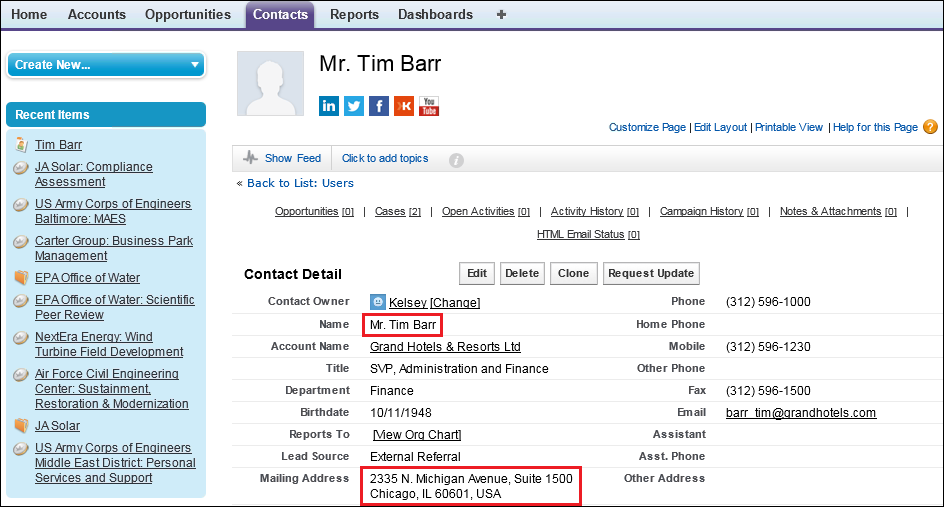
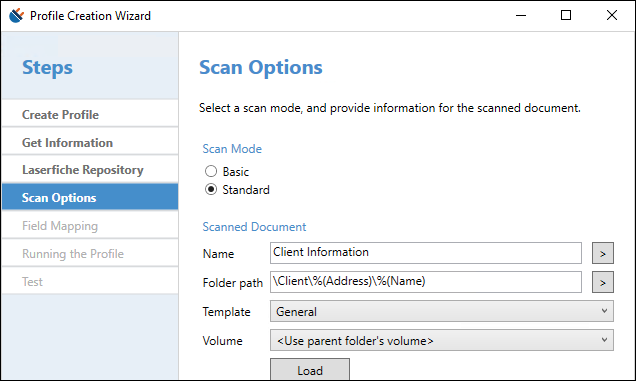
Example: You want to scan documents to the following folder path: \Clients\Zip Code\Last Name. Laserfiche Connector is configured to grab the client's name and address from SharePoint and create tokens from those controls.

On the Scan Options page, insert the tokens from these controls into the Folder path field. (E.g., \Client\%(Address)\%(Name).)

Select the token button again, and choose Token Dialog. Select the Address and Name tokens and apply regular expressions to each of them. Then click Show tokens as plain text to see the resulting folder path.

Multi-value Tokens
You can create multi-value tokens in Laserfiche Connector by giving multiple tokens the same name on the Define Token page of the Profile Creation wizard. These multi-value tokens can be inserted into multi-value fields in Laserfiche or other applications. Additionally, you can apply an index these tokens to return specific values from them.
If you need to use a single value from a multi-value token, you can apply an index to the token to retrieve the value need. There are two options for applying indexes.
- If you know the index for the value you need, insert it in the Apply index field in the Token Editor. Alternatively, you can edit the token directly by adding ;#[IndexNumber1]# to the token, replacing 1 with the index value. E.g., %(tokenName;#[IndexNumber1]#). The first value in the multi-value token will have an index of 0, the second value an index of 1, and so on. If an invalid index number is specified here, for example a non-integer, Laserfiche Connector will return all values combined with a semicolon. If the index number is an integer, but out of scope, it will return empty.
- If you want to return all values in a multi-value token, apply this case-sensitive formula to the token: LFCReStr(Parameter1,Parameter2,Parameter3) in the profile's XML file.
- Parameter1 is the token index identifier. You can use any identifier here, but i is most common. However, ensure you use a different index identifier for each multi-value token you apply this formula to.
- Parameter2 is the value you want repeated in each value returned by the multi-value token. Usually, this is just the indexed token, but in some cases you may want to add a static string to each value as well. Besides the token itself, this parameter must include the token index identifier (i.e, Parameter1) and it must be enclosed in asterisks. E.g.,* %(token;#[i]#)*
- Parameter3 is the delimiter used to separate the values when the token is resolved.
Note: If you use a comma, asterisk, or parentheses (e.g., ',' or '*' or ')') in any of the parameters, you must escape the character by surrounding it with two asterisks. E.g., To use a comma to join the list of values, use *,* as Parameter3. To use '*' to join the list of values, use **** as Parameter3.
Note: If the page you are retrieving token values from is dynamic and some of the controls you've associated with tokens could be hidden, then we recommend configuring the IgnoreError attribute to ensure Laserfiche Connector isn't interrupted when a control cannot be found. Learn more.
The complete formula will resemble the following:
LFCReStr(i,*"%(token;#[i]#)"*,*,*)
Where Parameter1=i, Parameter2=*"%(token,#[i]#)"*, and Parameter3=*,*. Laserfiche Connector will iterate through the multi-value token, returning each value, until all the values are returned.
Example: Rebekah wants to use Laserfiche Connector to get values from a list and search for documents that contain all those values in the repository. She knows the list always has three values, so she applies an index to the token to separate out the values and include them all in the search. She enters the following in the advanced search text box on the Search Criteria page of the Profile Creation Wizard: ("%(token;#[0]#)","%(token;#[1]#)","%(token;#[2]#)")
Example: Thomas wants search the repository for the purchase order (PO) numbers selected in his company's accounting software. On the Search Criteria page of the Profile Creation Wizard, he enters the following advanced search syntax: {[]:[PO](any)in(LFCReStr(i,*"%(CustomersPOs;#[i]#)"*,*,*))}. This syntax searches the repository for a document or folder whose PO metadata field contains any of the returned PO numbers, E.g., {[]:[PO](any)in("1245","2345")}.