Laserfiche Connector for Boomi
For customers using Boomi, Laserfiche has provided an iPaaS connector that makes the interaction between Laserfiche repository and other third-parties easier. The operations supported in the Laserfiche connector are based on Laserfiche repository APIs.
The Laserfiche Integration with Boomi is helpful for:
- Viewing a document or document metadata from Laserfiche and viewing or downloading it in another system, like a CRM, ERP, or any system with relevant documents stored within Laserfiche.
- Saving a document to Laserfiche or updating Laserfiche metadata from another system. This action can be monitored to start a Laserfiche business process.
- Gathering healthcare data. You can convert a Laserfiche document's metadata into the HL7 data format before sending it to a healthcare system requiring that standard.
- AP Processing. Laserfiche’s solutions for automating invoice processing can update necessary ERP and financial systems.
Note: The Laserfiche connector for Boomi is based on Laserfiche Repository API V1 build version 3a7a49ffc2db49aecc10091994a0292be398cd51_.20221214.3
How to Configure the Laserfiche Connector for Boomi
First, configure a connection to your Laserfiche repository.
- From the Boomi Designer, select Create New and select Connection.
- Select Laserfiche Connector from the drop-down menu and click Create.
- Provide a descriptive name for the Connection, and define the following
- Platform: The Laserfiche Connector is available for both Laserfiche Cloud and self-hosted installations.
For Laserfiche Cloud
- Service Principal Key: Create the Service Principal Key by creating a Boomi-specific Service Principal user in your Laserfiche Account Administration. Grant this user the appropriate access rights in Laserfiche to act on behalf of the Laserfiche Connector. Then open the user you created and click Create Service Principal Keys. Ensure you save this key as you will not be able to view this key again in Laserfiche.
- Base-64 Encoded Access Key: To create the Base-64 Encoded Access Key, in the Laserfiche Developer Console, create a Boomi app by creating a service application and selecting the Service Principal user as the Service Account. In the Boomi app you created, navigate to the Authentication tab, and click Create key next to Access Keys. Then download the key as a base-64 string and copy the key from there.
For self-hosted installations
- Base URL: The base URL for your Laserfiche API. E.g., https://ServerName/LFRepositoryAPI
- Repository ID: The name of your Laserfiche repository.
- Username: The username of an account that has the appropriate access rights to the Laserfiche repository to make changes on behalf of Boomi.
- Password: The password for the above account.
- Click Test Connection and choose an Atom (runtime environment) to test the connection on.
How to Use the Laserfiche Connector for Boomi
- Open the Boomi process you want to add a Laserfiche Connector to.
- Search for the Laserfiche Connector and drag it to the canvas.
- In the Connector Shape pane's General tab, define the following:
- Display Name: Provide a descriptive name for your shape that describes the action the shape will take in Laserfiche
- Connector: The connector will default to the connector you selected on the canvas, but you can change that here if needed.
- Action: Select the action you want the connector to take in Laserfiche.
 See a list of available actions.
 - Connection: Select the connection you configured in the How to Configure the Laserfiche Connector for Boomi section.
- Operation: Select the operation you want the action to perform. The operation specifies exactly how the action will run. For example, which repository the action will interact with and which data will be returned by the action. You can select a pre-configured operation or click the green plus button to create an operation. See How to Configure an Operation below.
- In the Parameters tab, click the green plus button to add a parameter. The parameters available are from the request schema defined in the request profile. The Request profile corresponds with the JSON schema of the request body of the Laserfiche API call and defines the data expected by the action. To learn more about request profiles, see How to Configure an Operation below.
- In the Dynamic Operation Properties tab, you can add values that will overwrite the default values defined in the operation. These are separate from the parameters defined in the previous tab that come from the request profile. The input parameters available here correspond with the fields in the operation's configuration. See How to Configure an Operation below.
How to Configure a Boomi Operation
An operation defines how the Laserfiche iPaaS connector will interact with your Laserfiche repository. It represents a specific action (Search, Create, Update) to perform against a specific object in your Laserfiche repository. An object can be a document, folder, type of metadata, audit reason, task, or user attribute.
- In the Boomi Designer, select Create New, and select Connector operation. Alternatively, when configuring a shape on the canvas, click the green plus button next to Operation to define an operation for that shape.
- The fields available for the operation will depend on the Connector Action and will correspond with the parameters available in the Laserfiche API. See the parameters for each action here.
- The Object field corresponds to the action's category in the Laserfiche API.
- Click the Import button to retrieve Request and Response profiles for the operation. Select an Atom (runtime environment) and the Connection you configured above. The Request profile corresponds with the json schema of the request body of the API call. You can review the Request and Response profiles to see the type of data the action will get and return when the action runs.
- You can also set Tracking Direction to record either input or output data in your process reporting.
- Select Error Behavior if you want to be able to act on failed operations in your process instead of just reporting them on the Manage page.
- The rest of the options are operation parameter fields based on the Connector action and the Laserfiche API. The values entered here become default values for the all shapes in the process that use this operation. You can override the default values in the shape's Dynamic Operation Properties tab. Some common fields are:
- Repository ID: For Laserfiche Cloud, you can find your repository ID from your repository's URL. For example, https://app.laserfiche.com/laserfiche/browse.aspx?repo=r-123a45aa . For self-hosted Laserfiche installations, your repository ID is the name of the repository.
- Entry ID: Enter the ID of the entry you want the operation to interact with by default.
How to Set up an Atom
See Boomi's documentation for setting up an atom.
How to Test a Laserfiche Connector Shape
How to Send a Request to Boomi through a Laserfiche Web Request Rule
You can start Boomi processes from on a web service request from Laserfiche, allowing you to automatically invoke your integration from a Laserfiche workflow or business process. To start Boomi processes from Laserfiche, you must both configure Boomi to listen for the web request from Laserfiche and configure a web request rule in Laserfiche to send information to Boomi.
Configuring a Boomi Atom to Listen for a Web Request
- Navigate to the Atom Management page in Boomi.
- Select the Atom that will be running the Boomi process.
- Under Settings & Configurations, select Shared Web Server.
- In the General tab, under Basic Settings, make a note of the base URL. You'll use this value in the Laserfiche web service connection you'll create in the next section.
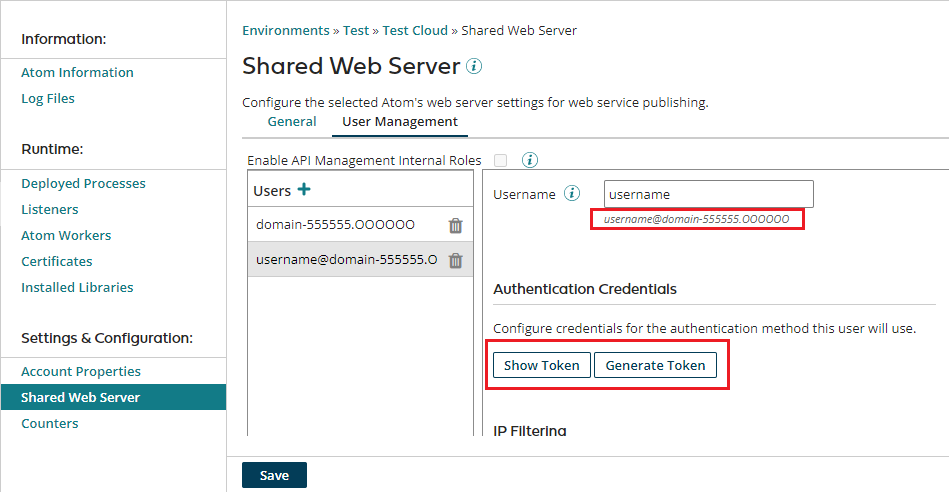
- In the User Management tab, configure a user that Boomi can use to call to the web service.
Configuring the Laserfiche Web Service Connection to Connect to Boomi
- In Laserfiche, navigate to the Process Automation landing page, and click Integrations.
- Select Web Service Connections, and create a new connection. Learn more about web service connections.
- Provide a descriptive name for the connection, and select to send requests directly to Boomi.
- Click Create.
- Enter the Boomi base URL, which can be found on the Shared Web Server page of the Boomi Atom configured in the previous section.
- Select Basic authentication.
- Enter the username and password of the user you configured on the Shared Web Server page of the Boomi Atom configured in the previous section.
- Username: Use the full username found in italics under the Username field in Boomi
- Password: Use the token found under Authentication Credentials in Boomi.
- Click Test.
- Click Create to create the connection.

Note: If you click Test, you might get a 404 response since the base URL itself is not hosted on cloud. This response can be ignored and will not be an issue moving forward.
Configuring a Boomi Operation and Shape to Listen for a Web Request
Operation
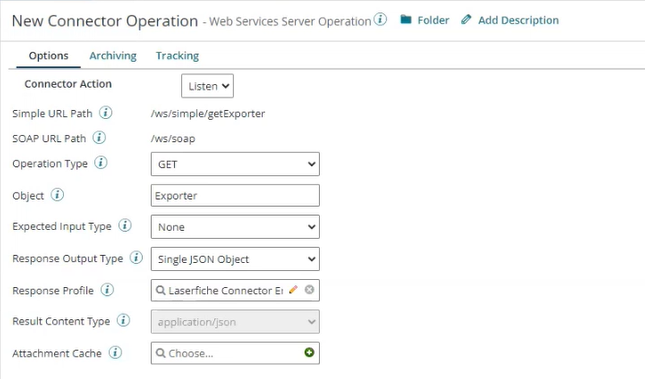
- In Boomi, create a Connector Operation, select Web Services Server as the connection, and click Create.
- Set the Connector Action to Listen.
- Select the Operation Type that corresponds with information you want to pass to Boomi.
- Next to Object, provide an object name. The value you enter here will become part of the Simple URL Path for the connector operation. You'll use this URL in your Laserfiche Web Request Rule as described in the next section.
- Configure the expected input type for the data Boomi is expecting to receive.
- Configure the output type to specify how the Boomi shape using this operation will format the data it exports. Depending on the output type you select, you can choose a Laserfiche request profile to further format the data.

Shape
- Navigate to the Boomi canvas, and drag a Start Shape to the Boomi canvas.
- Provide a descriptive display name for the shape, e.g., "Listen for Web Service Call from Laserfiche"
- Next to Connector, select Web Services Server.
- Next to Action, select Listen.
- Next to Operation, select the operation you created in the previous section.
Configuring the Laserfiche Web Request Rule to Start the Boomi Process
- Navigate to the Process Automation landing page, and click Rules.
- Select Web Request, and create a new rule. Learn more about rules.
- Enter a rule name and description.
- Select Web Service Connection, and select the connection you made in theConfiguring the Laserfiche Web Service Connection section above.
- Click Create.
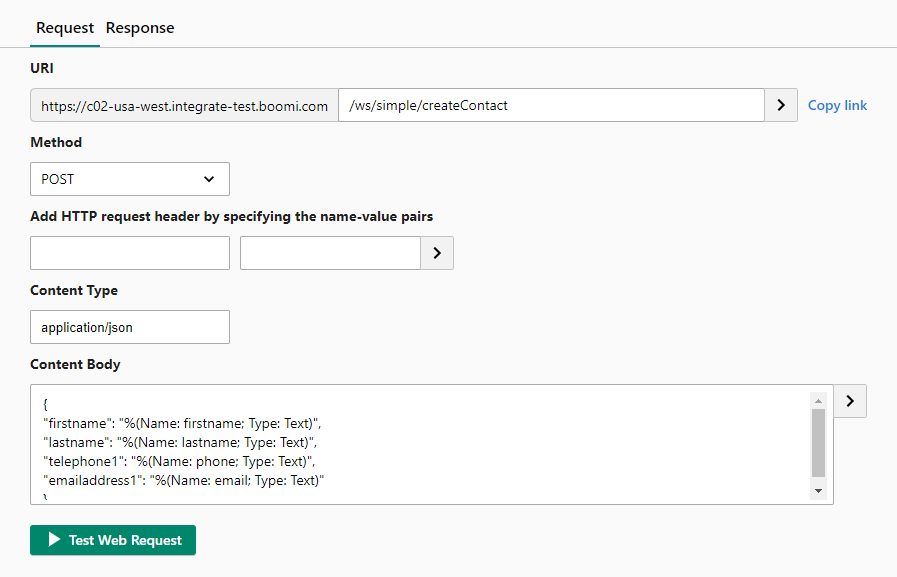
- In the Web Request Rule editor, in the Request tab, the base URI should match the base URL provided in the Laserfiche web service connection. See the Configuring the Laserfiche Web Service Connection section above.
- Complete the request URI with the Simple URL Path provided in the Boomi operation. Append parameters in this section of the URL as needed. You can add Laserfiche tokens that can be filled in by a workflow when running the rule. E.g., /ws/simple/getExporter?entryid=%(Name:EntryID;Type:Text)
- Under Method, select Post.
- Under Content Type, select type of data you are sending to Boomi. E.g., application/json. The content type should match the input type specified in the Boomi operation.
- Under Content Body, enter the data you want to send to Boomi.
- Click Test Web Request.
- In the Test Web Request Rule dialog, double check the Request and provide Input Parameters.
- Click Test to proceed.
- This test result will show when the request has been successfully sent to Boomi and has passed basic authentication.
- You can now run this rule, which will kick off your Boomi process, from the Run Rule activity in Laserfiche workflow or a Rules Service Task in a Laserfiche business process.
