Application Connections
Laserfiche Cloud includes pre-built integration points with external applications and customer relationship management (CRM) systems. The Laserfiche Cloud integration platform currently supports the following CRM systems:
- Salesforce
- Redtail CRM
- Microsoft Dynamics 365 CRM
- Ellucian Banner Integration through Ethos
By providing Laserfiche Cloud with access to Salesforce, Redtail, Microsoft Dynamics, and Ellucian Banner, you can create workflows to add, update, remove, and retrieve data from the respective CRM system.
Note: Ellucian Banner Integration through Ethos is available through your Laserfiche provider, please contact your provider for more details.
To start integrating with the above CRM systems
- Create an external connection profile. A connection profile contains authentication information for your CRM system. Depending on the CRM system, you will need multiple pieces of information, such as a username, password, and API key needed to create a connection to the CRM system.
- Configure a Execute Application Action activity in a workflow or access data to auto-fill form fields with lookup rules in a business process.
Creating an Application Connection
- From the Process Automation landing page, select the Integrations option.

- On the Application connections listing page, choose to create a new Salesforce, Redtail, Microsoft Dynamics 365, or Ellucian connection. You will need authentication information from your CRM system in order to complete the process.
Example: In order to create a connection to Salesforce, you must have created a Connected App in Salesforce for Laserfiche Cloud and turned on the Enable OAuth Settings option for the connected app. Make sure that the Access and manage your data (api) OAuth Scope is selected for the connected app. Take note of the Consumer Key and Consumer Secret for the connected app. In addition, you will need the username and password for the Salesforce user Laserfiche Cloud will sign in as, as well as the a generated security token value for that user. Salesforce requests a "callback URL" when enabling OAuth Settings, but Laserfiche does not use the redirect authentication approach, so any valid URL can be used for the callback URL.
Note: Microsoft Dynamics allows two user types to be used for authentication. See the Microsoft Dynamics documentation for specific details about creating a Microsoft Dynamics connection.
- Verify and save the connection information.
Note: the new connection will be enabled by default. Use the Connection Status toggle switch to disable the connection in order to prevent immediate use.
Importing and Exporting Connection Profiles
You can export existing connection profiles and save them to your local computer as .dsi files. You can also import .dsi files into Process Automation and create new connection profiles from them.
To export a connection profile
- On the Application Connections page, select the connection profiles you want to export.
- Click the Export icon in the top right corner.
- In the Export Connection dialog box, specify the name of the .dsi file that will be downloaded. Even if you had selected multiple profiles in step 1, they will still be exported into one .dsi file.
- Click Export.
To import a connection profile
- On the Application Connections page, click the Import button in the top left corner.
- In the Import Connections dialog box, click Choose file and browse for a .dsi file to import.
- Click Next. This takes you to a dialog where you can choose what to do for each connection in the .dsi file that has the same name as an existing connection.
- For each connection with the same name as an existing connection, select whether you want to replace an existing connection, rename the imported connection, or discard the connection.
- You can also select an action for multiple connections at once by holding down the SHIFT or CTRL key as you click on multiple connections, then selecting the appropriate bulk action below the list of connections. Click Apply to set all the selected connections to use that bulk action.
- Click Next.
- Review the summary of the import. Click Back to make more changes, or click Finish if you're satisfied.
List View Right Pane Tabs
When a connection is selected in the list of application connections, the right pane displays additional information and options. Three tabs are available: Details, API usage, and Notifications.
The Details pane displays an easily readable summary of the information from the columns of the table.
The API usage pane displays statistics for the selected connection. These cards display a graph of the number of times the connection has been used to read or write from the external application, and the average response time of the application. You can choose to view information about the current cycle, the last 7 days, or the last 30 days.
The Notifications panel allows you to configure alerts regarding usage of the connection. Notifications can be created which will show in the notification bell within the cloud interface, or send an email, when the following occurs:
- Usage of the connection reaches 100% of the defined limit.
- Usage reaches 80% of the defined limit.
- If the status of the connection is changed (from enabled to disabled or back.)
If email notifications are desired, click Configure email settings... and for each enabled notification select whether it should send an email.
Connection Status Control
Application connections can either be enabled for use or disabled. The connection status will be indicated in the Status column of the Application Connectionslist view.
Each connection may be disabled to prevent over-use in one of two ways - manually in the right pane when viewing connection details, or automatically by setting up daily usage limits in the API Limit panel.
To set daily usage limits:
- Set the maximum number of calls to the connection that can be made from Laserfiche to the connection.
- Specify what time in UTC the limit should reset.
- Click Disable connection when reaching limit to disable the connection if the specified limit is reached.
Object Field Mapping
Many object fields allow you to change which internal field name is mapped to the application fields. To adjust field mappings, expand the Fields section, and when available, select the alternate application field to be used in the connection to the Laserfiche field.
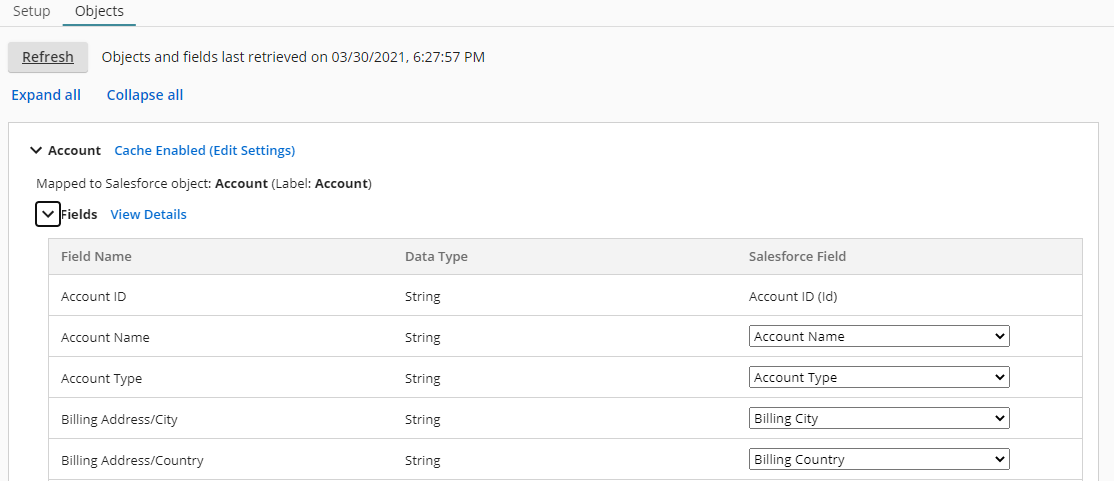
Note: The Ellucian integration only allows limited changes to the default mapping. Elements that can be altered will have a dropdown for selecting alternate Ellucian fields to be mapped to Laserfiche fields.
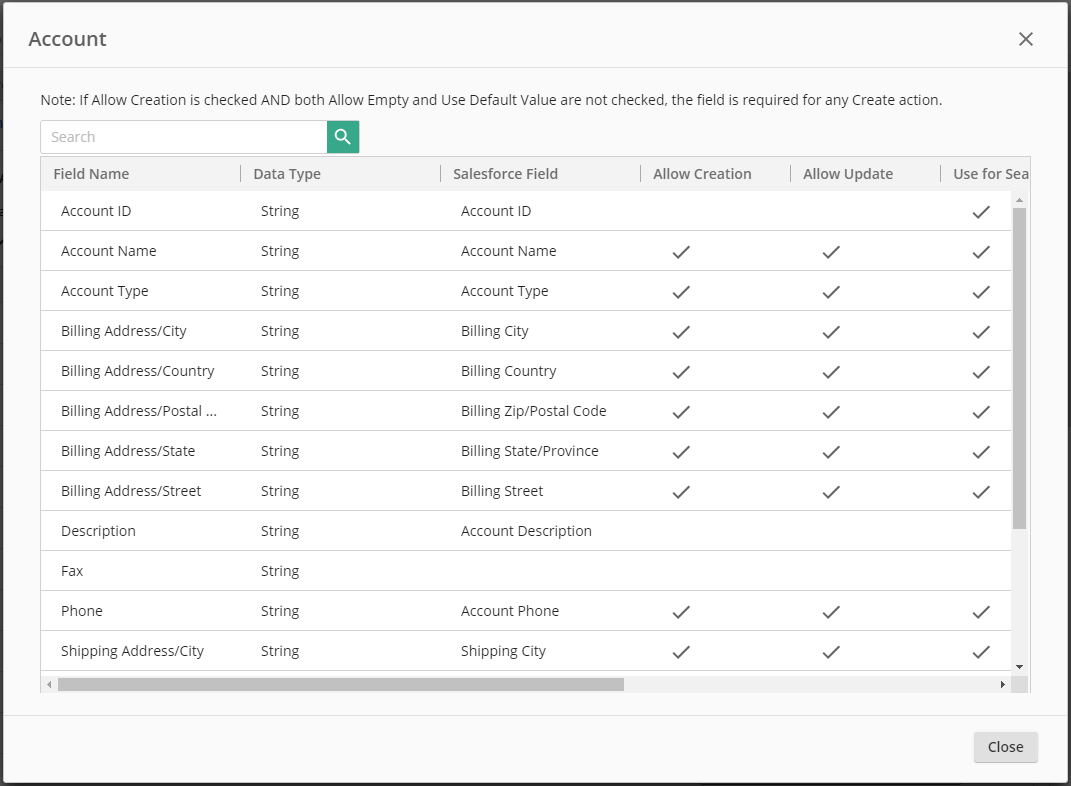
The View Details link displays a chart that shows how fields can be used by the application Actions. These details show which fields can be populated when creating or updating a record, or are read-only. ![]() Show me what this looks like.
Show me what this looks like.
Object Caching
Depending on the application, frequently requested object data may be cached to improve lookup and form load performance. Objects that support data caching will display the Configure Cache Settings link next to the object name, click to open the cache settings dialog. ![]() Show me what this looks like.
Show me what this looks like.
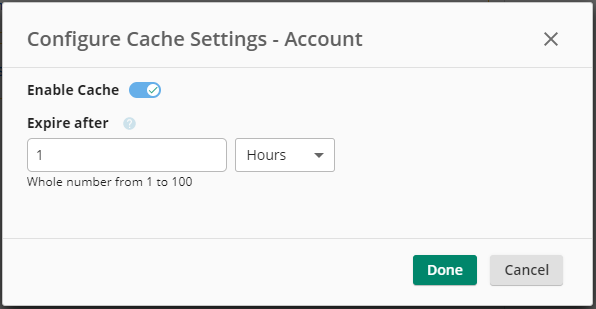
To configure a cached object:
- Select the Enable Cache switch.
- Set the span of time that data should be cached. You can set for seconds, minutes, hours, or days, from 1 to 100 in whole numbers.
- Click Done.
The link will change to Cache Enabled (Edit Settings) indicating the object is being cached.
Note: Not all applications support caching of their objects.
Object Actions
The Actions area displays what actions can act upon the object, and which Laserfiche Cloud applications have access to the actions. If object caching has been enabled, a database icon will be displayed next to the action name that will use the cached data.

Non-Standard Objects in Microsoft Dynamics 365
For connection profiles using Microsoft Dynamics 365, you can configure additional objects other than the default set which can be used to create, update, or delete information in MS Dynamics 365 with a Workflow.
To configure additional objects
- Create a new connection profile, or edit an existing connection profile by double-clicking on an existing connection profile.
- On the connection profile's page, click on the Objects tab.
- Click Add Objects to display the list of available additional objects in the MS Dynamics 365 account.
- Select the additional objects to be used within a workflow or process, and click Add.
- The additional objects will now be listed in the Objects tab below the default objects.
-
Add the fields that you want to make available for creation, updates, and deletions in a workflow.
- Expand the object, and click Add Field, name the field, and select the Dynamics-side field to use.
- To delete a field, click the trash can icon to the right of the field listed.
- Click Save when you've finished configuring additional fields. The selected fields will now be available for creation, deletion, or modification in the Run Application Action workflow activity.
- To remove an object from the list, click the three dots to the right of the object name and select Remove Object.
Non-Standard Objects in Salesforce
For connection profiles using Salesforce, you can configure additional objects that can be used to create, update, or delete information in Saleforce by a workflow.
To configure custom fields
- Create a new connection profile, or edit an existing connection profile by double-clicking on an existing connection profile.
- On the connection profile's page, click on the Objects tab.
- Click Add Objects to display the list of available additional objects in the Salesforce account.
- Select the additional objects to be used within a workflow or process, and click Add.
- The additional objects will now be listed in the Objects tab below the default objects.
-
Add the fields that you want to make available for creation, updates, and deletions in a workflow.
- Expand the object, and click Add Field, name the field, and select the Dynamics-side field to use.
- To delete a field, click the trash can icon to the right of the field listed.
- Click Save when you've finished configuring additional fields. The selected fields will now be available for creation, deletion, or modification in the Run Application Action workflow activity.
- To remove an object from the list, click the three dots to the right of the object name and select Remove Object.
Updating connections and workflows when fields are changed in Salesforce
If a field's properties are changed in Salesforce, the changes will not automatically propagate to the relevant connection profiles. To make sure these changes take effect, you must do the following on the connection profile's page:
- Under General Information, click Refresh to retrieve the new field information.
- Click Save to save the new connection information.
- Republish any workflows using the connection.
Updating workflows when you change your selection of custom fields
If you select or clear any custom fields, the changes will not automatically propagate to existing workflows. To update a workflow with the changes, republish the workflow.
Updating connections and workflows when custom objects are removed
If a custom object is removed in a 3rd party application, the changes will not automatically propagate to the relevant connection profiles. Refreshing the connection profile will display a warning message. To resolve the warning, remove the custom object from the connection, and save the profile.
For the workflow Run Application Action activity:
Once the changes are saved in the connection, refresh the workflow, and the changes should be applied automatically to the activity. Save and republish the workflow to activate the changes.
Note: When using "search" actions:
- In Salesforce, any non-encrypted field (email, text area, URL, phone, or string) will return partial-match results, otherwise only exact-match results will be returned.
- In MS Dynamics, only string and memo fields will return partial-match results.