Previewing Test Values on the Document or PDF
This document covers using both a Word document with merge fields and a fillable PDF file.
Previewing with a Word document
After you prepare a Word document with merge fields, go through the creation wizard to create a document merge rule. There, you are prompted to upload the document that you want to associate with the document merge rule. The document you upload will be updated with the merged values when the rule runs in a process. Once uploaded, the document can be tested with sample values. The sample values allow you to preview how the document will look when values are entered into the document. Options in the toolbar allow you to navigate between test values and merge fields. This way, you can see how the document looks with and without the sample values.
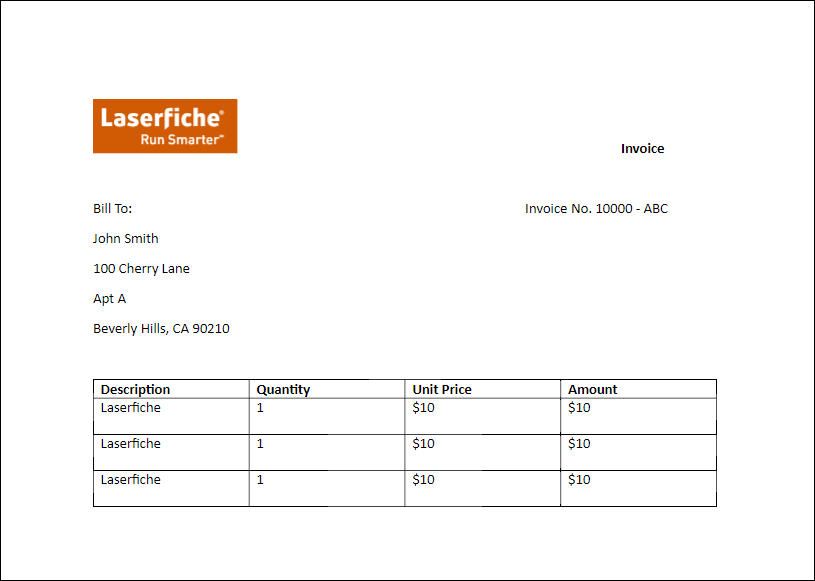
Example: You want to upload the invoice template used in Preparing a Document with Merge Fields with specific invoice details. You can click the test option in the toolbar and enter test values. Iterated over three times, the table is filled as followed:
Uploading the Document
The creation wizard had you upload a document to the document merge rule. But you may want to change the document at some point. You can do this without creating a whole new rule; instead, you can go through the steps of uploading a document. The old document is replaced once you upload a new document and then save the rule.
To upload a new document:
- Select the document button in the toolbar.
- Select Upload Document and choose a Word document.
- Click Open.
Testing Sample Values
As mentioned above, test-running your document merge rule is a great way to ensure that fields merge as expected. Once applied, the sample values can be displayed or hidden with the Original Document option in the toolbar. If the tested merge looks correct, go ahead and publish the rule.
To test sample values:
- Click Test in the toolbar.
- Enter sample values for each simple merge field.
- If you have table merge fields, specify the number of rows you want to iterate over and then enter test values for each column. Because the test is used to see how the table will look with values in it, you do not need to specify a value for each cell of the table.
- Click Test.
Downloading the Document
You may want a copy of the document used in the document merge rule. The document merge rule editor provides a download option in the toolbar to allow you to download the document associated with the rule. Note that this does not export the entire rule.
To download the document:
- Click Download Document
 in the toolbar.
 - Save the resulting file.
Exporting the Rule with a Briefcase File
You may want to save a copy of the rule used in the document merge. The document merge rule editor provides a download option in the toolbar to allow you to export the entire rule so that it may be uploaded again at a later date.
To download the rule as a .bri file, click the Briefcase Export button ![]() in the toolbar.
in the toolbar.
Previewing with a PDF file
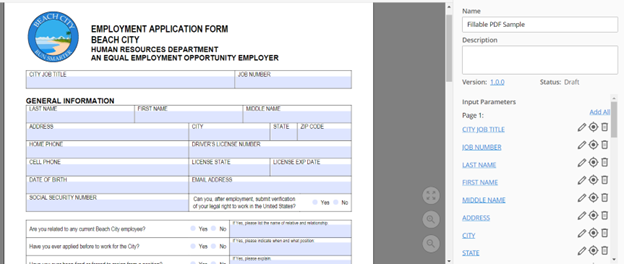
Document Merges can be used to insert information from your processes into Fillable PDF Forms. Go through the creation wizard to create a document merge rule. There you are prompted to upload a file that you want to associate with the document merge rule, select the desired fillable PDF for this step. The Fillable PDF you upload will be displayed with the fields in the designer.
Adding Fields
There are 3 ways to add fields:
- Double click on fields in the preview in the editor adds them to the right panel.
- Click Start Grouping in the toolbar and click on fields that you want to add to the group. Click End Grouping in the toolbar and it will open a dialog where you can provide a name for that group.
- Click Add All on the right panel to add all fields on that page as input parameters to the document merge rule.
Uploading the Document
The creation wizard had you upload a document to the document merge rule. But you may want to change the document at some point. You can do this without creating a whole new rule; instead, you can go through the steps of uploading a document. The old document is replaced once you upload a new document and then save the rule.
To upload a new document:
- Select the document button in the toolbar.
- Select Upload Document and choose a Fillable PDF document.
- Click Open.
Testing Sample Values
You can test-run your document merge rule to ensure that your fillable fields look as expected. Once applied, the sample values can be displayed or hidden with the Original Document option in the toolbar. If the tested merge looks correct, go ahead and publish the rule.
To Test Sample Values:
- Click Test in the Toolbar.
- Enter sample values for each single fillable field.
- If you have grouped fields, the individual values need to be separated by commas. The test dialog will pop out the individual values to make it easier to input and get the results you want.
- Click Test.
Downloading the Document
You may want a copy of the pdf used in the document merge rule. The document merge rule editor provides a download option in the toolbar to allow you to download the file associated with the rule. Note that this does not export the entire rule.
To download the document:
- Click Download Document in the toolbar.
- Save the resulting file.
Exporting the Rule with a Briefcase File
You may want to save a copy of the rule used in the document merge. The document merge rule editor provides a download option in the toolbar to allow you to export the entire rule so that it may be uploaded again at a later date.
To download the rule as a .bri file, click the Briefcase Export button ![]() in the toolbar.
in the toolbar.