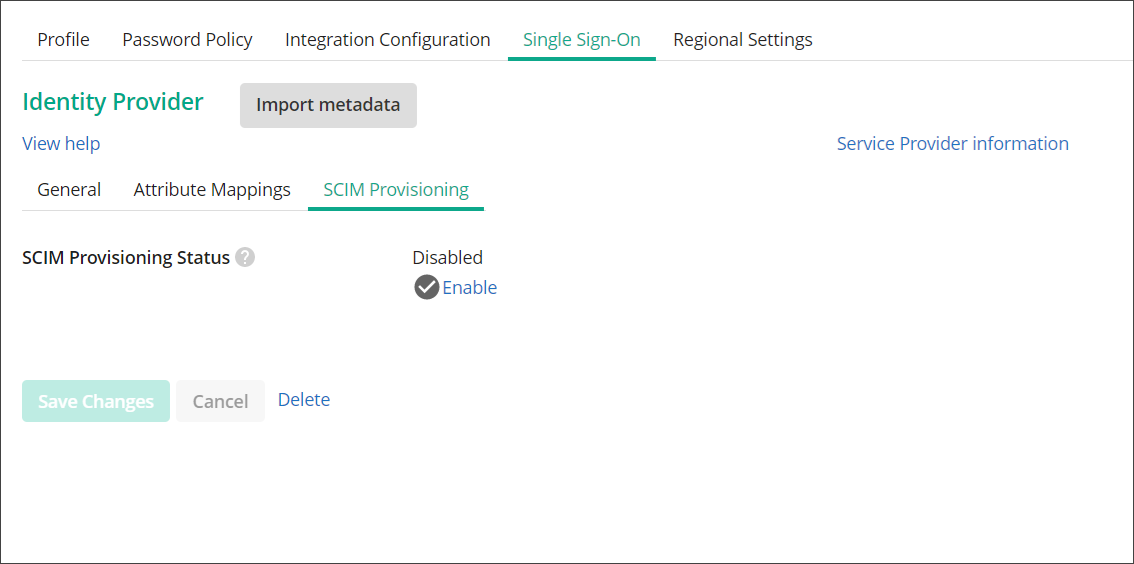
SCIM Provisioning
SCIM (System for Cross-domain Identity Management) is an open standard designed to manage user identity information. The goal of SCIM is to help automate the exchange of user identity data between your company's various applications and service providers. Once configured, users that are added, updated, or removed from your identity provider will be automatically updated in Laserfiche. This will greatly minimize manual administration of users between identity providers and Laserfiche.
Note: When an administrator removes assigned users or groups from the SCIM application on the identity provider, the corresponding user in Laserfiche is disabled, and the corresponding group in Laserfiche is removed.
Pre-requisites
Before you can use Just-in-Time provisioning, you must have the following setup:
- Configure single sign-on (SSO).
Configuring SCIM in Laserfiche Cloud
- Navigate to Laserfiche Cloud Account Administration.
- View the Settings page.
- Select the Identity Provider tab
- Select the Provisioning tab.
- Select the SCIM option and click Save Changes.

-
In the SCIM Connection section, take note of the Management Endpoint. You will need to provide this URL to your identity provider for where to send SCIM requests.
- Select Generate token to create an authentication token. In the Cross Domain Identity Management Token dialog that appears, use the copy to clipboard icon to copy the bearer token to the Windows clipboard. This token will let the identity provider authenticate with the SCIM server. Save this token in a secure location for later use.
- For more information on configuring SCIM for different identity providers, see the Configuring SCIM for Specific Identity Providers help topic.
SCIM Provisioning Licensing Rules
Laserfiche can help automate license assignments for SCIM-provisioned users based on the user's group membership.
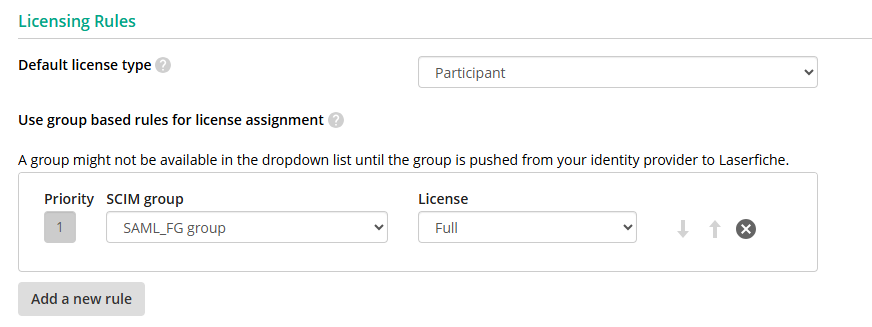
Group rules should be organized by priority. If a user is a member of multiple groups, the user will be assigned the license that is set for the rule with the highest priority, the first rule that matches going top to bottom. The first rule on the page has the highest priority. The last rule on the page has the lowest priority.
- Navigate to Laserfiche Cloud Account Administration.
- View the Settings page.
- Select the Identity Provider tab
- Select the Provisioning tab.
- In the Licensing Rules section, select a Default License Type.
- Optional: If no groups have been provisioned from your Identity Provider, you will need to push groups to Laserfiche Cloud first.
Note: Laserfiche does not retrieve information from your Identity Provider; Laserfiche can only receive information. A group may not be available in the dropdown list for a license rule until the group is pushed from your Identity Provider to Laserfiche.
- Select Add a new rule to select a group and the license type that will be assigned to any users in this group.

- Select Save Changes to save your rules.
General Guidelines for SCIM License Rules
See the following general recommendations when using SCIM license rules to automate license assignment.
- Plan out the group structure for license assignment.
- Automate License Changes Based on Group Membership: SCIM Group Licensing allows for automatic license assignments when a user is added or removed from a group, ensuring that users always have the correct access.
- Minimize Group Overlap: Avoid unnecessary group overlap to prevent complexity in license assignments and potential conflicts.
- Create Specific License Groups If Needed: Use dedicated SCIM groups for licensing when possible, rather than relying on existing groups created for other purposes, like email or access management.
- Configure a Default License Type as a Fallback.
Configure default license type as a fallback for users who are not covered by group licensing rules. This ensures that users don’t lose access if they are not assigned to any group or in case of group synchronization failures.
- Keep each group under 5000 users when using SCIM provisioning with Okta.
This recommendation aims to provide a smooth user experience for Okta customers as they may experience provisioning issues with group memberships exceeding this size.
- Only SCIM-provisioned users are affected by SCIM license rules. Existing users cannot be migrated over to being managed through SCIM group licensing.
Note: When SCIM license rules are saved for the first time, all SCIM users' licenses will be automatically managed by these rules. The rules apply only to direct groups, not to indirect or nested groups (i.e., groups assigned to other groups).
Exempting a SCIM-provisioned User from Licensing Rules
When a user is provisioned via SCIM to Laserfiche, the Exempt from SCIM licensing rules option is not selected by default. The license type cannot be changed until this checkbox is selected. Additionally, attempting to modify the license type through the Import user configuration CSV file or Set user license type options on the Users page will result in an error message: Cannot update SCIM-managed user license.
Clear the checkbox to have the user's license assigned automatically through SCIM license rules. When checked, administrators can override SCIM license rules and specify a license type.
Note: For manually created users, this checkbox is not available.