Start Events
Start events are events used to start a business process. Most processes will be started by a message start event, which represents a form submission. You can also start events on a fixed schedule by using timer start events, or start them manually using a generic start event.
Generic Start Event
This generic start event lets a user start the process manually, as opposed to starting it with a form submission. This lets you push content and forms to other users when you want to.
Generic start events are represented by the following symbol:
Tip: If you are building a process that begins with a form submission, use a message start event. If you are building a form that is manually started and does not begin with a form submission, use a start event.
Configuring Generic Start Events
- Double-click the event on the canvas to open its properties window.
- Type a name for the event in Name.
Message Start Event
Message start events start a process when a form is submitted. This is the most commonly used start event and is useful for capturing information that you can use in a business process.
Note: To provide users access to a form, see Allowing Access to a Process for more information.
Message start events are represented by the following symbol:
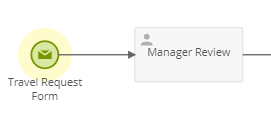
Example: You can design a process with a message start event that represents an employee's submission of a travel request form. After the form is submitted, the process routes the form to the employee’s manager for review. The diagram below shows how these two stages of the process look like in the process diagram.

Configuring Message Start Events
- Double-click the event on the canvas to open its properties window.
- Go to General to set up general properties like the starting form and the buttons on the form.
- Type a name for the event in Name.
- Under Description, describe the role that the form plays in the process.
- Select a starting form in Starting form. Users must complete this form to start the process. You can edit the selected form by clicking Edit.
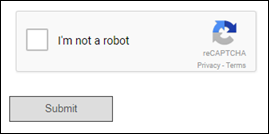
- Select Enable reCAPTCHA to protect your form from spam.

- Select Enable Compatibility Mode if support for screen readers may be needed.
Note: Enabling compatibility mode alters the default focus of the page. Users will need to click into the first form field to start filling out the form when this option is enabled, rather than it being the default cursor location.
- Type the button label for the submission action button in Submit button label.
- Under Save as draft select the Allow user to save incomplete form for later option to let users save form drafts, when the form is too long to complete in one session.
Note: If the form is public, all users will be able to save drafts. When a public user saves a draft, they are prompted for an email address, and recovery information for that draft will be sent to their email address.
- Selecting this option opens an email composition dialog to create a notification email to the user with the details necessary to recover the saved draft. Specify a Subject and Body for the message. The body may contain any variables that are available at this stage in the process. Once the message has been composed, click Done.
- To edit the notification email, click the Edit button to the right of the Allow user to save... option.
- To help prevent users from mistyping the email address, select the Use email confirmation when saving public drafts option. This prompts users to re-enter their email address.
- Under Action history privacy, select the Hide action history from the initiator when viewing this start event option to prevent the initiator from seeing action history in the inbox. This option may be over-ridden by the action history settings at the process level.
- Under Load tasks sequentially, select the Automatically load the next task if the same person is assigned to it option if the next user task in the process is assigned to the same person as this start event and you want the next user task's form to appear immediately after the user submits this user task's form.
- Select the Only display the form option when you click the previous option to load only the form in the Tasks tab. If you select this option, the user will not see the Comments section or the Action History pane when the next form is loaded.
- Go to On Event Completion to set up what happens after a user submits the form.
- Select Show a follow up message to set up a message to show the user in the rich text editor. (If you include a URL in your thank you message, it must begin with http:// or https://.) You can also choose to show the submitted form to the user below the thank you message and to provide options for users to download or email the form for their personal records.
- Select Redirect to website to specify a website that will appear after the user submits a form.
Timer Start Event
Timer start events start a process on a particular date or schedule. Timer start events are useful if you have a process that should automatically start at a certain time or on a certain schedule.
Time start events are represented by the following symbol:
Example: Every month, the manager of the sales department must fill out a form that rates each salesperson's performance. The manager can use a timer start event to start a process on the first of every month, where the process emails a link to the form he needs to fill out.
Configuring Timer Start Events
- Double-click the event on the canvas to open its properties window.
- Type a name for the event in Name.
- Use the options under Repeat to start a new instance of the process on a recurring schedule.
Error Start Event
See the Error Events page for more details.