Tags
Tags are a metadata type in Laserfiche that provide a way to categorize documents and folders. You can use tags to indicate information such as the entry's status, contents, or handling instructions. Tags are used to categorize entries on an entry-by-entry basis. You can also use tags to help with document retrieval, since you can search for documents categorized with a particular tag.
You can also use tags to restrict access to specific documents. See Security Tags for more information.
Viewing, Adding, and Removing Tags
You can view the currently-assigned tags, add tags, or remove tags from the right pane of both the Document Viewer and the Folder Browser.
- Select a document or folder in the folder browser, or open a document in the document viewer.
- Select the Details tab in the right pane. Any currently-assigned tags will be displayed under Tags.
- Do one of the following:
- To add a tag, click Add and select a tag from the list. You can also add a new tag by typing a new tag name in this option. See Creating and Deleting Tags, below, for more information.
- To remove a tag, click Edit. Click the X icon to the left of the name of the tag you want to remove.
- Click Done.
Note: If the tag you are applying is a security tag, only users who have been granted that tag will be able to see the document to which it is applied. Security tags are marked with the security tag icon ( ) . See Security Tags for more information.
Creating and Deleting Tags
There are two ways to create a tag. You can quickly create a tag from within a document or folder, or you can create a tag in Repository Administration. You can only create security tags, or delete tags, in Repository Administration.
Creating a Tag while Working with a Document or Folder
- Select a document or folder in the folder browser, or open a document in the document viewer.
- Select the Details tab in the right pane. Any currently-assigned tags will be displayed under Tags.
- To add a tag, click Add and type the name of your new tag.
- Click Done.
Creating a Tag in Repository Administration
- Open repository management by selecting the app picker and then selecting Repository Administration.
- On the left, select Metadata and view Tags.
- Select the Add button (
 ) to add a new tag.
 - In the Name option, type a name for the tag.
- Optional: Select the Enable for AI-assisted selection checkbox to mark the tag as being eligible for automatic selection by Laserfiche AI.
- Optional: In the Description option, type a description for the tag. A description is required when the Enable for AI-assisted selection option is selected.
- Optional: If you want to create the tag as a security tag, select Security tag.
- Click OK to save the new tag.
Deleting a Tag
To delete a tag in the web client, open Tags, select the tag you want to remove, and click the Delete button ( )
)
AI-assisted Tags Classification
Use Laserfiche AI to assist with categorizing your documents by automatically applying selected tags to documents. Users can choose to automatically select tags for a document, and Laserfiche AI will apply any applicable tags to the document. If no tags are deemed appropriate, no tags will be selected. Tags that have not been marked as being enabled for AI-assisted selection will not be automatically selected and must be applied to documents manually.
Enabling AI-Assisted Tags
Administrators can turn on AI-assisted tag selection for the account; see Enabling and Disabling Laserfiche AI Features for more information.
Configuring a Tag for AI-Assisted Classification
When creating or editing the properties of a tag from Repository Administration, select the Enable for AI-assisted selection option to mark a tag as eligible for automatic selection. The description will be used to determine whether that tag matches a given document. Examples of possible prompts that could be stored in the description:
- An "Invoices" tag with a description of "This is an invoice, a document a seller sends to a buyer that itemizes goods or service provided, their costs, and the total amount due for payment."
- An "Email" tag with a description of "The document is an email."
Assigning Tags Automatically
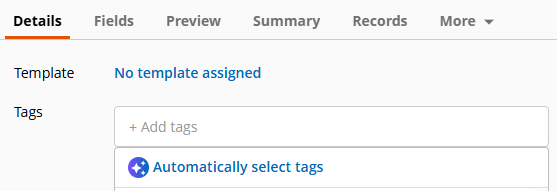
When viewing the metadata pane for a document, on the Details tab, when you choose to add a tag, the Automatically select tags option instructs Laserfiche AI to automatically assign any eligible tags.

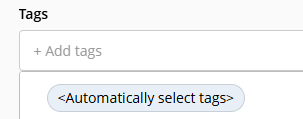
Users can also select the <Automatically select tags> option in the tag selection list; this is useful when applying automatic tag selection to a bulk import, and is also the way to use automatic tag selection with other Laserfiche applications.

Free Training: Using Metadata in Laserfiche Cloud eLearning course in Aspire.