This section contains the information you'll need to successfully install Laserfiche Forms.
Pre-installation
Prior to installing Laserfiche Forms, ensure your system meets the following requirements.
- IIS (Internet Information Services) must be installed on the computer where you plan to install Forms. See the Supported OS List for more information.
System Requirements
Below are the minimum and recommended system requirements for Laserfiche Forms. The term "Server" refers to the Web server.
Forms Server Requirements
- CPU: 4-core or more CPU
- Memory: 4 GB (8 GB recommended)
- Operating system:
- Windows 10
- Windows 11
- Windows Server 2016
- Windows Server 2019
- Windows Server 2022
ASP.NET 4.8 or later must be enabled.
Note: Hardware requirements may fluctuate based on the number of users logged in to the server. If you expect to have many simultaneous connections to your Laserfiche Forms server, we encourage you to configure it with a faster CPU and/or add more RAM.
Software Requirements
Below are the software requirements for Laserfiche Forms.
Laserfiche Server
- Laserfiche Forms is compatible with version 9.0 or higher of the Laserfiche Server.
- Laserfiche Forms is not compatible with standalone editions of Laserfiche (Executive, Desktop, etc.).
- In order to integrate with Laserfiche Audit trail, Laserfiche Forms requires Laserfiche Audit Trail 11 Update 4 (or later) and Laserfiche Full Text Search 11.0 (or later).
Web Server
- Internet Information Services (IIS) 10 (Windows 10, Windows 11, Windows Server 2016, Windows Server 2019, Windows Server 2022)
Database Server
- Microsoft SQL Server 2014 SP3 or above
- Microsoft SQL Server 2016 SP2 or above
- Microsoft SQL Server 2017
- Microsoft SQL Server 2019
-
Note: The express editions of Microsoft SQL Server can be used with Laserfiche Forms. Microsoft SQL Server Express has a 10GB storage limit per database and, because Forms stores attachments in the database, this limit can be reached quickly if file uploads are allowed. In addition, Microsoft SQL Server Express uses a maximum of 1GB of memory, which can affect performance.
Client Workstation
- Users can fill out forms that start a process in Chrome (latest version), Safari (latest version, Mac only), Firefox (latest version), Edge (Chromium), and Opera.
- The Laserfiche Forms Tasks listing, form designer, process designer, Administrative pages, etc. must be viewed in Microsoft Edge (Chromium), Firefox (latest version), or Chrome (latest version).
- Laserfiche Forms also supports mobile browsing Chrome, Firefox, and Safari (iOS 8 or later) are recommended.
Installing Laserfiche Forms
Open the Forms install package and double-click Autorun.exe.
- In the Welcome step, click Next.
- In the End-User License Agreement step, read the license agreement and select I accept the terms in the License Agreement if you agree to the terms of the license agreement. Click Next.
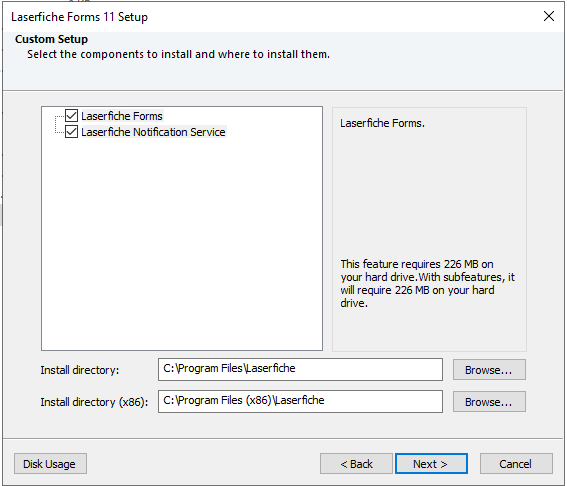
- In the Choose Setup Type step, select to install all program features or choose the features you want to install. If you select the second option, specify the desired install directory in the Custom Setup step. Click the Disk Usage button to see how much space is available on the specified disk and how much space the Laserfiche Forms installation requires.
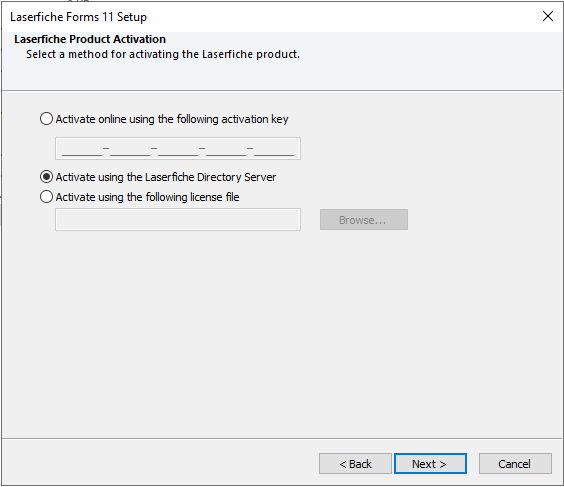
- In the Laserfiche Product Activation step, specify the desired method for activating Laserfiche Forms.
- If you have an activation key, select the Activate online using the following activation key option and specify the activation key in the text box. The installation will contact Laserfiche over the Internet at the end of the installation.
- If you received a license file, select the Activate using license file option and browse to the path where the Laserfiche Forms license file can be found.
- If you are in a Laserfiche Rio environment,
- Select the Activate using the Laserfiche Directory Server option.
- Click Next to continue.
- Specify the Laserfiche Directory Server and a username and password that can connect to the Laserfiche Directory Server.
- Click Next, and specify the License database and License block Laserfiche Forms will use.
- If you have authenticated participant licenses and register a new instance, you'll be able to allocate them to this Forms Server. Alternatively, any authenticated participants will be allocated as specified in the existing registration.
Note: If you are using Laserfiche Directory Server for license management and you have configured organizations, the Organization path option will be displayed after this step. Select the organization you want to use in this option. This option will not be displayed if you do not have organizations configured, or if you are not using Laserfiche Directory Server.
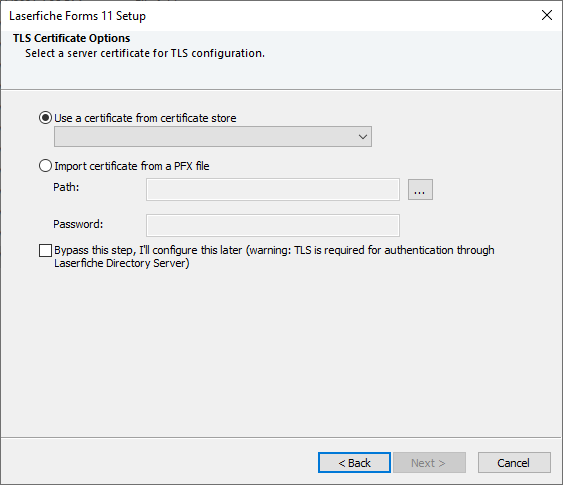
- In the TLS Certificate Options step, select a certificate in order to use HTTPS with your Forms server. Click Next
- In the Laserfiche Forms System Settings step, specify the credentials the Laserfiche Forms Application Pool and Routing Service and Notification Service will use. Click Next.
- In the Ready to Install step, click Install to start the installation process.
- The Prerequisites step may appear if Forms must install additional components.
-
A green check will appear next to installed items and a red X will appear next to items that have not been installed.
- If one or more of the items on the list has a red X next to it, install that item and then click Retry. Alternatively, select Bypass Prerequisites and click Next.
- If all the items installed successfully, click Next.
Important: Bypassing prerequisites may cause Forms to function incorrectly and is not recommended.
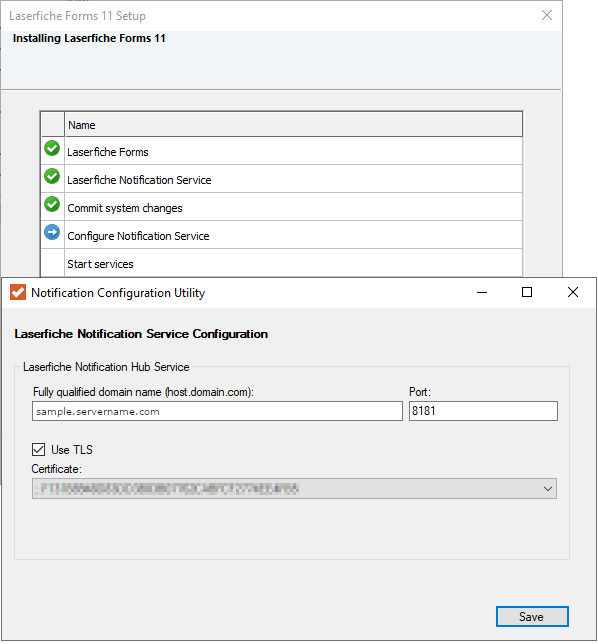
- The Notification Configuration Utility, will open, review the information which should match the settings specified in step 5 above. Click Save to accept and activate the settings.
- Some IIS features may need to be reset. If this is the case, a warning dialog box may appear. Click OK to continue the installation.
- When the installation is complete, click Next.
- Click Finish to exit the installation wizard.
- At the end of the installation, the Post-Installation Requirements step may display, prompting you to install the Activation Tool. Click Install to continue. Activation will run silently.
- Once you've installed Laserfiche Forms, you must configure it from the Laserfiche Forms Configuration page before use. To access this page, click Start, All Programs, Laserfiche, Forms, and then click Laserfiche Forms Configuration.
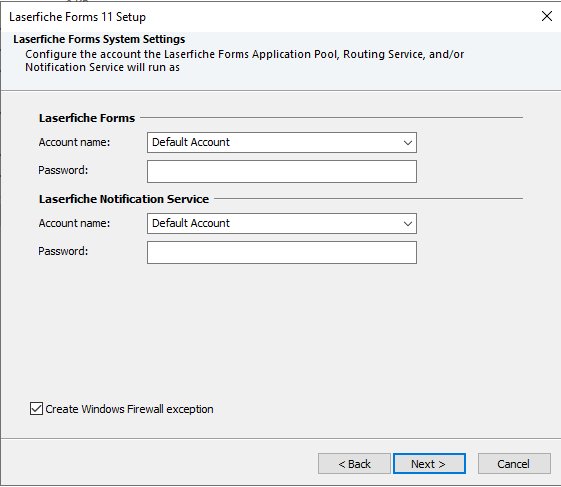
Note:Laserfiche Forms will use the Laserfiche Forms account to connect to your database server if Use Windows Authentication is selected on the Forms Configuration page.
Note: If you select Default Account, the application pool will run as ApplicationPoolIdentity and the Routing service and Notification service will run as Local System.
Important: The account that the Laserfiche Forms Application Pool and Routing Service use must have the right to create folders in the local file system.
Note: In most cases, activation will happen automatically during installation. However, if there is a problem with your activation key, the activation tool will launch at the end of installation. See Activation Tool for more information.
Post-Installation Recommendations
- Laserfiche Server (version 9 or later) or Laserfiche Directory Server must be installed.
- A network firewall should be installed to keep your information secure.
- If you are upgrading from a previous version of Forms, we recommend taking your Forms Server offline during the upgrade to decrease upgrade time. Upgrading may take several minutes, depending on the size of the Forms database.
- Laserfiche Forms can be upgraded before the Laserfiche Server is upgraded. This means that you can have a Laserfiche Forms 11 installation with a Laserfiche Server 9.1 installation.
- Laserfiche Forms requires Laserfiche Audit Trail (version 11 Update 4 or later) and Laserfiche Full Text Search (version 11 or later) in order to use Forms auditing features.