Events
Start Event
This generic start event lets a user start the process manually, as opposed to starting it with a form submission. This lets you push content and forms to other users when you want to.
Tip: If you are building a process that begins with a form submission, use a message start event. If you are building a form that is manually started and does not begin with a form submission, use a start event.
Configuring Start Events
- Double-click the event on the canvas to open its properties window.
- Type a name for the event in Name.
Message Start Event
Message start events start a process when a form is submitted. This is the most commonly used start event in Laserfiche Forms and is useful for capturing information that you can use in a business process. You can also use an HTTP POST request to complete a starting form.
Example: When an employee submits a travel request form, the Travel System process starts and routes the form to the employee’s manager for review.
Configuring Message Start Events
- Double-click the event on the canvas to open its properties window.
- Go to General to set up general properties like the starting form and the buttons on the form.
- Type a name for the event in Name.
- Select a starting form in Starting form. Users must complete this form to start the process. You can edit the selected form by clicking Edit.
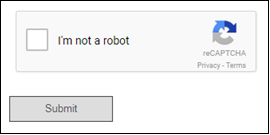
- Select Enable reCAPTCHA to protect your form from spam. To include this option on your form, first configure reCAPTCHA in Forms Configuration. After you configure and enable the option, the user will see the following button on the bottom of the form:
- In Forms 10.1 or earlier: Select Enable Honeypot CAPTCHA to use Honeypot CAPTCHA on the starting form. Honeypot CAPTCHA creates an invisible field that, when filled out, disables form submission. This prevents spam bots from submitting the starting form as they usually fill every field. In Forms versions newer than 10.1, Honeypot CAPTCHA is enabled by default when reCAPTCHA is not enabled.
- Click Collect Payment to add a payment gateway for form users to pay for items on the starting form.
- Type the button label for the submission action button in Submit button label.
- Select the Allow user to save incomplete form for later option to let users save form drafts, when the form is too long to complete in one session.
- Select Use email confirmation when saving public drafts to require that users verify their email.
- Select the Allow user to save form offline in the Laserfiche app option to allow users to download a form or task to their phones. A user can complete and submit the form or task offline and, when the user is back online, the form is submitted automatically.
- Select the Automatically load the next task if the same person is assigned to it option if the next user task in the process is assigned to the same person as this start event and if you want the next user task's form to appear immediately after the user submits this user task's form.
- Select the Only display the form option to display the form itself, without the Forms interface. This lightweight version does not include Comments, Action History, or anything else that might slowdown the form user’s experience.
Note: The On Event Completion section (described below) is what users see when they complete the Message Start Event. When you automatically load the next task, the event is only displayed after the last form is completed. When you only display the form, you can only use those variables from the final form in your event message. For example, message start event uses a form that has a First Name field and an Email Address field. Then, a user task uses a form that has the same First Name field and an Approval Reason list field. Only the First Name field and Approval Reason fields are available in the thank you page, not the Email Address field.
- Go to On Event Completion to set up what happens after a user submits the form.
- Select Show a follow up message to set up a message to show the user in the rich text editor. (If you include a URL in your thank you message, it must begin with http:// or https://.) You can also select to show the submitted form to the user below the thank you message and to provide options for users to download or email the form for their personal records.
- Select Redirect to website to specify a website that will appear after the user submits a form.
Timer Start Event
Timer start events start a process on a particular date or schedule. Timer start events are useful if you have a process that should automatically start at a certain time or on a certain schedule.
Example: Every month, the manager of the sales department must fill out a form that rates each sales person's performance. The manager can use a timer start event to start a process on the first of every month, where the process emails a link to the form he needs to fill out.
Configuring Timer Start Events
- Double-click the event on the canvas to open its properties window.
- Type a name for the event in Name.
- Use the options under Repeat to start a new instance of the process on a recurring schedule.
- Set the Interval value and select the span type (day, month, year, etc.)
- Set the End date, if desired.
Timer Catch Event
A timer catch event helps adjust the amount of time before a process continues, an activity is escalated, or an alternate path is taken. You can use it as an independent event or attach the event to a user task or sub-process.
Delaying a Process
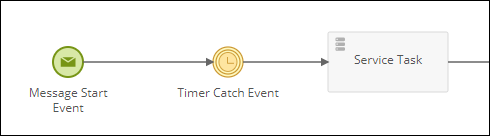
When you use a timer catch event in a process, the process is delayed based on the wait period you enter under Wait. This can be used to wait for another part of a process to complete.
Example: During an initial customer interview, a sales person completes a form on a potential customer. If the lead is promising, the sales person wants to follow up five business days later. To get started, add a time catch event to delay the process for five days from when the form was submitted. Then, send an email to remind the sales person to follow up on the lead. You can do this with the following configuration:

To delay a process:
- Double-click a timer catch event to open its properties.
- Type a name for the event under Name.
- Specify the wait conditions under Wait. You can delay the process based on the following options:
- Select Date and time to specify a specific date and time until when you want the event to delay the process.
- Select After to specify a specific amount of time you want the process to be delayed. You can also exclude weekends from the amount of time.
- Select Variable to specify a number of days before or after a value in a variable. You can also exclude weekends from the amount of time.
Escalating a User Task or Sub-process
Another way to use the timer catch event is to attach the event to a user task or sub-process that you want completed within a specific time period. If the time period passes without completion, you want to move to other activity.
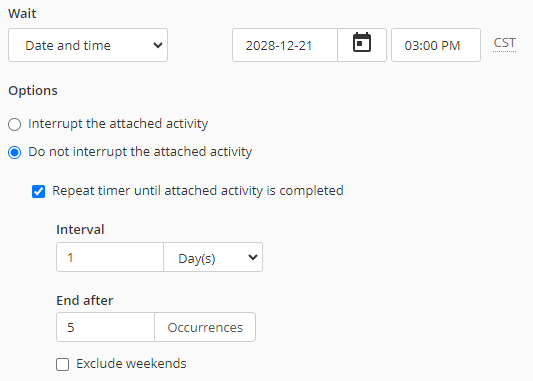
Example: A manager wants a report completed within five business days. If the five business days pass, he wants to send a reminder every business day to the employee to complete his task. The manager can do this with the following configuration:

To escalate a user task or sub-process:
- Right-click a user task and click Attach timer event.
- Double-click the event attached to the task.
- Type a name for the event under Name.
- Specify the wait conditions under Wait. You can delay the process based on the following options:
- Select Date and Time to specify a specific date and time until when you want the event to delay the process.
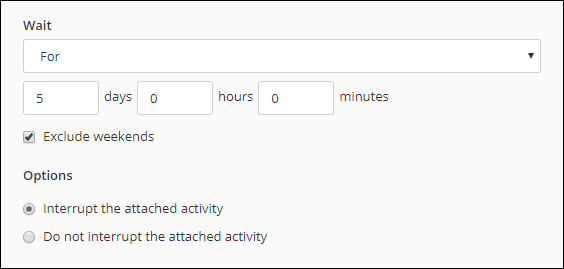
- Select After to specify a specific amount of time you want the process to be delayed, after which the next step will begin. You can also exclude weekends from the amount of time.
- Select Variable to specify a number of days before or after a value in a variable. You can also exclude weekends from the amount of time.
- Select Do not interrupt the attached activity.
- To repeat the event, select Repeat timer until attached activity is completed.
- Set the Interval for how often the reminder is sent.
- Set the End after value, the default is 5.
- Select Exclude weekends if desired.
- To repeat the event, select Repeat timer until attached activity is completed.
Taking an Alternate Path
Another way to use the timer catch event is to attach the event to a user task or sub-process that you want completed within a specific time period. If the time period passes without completion, you want to end the user task or sub-process and move to an alternate path.
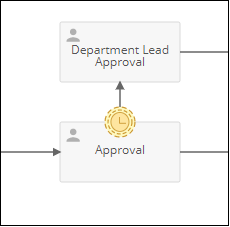
Example: A manager wants a report completed within five business days. If the five business days pass, he wants to cancel the activity and have the department lead complete the task. The manager can do this with the following configuration:
To take an alternate path:
- Right-click a user task and click Attach timer event.
- Double-click the event attached to the task.
- Type a name for the event under Name.
- Specify the wait conditions under Wait. You can delay the process based on the following options:
- Select Date and time to specify a specific date and time until when you want the event to delay the process.
- Select After to specify a specific amount of time you want the process to be delayed. You can also exclude weekends from the amount of time.
- Select Variable to specify a number of days before or after a value in a variable. You can also exclude weekends from the amount of time.
- Select Interrupt the attached activity.
Signal Throw and Catch Event
A signal throw event can broadcast a signal that a signal catch event will listen for. Upon receiving the signal, the signal catch event can act on the signal. In BPMN, this is referred to as "throwing" and "catching" a signal.
A signal throw event in a process flow broadcasts a signal. The signal catch event listens for the broadcast signal. When the signal is received, the process flow that starts from the signal catch event runs.
Example: A process simultaneously routes a proposal form to a manager, an administrative assistant, and the accounting team for review. This parallel routing ensures proposals are processed by all three parties in a timely manner. However, in the case the manager denies a proposal, the administrative assistant and accounting team no longer need to continue their review. To account for this situation, a signal throw event is placed in the process flow that's taken if the manager denies the proposal. Corresponding signal catch events are attached to the administrative assistant's and accounting team's user tasks. If the signal throw event is reached, the signal catch events attached to the user tasks will cancel the user tasks and the process flow paths out of those signal catch events will be taken. Those process flows lead to email service tasks that alert the administrative assistant and accounting team that they no longer need to continue working on the proposal.

Note: The listening signal catch event will only receive a broadcast when the user task or sub-process is active or has not yet run. If the process has already moved past the user task or sub-process, the signal catch event will not be listening for a broadcast signal.
To configure signal throw and catch events
- Drag a signal throw event onto the canvas and connect it to a spot in the process flow.
- Double-click the signal throw event to configure it.
- In the Name text box, provide a descriptive name for the signal.
- Under Broadcast signal, choose or create a signal that this event will send out when it's reached. Signals can be created by selecting Create a signal from the menu and typing a name in the dialog box that appears. Existing signals can be edited by selecting them in the menu and clicking Edit.
- Right-click the user task or sub-process from which you want a process flow to run when the first signal intermediate event is reached.
- Select Attach signal event.
- Double-click the attached signal event.
- In the Name text box, provide a descriptive name for the event.
- Under Listen to signal, select the signal you configured in step 4. This attached signal event will now "listen" for the signal that is "broadcast" when the other signal intermediate event in the process is reached. It will run when it receives that signal.
- By default, the user task or sub-process will be interrupted and canceled when the attached signal catch event runs. Select the Do not interrupt the attached activity if you want the user task or sub-process to continue running.
- When you are done, define a process flow that will be taken if this signal intermediate event is run.
- Continue to attach signal catch events to any tasks you also want alternate process flows to run from when the first signal throw event "broadcasts" its signal.
Note: The process flow out of the attached signal catch event will begin running as soon as the broadcast signal is received. It will not wait for the user task or sub-process to finish running.
Error Start Event
Error start events start a process based on a custom error generated from an error end event. Error start events interrupt all activities in a process.
To configure an error start event
- Double-click the error start event on the canvas to open its properties window.
- Under Catch, configure whether to catch any custom errors generated by error end events or to catch a specific custom error.
Error Catch Event
Error catch events can be attached to a sub –process to listen for custom errors generated by an error end event. The error catch event always interrupts the sub-process to which it is attached.
To attach an error catch event
- Right-click a sub-process and click Attach error event.
- Double-click the error catch event that appears on top of the sub-process to view its properties window.
- Under Catch, configure whether to catch any custom errors generated by error end events or to catch a specific custom error.
Error End Event
Error end events generate a custom error and then end the current process flow. The custom error can be caught by error start events and error catch events. Custom errors that are not caught by an error start event or error catch event will not terminate whole process, but will be logged in the instance log. This means that when the error end event is placed in a main process, the entire process is interrupted and the error start event flow proceeds. the a sub-process, this means the error end event interrupts only the sub-process and the error boundary event outflow is taken; meanwhile, all active flows in the main process remain active.
Error Events Sample
A designer creates a process that contains the following sub-process (the first image). In the sub-process, the user must check the field variable to determine if someone included a bad field value in the previous task from the main process. If they did, the sub-process moves to the error end event and throws a customized error.
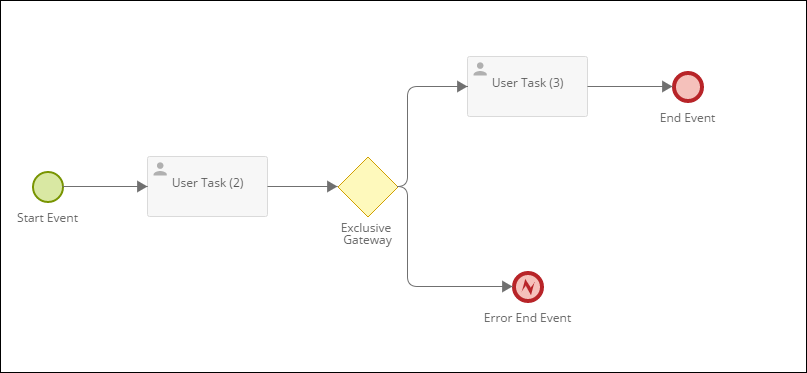
In the following main process (the second image), the error catch event attached to the sub-process catches the error thrown by the error end event and performs an action. If the error is thrown from the error end event in the sub-process and no error catch event catches the error, the error start event starts. This ensures that all other errors are caught and handled appropriately.

End Event
End events mark the end of a process. Once a process flow reaches an end event, the process flow ends. However, if there are other process flows still in progress, those will continue until they also reach an end event.
Terminate End Event
Once a process reaches a terminate end event, the entire process will be terminated including sub-processes and process flows that do not end in terminate end events.
Related Topics