Register an individual user account with Laserfiche Directory Server to grant the user access to Laserfiche applications.
- In Laserfiche Directory Server, navigate to your licensing site.
- Click the Accounts tab.
- Click the Users tab.
- Click
 button. In the context menu, select the type of user you want to register: Laserfiche User, Windows Active Directory User, LDAP User, or SAML User. For more information, follow the links below:
 - After registration, you may need to do more to ensure that users can access the relevant products.
- If you want a user to access a Laserfiche repository, then they need to be added to that repository.
- In the Laserfiche Administration Console, they should be added under the Laserfiche Directory Accounts node.
- In the web client management page, choose to add either a Windows or Laserfiche user, depending on whether the user is registered in Directory Server as a Windows user.
- If you want a user to access Forms, make sure they belong to a group that is granted access on the Forms configuration page. You can view or edit this list of groups when you configure Directory Server authentication in Forms.
- If you want a user to access a Laserfiche repository, then they need to be added to that repository.


Note: With Directory Server 10.0 or earlier, Community Named User Licenses are assigned by selecting the Retrieval license license type and selecting the Forms authenticated participant checkbox.
Important: When processing Active Directory Group Synchronization rules, Directory Server clears out all non-exempt named users. Registered named users that are marked as being exempt from synchronization rules and registered named devices are not affected.
Note: While you can assign a license to the built-in domain administrator account ([SampleDomainName]\Administrator), the account may not be able to sign in to Laserfiche repositories.
How to Register a Laserfiche User
- Click . In the context menu, select Laserfiche User.
- Using the drop-down menu, choose the Organization and Group for this user. If you need to create a new Organization or Group, use the +Organization or +Group button. For more information, see Managing Group Membership.
- Fill out the user information.
- If this user does not have a Group assignment, use the drop-down menu to select user License.
- Click Finish to save the user information or click Save and add another user to add additional users.
How to Register a Windows Active Directory User
- Click . In the context menu, select Windows Active Directory User.
- Using the drop-down menu, choose the Organization and Group for this user. If you need to create a new Organization or Group, use the +Organization or +Group button. For more information, see Managing Group Membership.
- Click the Register directory user(s) button.
- In the Register Directory User(s) dialog box, using the drop-down menu, select an Active Directory identity provider.
- Search for user names. By default, the search within this domain is set to Entire Directory. To change this, use the drop-down menu.
- In the Search Results section, select users to add. Selected users automatically appear in the Added users section.
- Click OK to finish adding users in the Register Directory Users dialog box.
- Click Finish on the Create User page.
How to Register an LDAP User
- Click . In the context menu, select LDAP User.
- Using the drop-down menu, choose the Organization and Group for this user. If you need to create a new Organization or Group, use the +Organization or +Group button. For more information, see Managing Group Membership.
- Click the Register directory user(s) button.
- In the Register Directory User(s) dialog box, using the drop-down menu, select an LDAP identity provider.
- Search for user names. By default, the search within this domain is set to Entire Directory. To change this, use the drop-down menu.
- In the Search Results section, select users to add. Selected users automatically appear in the Added users section.
- Click OK to finish adding users in the Register Directory Users dialog box.
- Click Finish on the Create User page.
How to Register a SAML User
- Click . In the context menu, select SAML User.
- Using the drop-down menu, choose the Organization and Group for this user. If you need to create a new Organization or Group, use the +Organization or +Group button. For more information, see Managing Group Membership.
- Using the drop-down menu, choose the name of your SAML Identity Provider. Once you select the SAML provider, the User Information section will appear.
- Fill out the user information. For the Unique Attribute field, you must use the value of the Unique Login Attribute in your SAML provider.
- If this user was assigned to a Group, the License field will be automatically populated. If this user does not have a Group assignment, use the drop-down menu to select user License.
- Click Finish to save the user information or click Save and add another user to add additional users.
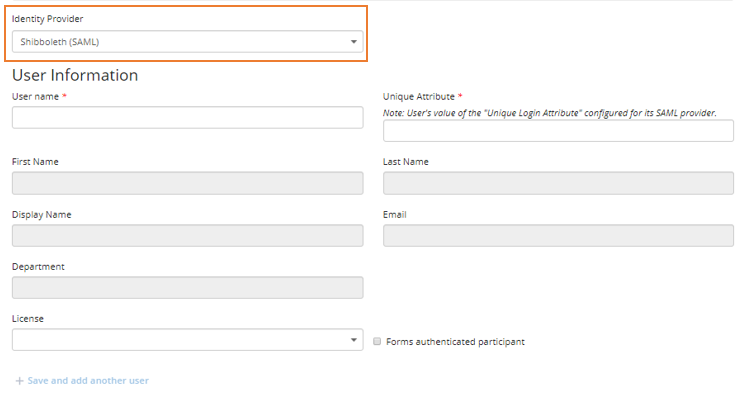
Note: As shown in the image above, mapped claims should be grayed out if the SAML Identity Provider authentication was properly configured. For more information, see Adding a SAML Identity Provider.
Note: The Import user list button can be used to import many users at once. For more information, see Batch Import of SAML User Accounts.