The General tab on the Settings page displays general miscellaneous information about the licensing site:
- Primary License
- Licensing Site
- Enable Relicensing Notifications
- Enable Active Directory Synchronization
- Multi-factor Authentication
- Enable Cluster
- SAML Login Configuration
- Directory Server Administration Site Display
- Application Version Information
Primary License
Use the Renew primary license link and Deactivate link to manage the primary license associated with the licensing site.
Directory Server 10.3.1 adds an option to automatically renew a primary license prior to the primary license expiration date. Turn on the Renew subscription primary license automatically option to take advantage of the automatic renewal. Directory Server will start attempting to renew an expiring primary license 30 days before the expiration date.

Licensing Site
Directory Server 10.3 or later includes a Modify connection string option that allows you to configure the SQL connection string to your licensing site's SQL Server database.
Use the Detach licensing site option to detach the licensing site from Directory Server.

Relicensing Notification
Turn on the Enable Relicensing Notifications option to send notifications to registered instances of Laserfiche Forms 10.4 and Laserfiche Server 10.4 when there is a change in the primary license. Choose between sending the update notification immediately or during a scheduled time window. Laserfiche Forms and Laserfiche Server can then attempt to automatically retrieve an updated application license.

Note: Laserfiche Forms 10.4 and Laserfiche Server 10.4 and later support automatically replacing their application licenses based on changes to the Directory Server primary license. You must specify whether you want the registered Laserfiche Forms or Laserfiche Server instance to override the default notification settings. To learn more, see Application Licenses.
Enable Active Directory Synchronization
Turn on Active Directory synchronization and configure a polling interval or choose to run synchronization rules on a schedule. There are also additional options for configuring how Directory Server should handle deleted users within Active Directory.
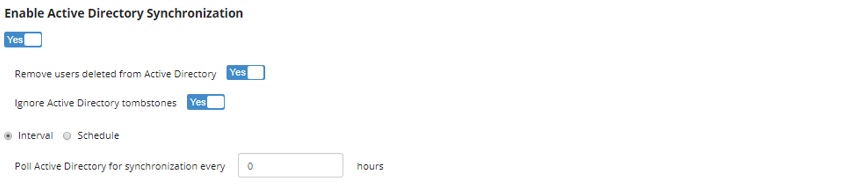
Note: When the Poll Active Directory for synchronization every value is set to 0, Active Directory synchronization will occur every 30 minutes after the service is started.
Multi-factor Authentication (MFA)
Directory Server 10.4.3 and later supports configuring two-step verification for Laserfiche Users. If MFA is turned on for a Laserfiche User, upon next sign-in, they will be presented with instructions to link their account with a one-time passcode authenticator app (e.g., Google Authenticator or Microsoft Authenticator).
- MFA always required for Laserfiche Users: Turn on this option to turn on MFA for all Laserfiche Users.
- MFA inherited behavior is enabled for Laserfiche Users: Turn on this option to turn on MFA for Laserfiche Users with an MFA status set to Inherited.

Enable Cluster
Directory Server supports the Windows failover clustering feature. Before turning on the clustering option, make sure the failover cluster is properly configured.
- Install the Windows Failover Clustering feature on all computers in the potential cluster. Make sure to include the cluster management tools.
- Open Windows Failover Cluster Manager and create a new cluster.
- Include all the appropriate computers in the cluster.
- Under Nodes, verify that all the appropriate computers are listed.
- Install Laserfiche Directory Server with the Laserfiche Directory Server Failover Cluster Support component on all computers in the cluster.
- Using Windows Failover Cluster Manager, under Roles, create and configure a new role.
- In the wizard, on the Select Role step, select Other Server.
- On the Client Access Point step, specify a cluster role name.
- When prompted to select a Resource Type, choose Laserfiche Directory Service Resource.
- Back in the Failover Cluster Manager, right-click on the newly created role and view the Properties.
- On the General tab, in the Preferred Owners section, select all the nodes.
- On the Failover tab, adjust failover settings as appropriate.
- Check that Resource properties for the role are configured.
- Select the Role.
- At the bottom of Failover Cluster Manager, click the Resources tab.
- Under Server Name, right-click on the Server name (the "Client Access Point") and click Properties.
- On the Dependencies tab, take note of the IP address value. Then close the properties dialog box.
- Under Other Resources, right-click on Laserfiche Directory Service Resource, and click Properties.
- On the Dependencies tab, take note of the Resource name.
- Start the cluster. Right-click on Laserfiche Directory Service Resource and click Bring Online.
Note: You may need to stop all Directory Server services before starting the cluster.
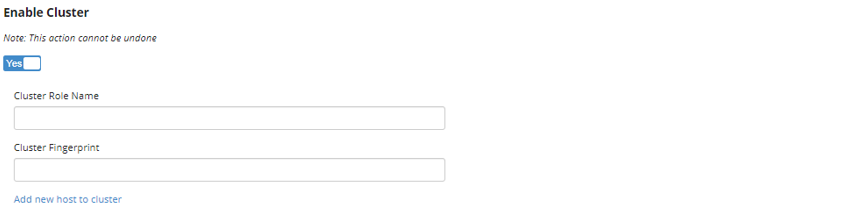
- Turn on the Enable Cluster option.
- Next to Cluster Role Name, specify the cluster role created in the previous section.
- Next to Cluster Fingerprint, specify the hardware fingerprint of the first cluster node hosting Directory Server.
- Click Add new host to cluster and add a cluster node. Repeat as necessary for additional nodes.
Note: The licensing database connections must be configured separately for each node. Administrators should create and activate the Directory Server database on one node, then attach the database to the other Directory Server nodes. To learn more, go to Configuring Windows Failover Clustering for Laserfiche Directory Server.
Note: Directory Server Failover Cluster Support requires Microsoft Windows Server 2012, Microsoft Windows Server 2012 R2, or Microsoft Windows Server 2016. In a Windows Server 2012-based failover cluster, you may need to install the following Microsoft update: https://support.microsoft.com/en-us/kb/2803748
SAML Login Configuration
If you've configured an identity provider to authenticate using SAML, Default Landing Page lets you set a default landing page that will be shown after successful authentication requests initiated by the identity provider. This does not affect SAML authentication requests that are initiated from a Laserfiche application—users will still be redirected to a Laserfiche application's home page after selecting SAML authentication on the application's sign-in page.
Under SAML Entity ID, you can specify a custom ID that Directory Server will use to identify itself to the SAML identity provider. By default, Directory Server's entity ID is in the format https://DirectoryServerHostName/lfds.
If you're moving Directory Server to a new computer or changing its host name, but you don't want to reconfigure your SAML identity providers, you can specify the old entity ID in this field. The old ID will effectively act as an alias for the new entity ID.

Note: The Default Landing Page and SAML Entity ID fields are optional for most SAML authentication configurations, including those for Shibboleth, Okta, and Microsoft Entra ID.
Directory Server Administration Site Display
Users can use this setting to choose a default licensing site when navigating to https://[MachineName]/lfds/. This user setting will only apply to the user checking the check-box.

Application Version Information
In Directory Server version 11 and later, application version numbers are sent to Laserfiche during licensing for troubleshooting and product improvement. Administrators can choose to turn this feature on or off by setting the Allow version information collection to Yes or No.

Note: By default, the Allow version information collectionsetting is set to Yes.
Enable SCIM Service
In Laserfiche Directory Server 11 Update 3 and later, set the toggle to Yes to use the SCIM 2.0 implementation. Existing TLS certificates configured in the Laserfiche Directory Server Configuration Utility will be shown.
Turn on the SCIM Licensing Synchronization option to automatically reallocate licenses for SCIM-provisioned users. Any configured Group-based rules will run according to the set schedule.