Delete Exchange Item
![]() How does this activity look in the Designer Pane?
How does this activity look in the Designer Pane?
To add this activity to a workflow definition
Drag it from the Toolbox Pane and drop it in the Designer Pane.
To configure this activity
Select the activity in the Designer Pane to configure the following property boxes in the Properties Pane.
-
 Activity Name
Once added to a workflow definition, the default name of an activity can be changed. Providing a custom name for an activity helps you remember the role it plays.
To name an activity
- Add an activity to your workflow by dragging it from the Toolbox Pane and dropping it in the Designer Pane.
- Select the activity in the Designer Pane.
- Under
 Activity Name in the Properties Pane,
replace the default name.
Note: Activity names cannot be the same as any other activity name in the workflow, they cannot be the same as the workflow's name, they must be less than 100 characters, they must contain at least one alphanumeric character, they cannot be "Name," and they cannot be the same as the activity's runtime type (which is usually only an issue with custom activities).
-
 Activity Description
Use the Activity Description to provide descriptive text to help you remember the role that the activity plays in the workflow. All activities contain a default description that you can modify while constructing your workflow.
To modify an activity description
- Add an activity to your workflow by dragging it from the Toolbox Pane and dropping it in the Designer Pane.
- Select the activity in the Designer Pane.
- Under
 Activity Description in the Properties Pane, replace the default description.
-
 Item to delete

In the Item to delete property box you can choose which Exchange item you want to delete with the activity. You can only delete Exchange items that were created by a Create Exchange Item activity earlier in the workflow definition.
To delete an item
- Add the Delete Exchange Item activity to your workflow definition by dragging it from the Toolbox Pane and dropping it in the Designer Pane.
- Select the activity in the Designer Pane.
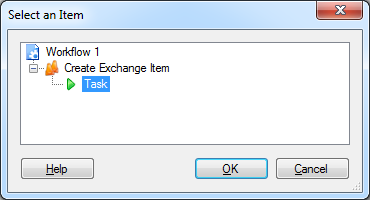
- Under Item to delete in the Properties Pane, click the Select link.
- In the
 Select List Item dialog box, click the green arrow
  next to the Exchange item you want to delete.
 - Click OK.
-
 Tokens
The Delete Exchange Item activity produces the following token.
Name Description Sample Syntax* was deleted Whether the Exchange Item was deleted. This token can have one of two values: True or False. %(DeleteExchangeItem_was deleted) *The "DeleteExchangeItem" portion of the syntax changes to match the activity's name as specified in the Activity Name property box. All non-alphanumeric characters, except underscores, are removed from the name.
Example: If you rename the activity "Delete Task," the syntax for the was deleted token will be %(DeleteTask_was deleted).
-
 Advanced
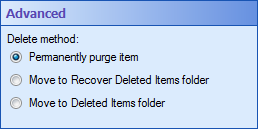
This property box allows you to configure the type of delete action when deleting a Microsoft Exchange task, appointment, or contact.
To configure the Advanced property box
- Select the Delete Exchange Item activity in the Designer Pane.
- Click the Advanced button (
 ) at the top of the Properties Pane.
 - Under
 Advanced in the Properties Pane, select or clear the following options:
- Permanently purge item: Select this option to permanently purge the item from mailbox.
- More to Recover Deleted Items folder: Select this option to send the item to the user's Recover Deleted Items folder in Outlook.
- Move to Delete Items folder: Select this option to send the item to the user's Deleted Items folder in Outlook.


