Document Merging
![]() Document Merging tab, can be used with all scan sources, but is particularly relevant for the Laserfiche Capture Engine, which is designed to process documents that have already been stored in a Laserfiche repository.
Document Merging tab, can be used with all scan sources, but is particularly relevant for the Laserfiche Capture Engine, which is designed to process documents that have already been stored in a Laserfiche repository.
Create a New Document
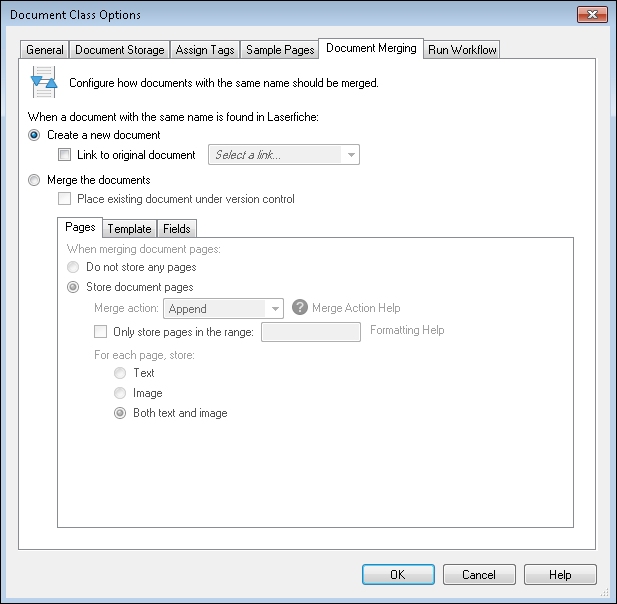
By default, Create a new document will be selected. When a document stored from Quick Fields has the same name as an existing document, the document from Quick Fields will be stored as a new, separate document. The new document will be named according to the Laserfiche naming convention for duplicate items in a folder, which is the name of the document with a sequential number in parentheses; e.g., Invoice (2). You can also save the new document as a new version or link it to the original document. For more information on versions and links in Laserfiche, see the Laserfiche Client help files.
Merge the Documents
You can also select Merge the documents to automatically merge the documents, and can configure settings to specify which information from which document will be kept with the final merged document. Select Place existing document under version control to place the original document under version control before the new one is merged with it.
Note: This option will result in a slower storage time. Use it only if you actually need it; otherwise the default settings will be more efficient.
Pages
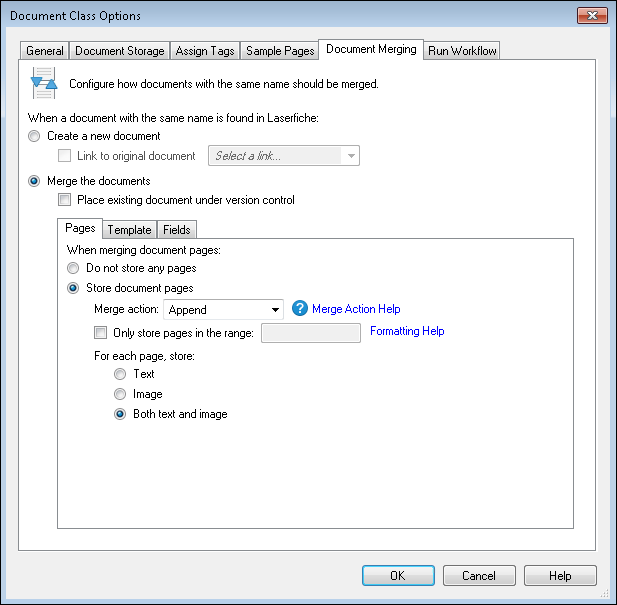
In the ![]() Pages tab, you can determine which pages from the document processed in Quick Fields will be stored in Laserfiche, and how they will be stored in relation to the previously existing pages.
Pages tab, you can determine which pages from the document processed in Quick Fields will be stored in Laserfiche, and how they will be stored in relation to the previously existing pages.
- Do not store any pages does not change the pages of the document stored in Laserfiche. You might select this option to make changes to the template or fields without altering the document itself.
- Store document pages saves pages from the document processed in Quick Fields to the merged document. Use the Merge action: drop-down menu to determine where the stored pages will be saved in relation to the existing pages:
- Append places the new pages at the end of the document in the order in which they were listed in Quick Fields.
- Prepend places the new pages at the beginning of the document in the order in which they were listed in Quick Fields.
- Replace removes the pages from the existing document and replaces them with the new ones. For example, storing a 5 page document will replace pages 1-5 of a 20 page document.
You can also specify which pages or components of pages to store.
- Only store pages in the range: Saves only pages in a specified page range.
- For each page, store:
- Text: Saves extracted text to Laserfiche. When it is cleared, only the pages or metadata will be stored without the extracted text.
- Image: Save page images to Laserfiche. When it is cleared, only the text or metadata will be stored without the pages.
- Both text and image: Saves extracted text and image pages to Laserfiche. When selected, text, metadata, and pages will all be stored.
Template
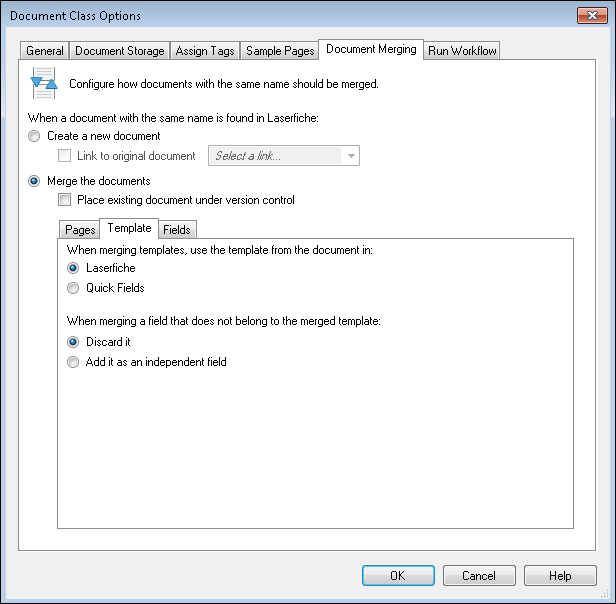
The ![]() Template tab allows you to specify what should happen when the documents to be merged have different templates assigned to them.
Template tab allows you to specify what should happen when the documents to be merged have different templates assigned to them.
Specify whether to use the template assigned to the document in:
- Laserfiche
- Quick Fields
Specify how to handle fields from the template that will not be used:
- Discard it
- Add it as an independent field
Fields
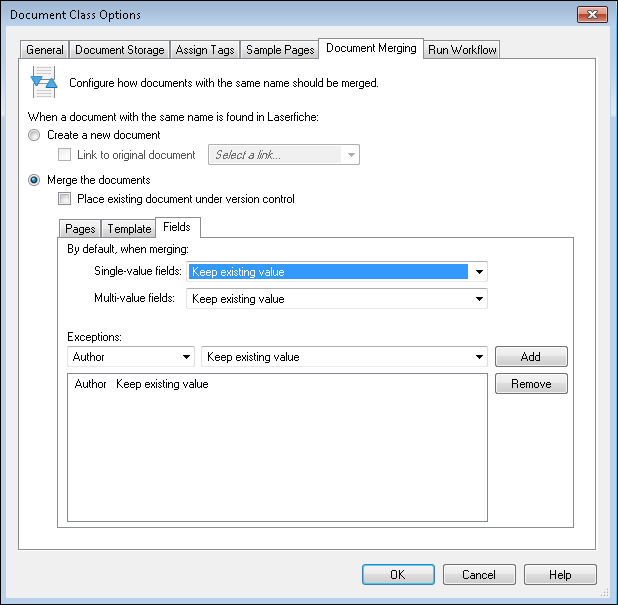
In the ![]() Fields tab, you can configure settings for what will happen to the values in fields when you merge documents.
Fields tab, you can configure settings for what will happen to the values in fields when you merge documents.
Single-value fields
Specify default settings for what should happen to the data in single-value fields when you merge documents.
- Overwrite with new value: Use the value from Quick Fields.
- Overwrite only if the new value is not empty: Use the value from Quick Fields unless there is no data from Quick Fields. In this case, keep the existing data from Laserfiche.
- Keep existing value: Use the value from the Laserfiche repository.
- Keep existing value if not empty: Use the value from the Laserfiche repository unless there is no data already in that field, in which case use the data from Quick Fields.
Multi-value fields
For multi-value fields, you have the same default options as for single-valued fields, plus one more.
- Append new values: Adds the values from Quick Fields as additional data in the multi-value fields.
Exceptions
You can create settings other than the default for specified fields.
To create merge settings for a particular field
- Under Exceptions, select the name of the field.
- Select the action that should be performed when merging that field.
- Click Add.
To remove merge settings for a particular field
- Select that field and setting from the list.
- Click Remove.


