OmniPage Zone OCR Advanced Options
You can configure advanced OCR settings for the OmniPage Zone OCR process. In most cases, these settings should only be modified if your OCR accuracy is low.
To configure advanced settings
- Add an OmniPage Zone OCR process to your session.
- During the Region Selection configuration process, select a region you have added and click Advanced options.
- In the
 Advanced Options dialog box, configure the following settings. Note that each setting is organized into a category. Expand a category to view its settings.
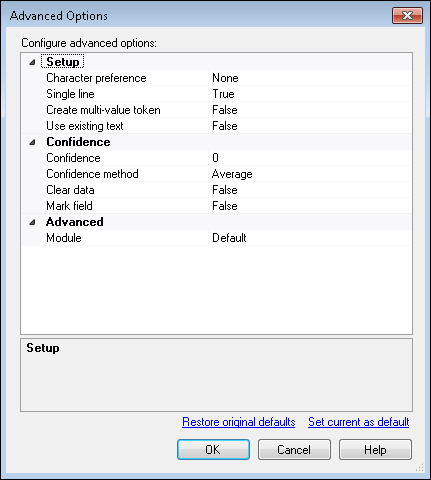
Setup
- Character preference: Specify the type of text that will most often appear in the region: letters or numbers, or None for no preference. When the OCR engine encounters a character that could be identified as either a letter or a number (e.g., 1 or I), it will default to the type you select. You can also select Custom to specify the preference per character rather than per zone. If you select Custom, a Custom Character Preference line appears in the Advanced section. See below for configuration information.
- Single line: If the region contains multiple lines of text, specify which lines should be returned. If you select True, only the first line will be returned. If you select False, all text will be returned.
- Create multi-value token: This option can only be set to True if Single line is set to False. If this option is set to True, when the token generated by this process is placed in a multi-value field, each line of text will appear as a separate value in the field. If it is set to False, all information in the token will still appear as a single value.
- Use existing text: This option specifies whether the zone should use existing text or OCR text from the image. If True is selected, it will check and see if there is any text associated with the image (from OCR, Laserfiche Capture Engine retrieving text, or PDF generating text). If there is no text, it will be OCRed and returned. If False is selected the text within the zone bounds will be OCRed and used.
Confidence
- Confidence: Specify how confident the OCR engine should be when determining whether or not the OCRed value is correct. Choose a number between 1 and 100, where 100 is the most confident. Alternately, enter 0 to disable this feature.
Note: This setting applies to the entire region, not to each individual OCRed character.
Tip: If you enable this feature, the recommended value is 65.
- Confidence method: Specify which statistical value the confidence level (set above) should apply to: the region's minimum value, median value, average, or average excluding outliers (an outlier is a figure that is significantly distant from the rest of the data). The OCR engine calculates these figures by taking into account each individual OCRed character in the region.
Example: Jim sets his confidence level to 90 and his confidence method to minimum. In effect, Jim is specifying that the OCR engine should only be confident that it has returned an accurate value if the region's least accurate value (its minimum) is at least 90 out of 100. Alternatively, Mike sets his confidence level to 55 and his confidence method to average. In effect, Mike is specifying that the OCR engine should only be confident that it has returned an accurate value if the region's average confidence level is at least 55 out of 100.
- Clear data: Specify what value should be returned if the OCR engine does not meet the region's confidence level. If you select True, a blank value will be returned. If you select False, the OCRed value will be returned, despite the fact that it has failed to meet the confidence level.
- Mark field: Specify whether Quick Fields should visually distinguish fields populated with an OCRed value that did not meet the confidence level. This setting applies regardless of whether the Clear data option is set to True or False.
Advanced
- Module: Specify a recognition module for the OCR engine to use. This setting should only be changed from Default by advanced users familiar with the alternatives (Dot matrix, 2-way vote, 3-way vote and Asian).
- Custom Character Preference: If you know the specific pattern for the information to be read from the zone, you can specify a character preference for each individual character in the string. The types of characters are represented by the following symbols:
- @ - Letters
- # - Numbers
- ! - Punctuation marks.
- . - No preference
Example: Mark is reading dates from a particular zone. The dates are always in a format similar to 08/01/2009, but sometimes the number one is read as a slash and vice versa. He sets the character preference to ##!##!#### to set the preference for each character in the string for letters or numbers, depending on its position.
- Click Restore original defaults to revert the settings to their default state. To set the newly defined settings as default, select Set current as default.