OmniPage Zone OCR
![]() OmniPage Zone OCR
OmniPage Zone OCR ![]() performs Optical Character Recognition (OCR) to generate text from a specified area of an image. It can be used in Pre-Classification Processing, First Page Identification, Page Processing, Last Page Identification, or Post-Processing. You can draw or specify the coordinates of a box in a particular area of a sample image, and text will be extracted from that area of all the pages processed with that process. This text, in turn, can be used in a number of different ways. The most common ways to use information extracted from an image via OmniPage Zone OCR are to identify documents and automatically populate fields. OmniPage Zone OCR can also be used to name documents and create folders.
performs Optical Character Recognition (OCR) to generate text from a specified area of an image. It can be used in Pre-Classification Processing, First Page Identification, Page Processing, Last Page Identification, or Post-Processing. You can draw or specify the coordinates of a box in a particular area of a sample image, and text will be extracted from that area of all the pages processed with that process. This text, in turn, can be used in a number of different ways. The most common ways to use information extracted from an image via OmniPage Zone OCR are to identify documents and automatically populate fields. OmniPage Zone OCR can also be used to name documents and create folders.
Note: OmniPage Zone OCR does not associate any text with the document. It just reads and gives you access to what it reads in a token. If you want text associated with the document, use OmniPage OCR.
Example: The City of Wonderland configures a session to process building permit applications. Though they are mixed in with other documents, the applications all have "Building Permit Application" written at the top of the first page. They create a document class called "Permit Application" and configure an OmniPage Zone OCR process in the First Page Identification stage to generate text from a region at the top of the page and identify it as belonging to the class if it contains the words "Building Permit Application" at the top.
Example: The City of Wonderland also wants to retrieve other information from the building permit applications and insert it into the fields. They create OmniPage Zone OCR zones in the regions that contain the date and the name of the applicant and insert tokens representing those zones into the document fields. When the documents are processed, the data will be automatically entered into the fields.
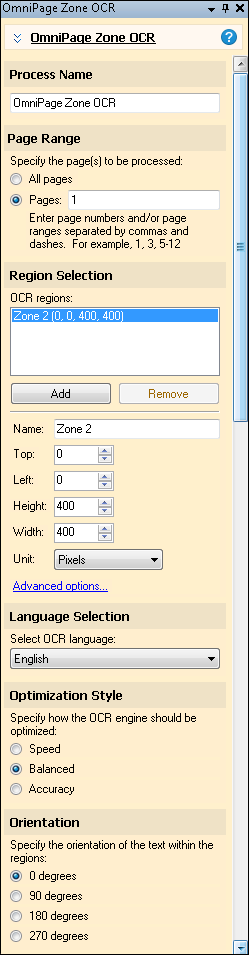
To use OmniPage Zone OCR
- In the Session Configuration Pane, select the stage of processing where you want to use OmniPage Zone OCR.
- In the Tasks Pane, select OmniPage Zone OCR.
- You can optionally enter a name for the process under Process Name.
- Move through each step of the wizard at the bottom of the pane. You can also click Skip Wizard to display and configure the properties all at once.
- Page Range: When configuring a process in Page Processing or Post-Processing, you will be prompted to specify a page range. In other stages, default settings will be automatically applied.
Note: When Zone OCR is configured to extract information from a zone on multiple pages, it only retains the value of the zone on the last page processed. If you want to accumulate all the values, use the Token Accumulator process.
- Region Selection: Define one or more regions, or zones, to be read by the OmniPage Zone OCR process.
- To define a region, drag and resize the zone on the Display Pane or specify coordinates in pixels or by percentage in the Tasks Pane.
Tip: If you are zoomed in to a specific area of an image, adding a zone will place it in the top left corner of the zoomed in image for convenience.
- Specify a name for the region. This will also be the name of the token that represents the value read from the region.
- To define an additional region with the same settings, click Add again.
- To remove a region, select it and click Remove.
- To configure advanced OCR options for a specific region, select the region and click Advanced options. More info.
- Identification Condition: When configuring OmniPage Zone OCR in First Page Identification, you will be promoted to set an identification condition to match the information read from the region with the definitions for the document class.
- Language Selection: Select a language to help optimize the character recognition.
Note: Arabic and Thai will be available if you are licensed for them in Quick Fields 10.1 and later.
- Optimization: Specify an optimization style. There is generally a trade-off between speed and accuracy.
- Speed: Reduces the amount of time it takes to OCR. Generated text may be less accurate.
- Balanced: Neither optimum speed nor optimum accuracy, but between the two.
- Accuracy: Increases OCR quality. Processing time will also be increased.
- Orientation: Specify the zone's orientation. If a captured document's text in the zone matches this setting, OCR will be more accurate.
Tip: 0 degrees represents a standard page with text that reads from left to right. 180 degrees represents a page that appears upside down.
- Optional: To preview how this enhancement will affect scanned images and OCRed or extracted text, test processes. For the best results, add a custom sample page before testing. Adjust and test until you are satisfied with the results.
Note: Zones can be copied and pasted within this and other processes that contain zones. When copying a zone within this process, pasting using CTRL + V will paste the zone directly on top of the zone you copied. Right-clicking on a different area of the image and selecting Paste Zone from the context menu will paste the copied zone where you right-clicked. The advanced settings will be copied as well.
Note: Local image enhancements can be used with OmniPage Zone OCR.
Note: If you define a zone OCR region using percentages for scanned pages of a certain size, the size and placement of the region will change if a page of a different dimension is scanned. For example, the region defined for a scanned page that is 8.5 x 11 in size will be a different size and in a different location on a scanned page that is 8.5 x 14.