You can add a custom sample page (image and/or text) to a document class or the Pre-Classification Processing stage of processing so you can test processes and image enhancements on a representative image or text before scanning a large group of documents. Custom sample pages can be added by importing from a network drive or scanning with the scan source you are using for the session. The sample text portion of a sample page can be OCRed from a scanned or imported image or directly imported.
To create a new sample page
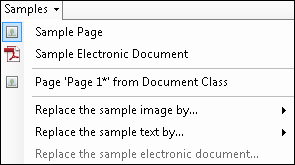
- From the Image Toolbar, select Samples. You can also right-click on the sample image or text displayed and hover over Sample Pages.
Note: If you are configuring sample pages in the Pre-Classification Processing stage, the
 Samples menu will look a little different. This is because you can configure electronic documents as sample pages in the Pre-Classification Processing stage.
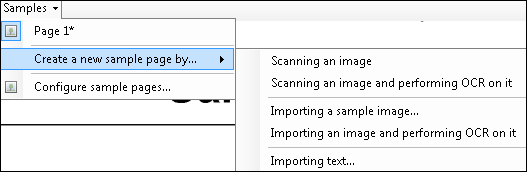
- Hover over Create a new sample page by and select one of the following options:
- Scanning an image: Select this option if you want to scan images with the scan source you are using for the session. Place a document on the scanner or select a retrieval directory for Universal Capture or Laserfiche Capture Engine. The first available image from the scan source will replace the default sample image. This option will scan in an image only.
- Scanning an image and performing OCR on it: Select this option if you want to scan an image with the scan source you are using for the session and OCR the image to create sample text from it. Place a document on the scanner or select a retrieval directory for Universal Capture or Laserfiche Capture Engine. The OCR Options dialog box will open.
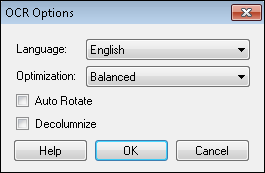
- Select a language from the Language drop-down menu to help optimize the character recognition.
- Select an optimization style for your image from the Optimization drop-down menu.
- Select Auto Rotate to temporarily rotate the image to an orientation suitable for OCR. After the OCR process is performed, the image will return to its original orientation.
- Select Decolumnize to convert multiple columns of generated text into a single column. Clearing the checkbox will preserve column formatting in the OCRed text, even if that separates words and sentences.
- Importing a sample image: Select this option if you want to import images from a network location. Browse to the location of the image and click Open.
- Importing an image and performing OCR on it: Select this option if you want to import images from a network location and OCR the images to create sample text. Browse to the location of the image and click Open.
- Importing text: Select this option if you want to import text only and no image. Browse to the location of the text file you want to import.
Note: Only .txt files can be imported as sample text files.
Note: You can also configure sample pages from the Document Class Options dialog box under Sample Pages.
Note: See Viewing and Modifying Sample Page Options to further modify your sample pages.