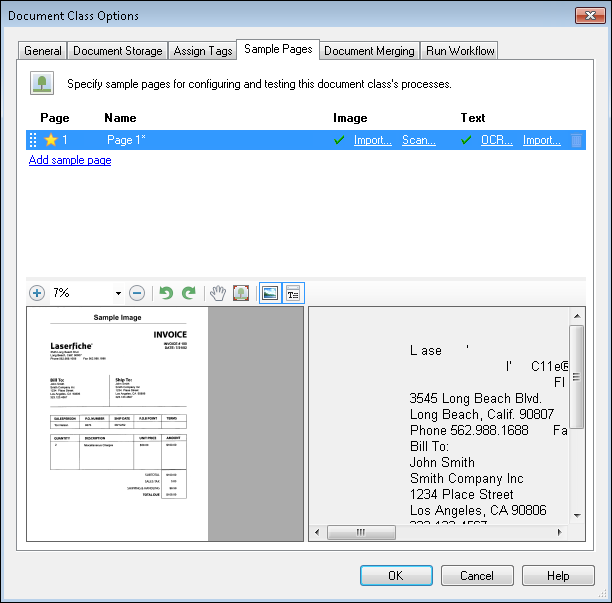
In the ![]() Sample Pages tab of the Document Class Options dialog box, you can view the sample page settings for a document class and modify the sample pages to suit your needs.
Sample Pages tab of the Document Class Options dialog box, you can view the sample page settings for a document class and modify the sample pages to suit your needs.
To view and modify Sample Page Settings
- Select the name of the document class and do one of the following:
- From the Samples menu, select
 Configure sample pages.
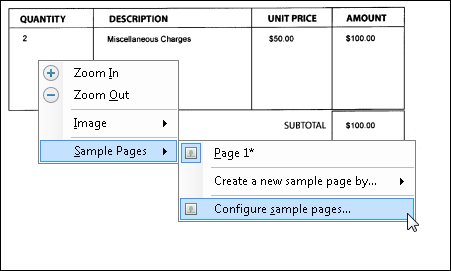
 - Right-click on the sample image or text currently displayed, hover over Sample Pages, and select
 Configure samples pages.
 - Right-click on a document class, select Document Options, and select the Sample Pages tab.
- From the Samples menu, select
- The Document Class Options dialog box will open to the
 Sample Pages tab.
To rearrange sample pages
- Drag the grip icon
to the left of the page number to the desired location.
To rename sample pages
- Double-click the page's name under the Name column, type the new name, and press Enter.
To set a sample page as the default
- Select the star
 next to the sample page you want to set as the default page. A yellow star indicates that page as the default page.
Note: The default sample page will be used when you specify a page or page range that does not have a corresponding sample page when configuring a process. For example, if you have sample pages for pages 1 and 2 only, but you configure a process to run on page 3, the default sample page will be used for page 3.
To delete a sample page
- Click the trash can
 to the right of the page's row.
To add/create another sample page
- Click
 Add sample page below the last sample page listed. You will then be able to select Import image, Scan image, Import text, or OCR the sample image at the bottom of the dialog box in the
  preview area. Scan, import, and OCR as desired.
To replace a sample page with another sample page
- If replacing an image, select the page associated with the image you want replaced and click Importor Scanunder the
 Image column.
 - If replacing text, select the page associated with the text you want replaced and click OCRor Importunder the
 Text column.
 - You will see a preview of the selected sample page (image and text) at the bottom of the dialog box. If you are viewing an image with no OCRed text, you can click Import text or OCR the sample image to generate it. You can zoom in on the image, rotate it 90 degrees to the left or right, and view it in a full-screen window. If you are viewing text with no associated image, you can click Import image or Scan image.
You can assign a sample page to a particular page number. This is useful when you are configuring processes or image enhancements to work on only specific pages of each document.
To assign a sample page a page number
- Double-click the page number in the Page column. Type the new page number and press Enter.
You can also view or modify sample pages using the Preview Toolbar. This toolbar appears above the displayed sample page.
| Item | Function |
|---|---|
|
|
Zooms in. |
|
|
Displays an image at a preset zoom setting. Select Fit to match the current size of the Laserfiche Scanning window. |
|
|
Zooms out. |
|
|
Rotates an image 90 degrees (left). |
|
|
Rotates an image 90 degrees (right). |
|
|
Pans an image. Drag in the direction you want to review. |
|
|
Displays the selected sample image in a maximized window. |
|
|
Displays the sample page's image. |
|
|
Displays the sample page's text. |


