OmniPage OCR
![]() OmniPage OCR
OmniPage OCR ![]() . Once text has been extracted from an image, it can be stored and associated with the image in Laserfiche.
. Once text has been extracted from an image, it can be stored and associated with the image in Laserfiche.
Many of the image enhancements available in Quick Fields are designed to improve the results of OmniPage OCR. For example, if the documents to be scanned in the session have been photocopied many times, they may have gray, speckled backgrounds or characters with gaps in them. You could configure a session that uses Despeckle to clean up the extra pixels in the background and Smooth to even out the shapes of the characters.
Where in the Quick Fields session you will use OmniPage OCR is determined by what you plan to accomplish with it. OmniPage OCR is very resource-intensive and can be slow if the image quality is poor, the image was scanned improperly, or if memory is limited. On the other hand, OmniPage OCR is a prerequisite for some processes, such as Auto-Annotation. OmniPage OCR is only available in Pre-Classification Processing, Page Processing, and Post-Processing. It cannot be used as a First Page or Last Page Identification process. If you want to use a process that depends on OmniPage OCR on a particular document class, you will probably want to use OmniPage OCR in Page Processing for that document class before the other process. If none of the other processes used in the session depend on OmniPage OCR, you can use it in Post-Processing, where it will be applied while the documents are sent to Laserfiche, even if this is scheduled to occur at a later time. This helps you save time during processing.
Example: Ernest is configuring a session to process letters sent to the State Tax Board pertaining to tax audits. He wants to use Auto-Annotation to redact any social security numbers found in the letters. In Page Processing, he configures OmniPage OCR and then Auto-Annotation so text will be extracted from the document and then matched against the pattern of a social security number.
Example: Bertram is configuring a session that will process patient surgery records by looking up the patient identification number in a database and populating the Laserfiche fields with additional information from the database. He wants to extract the text from the entire document, but does not need to do so during processing. He configures the session to use OmniPage OCR in Post-Processing, so that the time-consuming work of extracting the text will take place when the documents are sent to the Laserfiche repository, which will happen at night.
To Use OmniPage OCR
- In the Session Configuration Pane, select the stage of processing where you want to use OmniPage OCR.
- In the Tasks Pane, select OmniPage OCR.
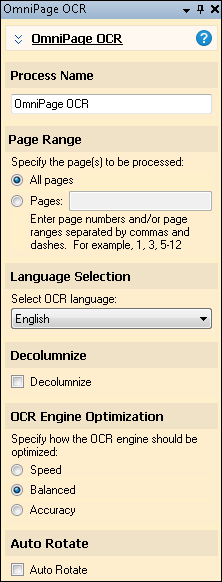
- You can optionally enter a name for the process under Process Name.
- Move through each step of the wizard at the bottom of the pane. You can also click Skip Wizard to display and configure the properties all at once.
- Page Range: When configuring this process in Page Processing or Post-Processing, you will be prompted to select a page range. In other stages, default settings will be automatically applied. When selecting a page range, you can select all pages or specify particular pages.
- To apply the process to every page, select All Pages.
- To apply it to selected pages, select Pages and specify pages and/or page ranges. The starting and ending numbers in a range determine the first and last pages in the range.
- Language Selection: Select a language to help optimize the character recognition.
Note: Arabic and Thai will be available if you are licensed for them in Quick Fields 10.1 and later.
- Decolumnize: Select Decolumnize to convert multiple columns of generated text into a single column. Clearing the checkbox will preserve column formatting in the OCRed text, even if that separates words and sentences.
- Optimization: Specify an optimization style. There is generally a trade-off between speed and accuracy.
- Speed: Reduces the amount of time it takes to OCR. Generated text may be less accurate. Choose this option if you are more concerned about the speed of your Quick Fields session than about having a few errors in the generated text.
- Balanced: Neither optimum speed nor optimum accuracy, but between the two. Choose this option if you want the generated text to be fairly accurate, but have more than a few documents and prefer the Quick Fields session not take the maximum amount of time to run.
- Accuracy: Increases OCR quality. Processing time will also be increased. Choose this option if you must have the most accurate text possible and are not concerned about how long it takes to run the Quick Fields session or have only a few documents to process.
- Auto Rotate: Enable Auto Rotate to temporarily rotate images to an orientation suitable for OCR. After the OmniPage OCR process is performed, the image will return to its original orientation.
- Optional: To preview how this enhancement will affect scanned images and OCRed or extracted text, test processes. For the best results, add a custom sample page before testing. Adjust and test until you are satisfied with the results.
To see the results of the OCR process, click the Text Pane button to display the text. Adjust and test until you are satisfied with the results.
Note: Some processes come with the basic Quick Fields installation, and some must be purchased as add-ons. Contact your reseller for more information.