Auto-Annotation
![]() Auto-Annotation
Auto-Annotation ![]() adds Laserfiche annotations to text that fits a certain specified pattern. The annotations will be applied to an imaged document and its associated text, or to the text associated with an electronic document (but not the electronic document itself). Auto-Annotation can be used in Pre-Classification Processing, Page Processing, or Post-Processing.
adds Laserfiche annotations to text that fits a certain specified pattern. The annotations will be applied to an imaged document and its associated text, or to the text associated with an electronic document (but not the electronic document itself). Auto-Annotation can be used in Pre-Classification Processing, Page Processing, or Post-Processing.
Note: Auto-Annotation requires text associated with an image or electronic document. You may need to configure OCR or Text Extraction before Auto-Annotation. You can also extract text from PDFs or retrieve it using Laserfiche Capture Engine.
Example: Alice is processing letters that may contain social security numbers somewhere in them, but the social security numbers may not be on all documents and will probably be in different locations on each letter that does contain them. She configures Auto-Annotation to look for a pattern of digits and dashes that fits social security numbers, and to redact all instances that match that pattern.
To configure Auto Annotation
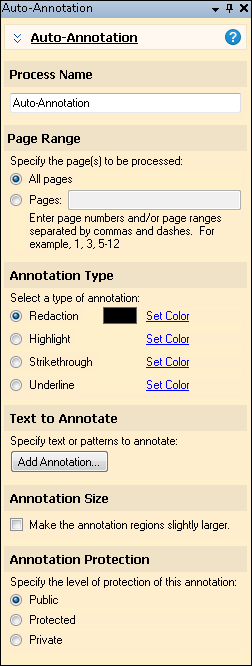
- In the Session Configuration Pane, select the stage of processing where you want to use Auto-Annotation.
- In the Tasks Pane, select Auto-Annotation.
- You can optionally enter a name for the process under Process Name.
- Move through each step of the wizard at the bottom of the pane. You can also click Skip Wizard to display and configure the properties all at once.
- Page Range: When configuring this process in Page Processing or Post-Processing, you will be prompted to specify a page range. In other stages, default settings will be automatically applied.
-
- Redaction
- Highlight
- Strikethrough
- Underline
- Text to Annotate: When you click Add Annotation, the New Annotation dialog box will appear.
- Specify a name for the annotation that will help you remember its function when reviewing the session later.
- Specify the text to annotate.
- You can specify text—for example, if you want to highlight a particular word.
- You can select the pattern button to use pattern matching expressions to annotate any text that matches a particular pattern (such as a social security number).
- You can manually enter a token into the Pattern box. This will account for patterns that are different per document. For example, if you want a different client name redacted on each document, input the %(Field.ClientName) token into the Pattern box.
- Select Test to enter a sample value and see whether the regular expression works.
No token picker is available, therefore, you must manually input the token syntax. - Specify a description that will help you remember the purpose of the annotation and the regular expression when reviewing the session later.
- Click OK.
- When you click on the summary of the annotation, the Edit Annotation dialog box will appear and you can modify any of these settings.
- Annotation Size: When Make the annotation regions slightly larger is selected, the annotation will become slightly larger. This can help ensure redacted data is fully covered.
- Optional: To preview how this enhancement will affect scanned images and OCRed or extracted text, test processes. For the best results, add a custom sample page before testing. Adjust and test until you are satisfied with the results.
- Annotation Protection: Select if you want the annotation applied to be
- Public: The annotation will be visible to everyone.
- Protected: The annotation can only be modified by its creator or document owner.
- Private: The annotation will only be visible to its creator.
For each annotation type, you can click Set Color to change the color or create a custom color.
Note: Some processes come with the basic Quick Fields installation, and some must be purchased as add-ons. Contact your reseller for more information.