Text Extraction
![]() Text Extraction
Text Extraction
![]() generates text from electronic documents that have associated text. Its functionality is similar to using the "Generate Searchable Text" command on an electronic document in the Laserfiche Client. Once text has been extracted from a document, it can be sent along with the document to the repository, making the document full-text searchable in Laserfiche. In Quick Fields, Text Extraction can be used in conjunction with other processes, such as Pattern Matching, to categorize documents and populate metadata. Text Extraction can only be used in Pre-Classification Processing.
generates text from electronic documents that have associated text. Its functionality is similar to using the "Generate Searchable Text" command on an electronic document in the Laserfiche Client. Once text has been extracted from a document, it can be sent along with the document to the repository, making the document full-text searchable in Laserfiche. In Quick Fields, Text Extraction can be used in conjunction with other processes, such as Pattern Matching, to categorize documents and populate metadata. Text Extraction can only be used in Pre-Classification Processing.
Note: Ensure you have Keep electronic file selected in either the Laserfiche Capture Engine or Universal Capture options dialog if you are extracting text from PDFs. Keep in mind we recommend you generate text from PDFs rather than use this Text Extraction process.
Example: The City of Wonderland has several years' worth of City Council minutes saved in Microsoft Word documents. They want to sort the documents into folders depending on whether the plans for the new Metropolitan Water District were discussed, and populate the fields associated with each document with the meeting date and names of guest speakers. They configure a session with Text Extraction in Pre-Classification Processing to extract the text from the Word documents. They then configure a Text Identification process in First Page Identification to look for the phrase "Water District" in the extracted text and identify documents that contain it as belonging to a class they name "Water Discussion." In Page Processing, they configure a Pattern Matching process to look for the terms "Date" and "Guest Speakers" in the extracted text and place the information that follows those terms in the Laserfiche fields.
To use Text Extraction
- In the Session Configuration Pane, select Pre-Classification Processing.
- In the Tasks Pane, select Text Extraction.
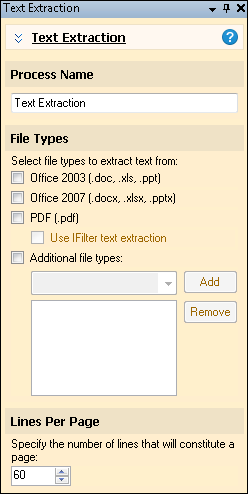
- You can optionally enter a name for the process under Process Name.
- Move through each step of the wizard at the bottom of the pane. You can also click Skip Wizard to display and configure the properties all at once.
- File Types: Select file types to extract text from using this process. You will only be able to select file types for which you have the corresponding program installed on the same machine as Quick Fields.
- Lines Per Page: This setting determines the page breaks in the text pages associated with an electronic document. Specify the desired number of lines that will constitute a page.
- Optional: To preview how this process will affect OCRed or extracted text, test processes. For the best results, add a custom sample page before testing. Adjust and test until you are satisfied with the results.
Note: You can right-click in the text pane to access the Sample Pages menu.
Note: Some processes come with the basic Quick Fields installation, and some must be purchased as add-ons. Contact your reseller for more information.