Creating a Default Setting for Unassigned Documents
If you have the Document Classification add-on or Quick Fields Agent, you can create default properties for documents that have not been assigned to any document class. You can send them all to the same folder in a repository. This is helpful if you want someone other than the scanner operator to be able to review the documents that were not processed in the session.
To set default properties for unidentified documents
- Select the Unidentified Documents node.
- In the Tasks Pane, click Modify settings.
- The
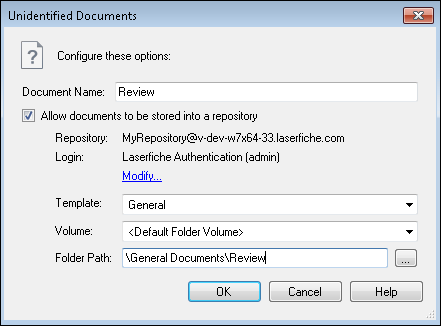
 Unidentified Documents dialog box will appear.
 - By default, all unidentified documents will be given the name Untitled. You can change the default name, and all documents in the Unidentified Documents section will be assigned that name.
- If desired, specify a Laserfiche repository where unidentified documents will be sent.
To send all documents in the Unidentified Documents section to the same place in a Laserfiche repository, do one of the following:
- Select the Network Repository radio button.
- Next to Server, type or select the new server.
- Next to Repository, type or select the new repository.
- To configure Quick Fields to use secure network communications when connecting to Laserfiche, select the Use TLS Connection checkbox.
Note: If you do not use the fully qualified domain name (i.e., servername.laserfiche.com) when entering the server name, you will not be able to authenticate using TLS. You will receive an Internal SSL error when attempting to validate the connection.
- Click Configure authentication to specify the sign-in credentials the document class will use to connect to Laserfiche.
- Select Windows authentication to log in using the Windows credentials associated with the user running the session.
- Select Laserfiche authentication to enter credentials associated with a Laserfiche account.
- Optionally, select the Laserfiche Directory Server tab to sign in using Laserfiche Directory Server.
- Enter your Laserfiche Directory Server username and password.
- Click Windows Authentication and sign in using your Windows account.
- Sign in using SAML authentication.
Note: Laserfiche Webtools Agent lets Quick Fields and Quick Fields Scanning connect to a Laserfiche repository with Laserfiche Directory Server authentication using a longer session so you will not have to enter credentials continuously to stay connected.
- Click Validate to validate the connection, then click OK.
- Select the Cloud Repository radio button.
- Click Configure Authentication.
- Enter your Laserfiche Cloud account ID and click Next. You can find the ID in Account Administration under the Plan tab (if you are signed in as an administrator) or in Repository Administration under Summary (if signed in as a user with appropriate access).
- If single sign-on (SSO) has been configured, you can sign in using your identify provider or enter your Laserfiche Cloud username and password and click OK.Note: Windows authentication cannot be used to connect to Laserfiche Cloud.
Note: The Laserfiche Cloud session connection will only be connected for a certain amount time. After this time period, users will have to authenticate the session connection again.
Once you have established a valid connection, you can select the default template, volume, and folder path for unidentified documents.
- Template: Use the drop-down list to choose from the templates available to you in the specified repository.
- Volume: Use the drop-down list to select a volume.
- Folder Path: Specify a folder path or click the Browse button
to navigate to an existing folder path.
- To apply these settings, click OK.
