You can create new and view existing annotations on a Laserfiche imaged or text document. You can also see information about when the annotations were created and by whom.
Note: Only the highlight, redaction, underline, and strikethrough annotations can be added to the text in the Text pane of a document.
To create a new annotation
- Open a document.
- Press the Annotation
button in the bottom toolbar.
- At the bottom, you have the option to add a sticky note, stamp, and freehand drawing. Pressing the More button lets you add a highlight, strikethrough, underline, and a redaction.
To add a sticky note
- Press the Sticky Note button
.
- In the Sticky Note dialog box, type the text you want placed in the sticky note, and press OK. Press and hold the note to drag it to a new location.
- Press the Color button
to change the sticky note color.
- Press the Text button
to edit the sticky note's text.
- Press the Delete button
to delete the sticky note.
- You can press Undo
at the top to remove your last addition or Redo
 to add it back.
 - Press on the document to unselect the current annotation and add additional annotations from the annotation toolbar at the bottom.
To add a stamp
- Press the Stamp button
in the bottom bar.
- Choose the personal or public stamp you want to add from the Stamp list and it will be automatically placed on the document for you. Press and hold the stamp to drag it to a new location. You can also use the drag handles to resize the stamp.
- Press the Color button
to change the stamp's color. Press the Back button to go back.
- Press the Opacity button
to change the stamps transparency. Press the Back button to go back.
- Press the Delete button
to delete the stamp.
- You can press Undo
at the top to remove your last addition or Redo
 to add it back.
 - Press on the document to unselect the current annotation and add additional annotations from the annotation toolbar at the bottom.
To add a freehand annotation
- Press the Draw button
.
- Draw on the image.
- Press the Color button
to change the drawing's color. Press the Back button to go back.
- Press the Line Width button
to change the width of the drawing. Drag the slider to the desired width. Press the Back button to go back.
- Press the Opacity button
to change the transparency of the drawing. Press the Back button to go back.
- Press the Delete button
to delete the stamp.
- You can press Undo
at the top to remove your last addition or Redo
 to add it back.
 - Press on the document to unselect the current annotation and add additional annotations from the annotation toolbar at the bottom.
To add a highlight to the image
- Press the More button in the annotation toolbar at the bottom.
- Press Highlight.
- A highlight box will appear on the image. Use the drag handle to resize it and hold and drag the highlight to move it.
- Press the Color button
to change the highlight's color. Press the Back button to go back.
- Press the Delete button
to delete the highlight.
- You can press Undo
at the top to remove your last addition or Redo
 to add it back.
 - Press on the document to unselect the current annotation and add additional annotations form the annotation toolbar at the bottom.
To add a highlight to the text
- Open the document and switch to text view.
- Select the text you want to highlight.
- Press the Annotation button in the bottom toolbar, then press the Highlight button
.
- To delete a highlight, press the annotation list button in the bottom toolbar to view all the annotations on the document. Swipe left on the highlight you want to delete and press Delete.
Note: A highlight added to an image will be synced to its text when the document is saved and vice versa.
To add a strikethrough to the image
- Press the More button in the annotation toolbar at the bottom.
- Press Strikethrough.
- A strikethrough box will appear on the image. Use the drag handle to resize it and hold and drag the strikethrough to move it.
- Press the Color button
to change the strikethrough's color. Press the Back button to go back.
- Press the Rotate button to rotate the strikethrough 90 degrees.
- Press the Delete button
to delete the strikethrough.
- You can press Undo at the top to remove your last addition or Redo to add it back.
- Press on the document to unselect the current annotation and add additional annotations from the annotation toolbar at the bottom.
To add a strikethrough to the text
- Open the document and switch to text view.
- Select the text you want to strike through.
- Press the Annotation button in the bottom toolbar, then press the Strikethrough button
.
- To delete a strikethrough, press the annotation list button in the bottom toolbar to view all the annotations on the document. Swipe left on the strikethrough you want to delete and press Delete.
Note: A strikethrough added to an image will be synced to its text when the document is saved and vice versa.
To add an underline to the image
- Press the More button in the annotation toolbar at the bottom.
- Press Underline.
- An underline box will appear on the image. Use the drag handle to resize it and hold and drag the underline to move it.
- Press the Color button
to change the underline's color. Press the Back button to go back.
- Press the Rotate button to rotate the underline 90 degrees.
- Press the Delete button
to delete the underline.
- You can press Undo
at the top to remove your last addition or Redo
 to add it back.
 - Press on the document to unselect the current annotation and add additional annotations from the annotation toolbar at the bottom.
To add an underline to the text
- Open the document and switch to text view.
- Select the text you want to underline.
- Press the Annotation button in the bottom toolbar, then press the Underline
button.
- To delete an underline, press the annotation list button in the bottom toolbar to view all the annotations on the document. Swipe left on the underline you want to delete and press Delete.
Note: An underline added to an image will be synced to its text when the document is saved and vice versa.
To add a redaction to the image
- Press the More button in the annotation toolbar at the bottom.
- Press Redaction.
- If a redaction reason is required, you will be asked to choose a reason for the redaction. The reason can be viewed in the redaction's metadata when viewing the annotations in the Annotation pane.
- A redaction box will appear on the image. Use the drag handle to resize it and hold and drag the highlight to move it.
- Press the Color button
to change the redaction's color. Press the Back button to go back.
- Press the Delete button
to delete the redaction.
- You can press Undo
at the top to remove your last addition or Redo
 to add it back.
 - Press on the document to unselect the current annotation and add additional annotations from the annotation toolbar at the bottom.
To add a redaction to the text
- Open the document and switch to text view.
- Select the text you want to redact.
- Press the Annotation button in the bottom toolbar, then press the Redaction
button.
- If a redaction reason is required, you will be asked to choose a reason for the redaction.
- To delete a redaction, press the annotation list button in the bottom toolbar to view all the annotations on the document. Swipe left on the redaction you want to delete and press Delete.
Note: A redaction added to an image will be synced to its text when the document is saved and vice versa.
- Press the Sticky Note button
- When finished adding your annotations, tap the check mark at the top. To cancel, press the X at the top.
- At the bottom, you have the option to add a sticky note, stamp, and freehand drawing. Pressing the More button lets you add a highlight, strikethrough, underline, and a redaction.
Attachment Annotations
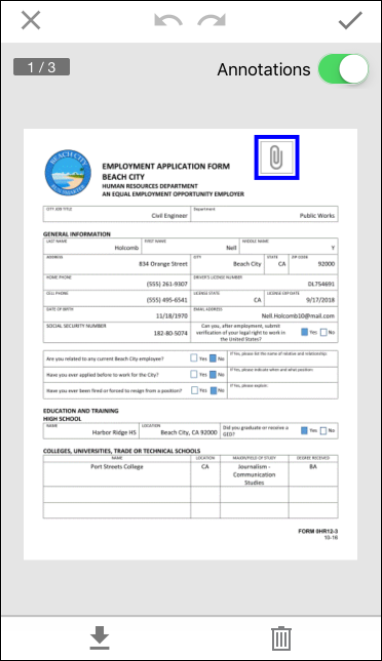
Attachment annotations (added using the Windows or web clients) can be deleted, shared, or uploaded to the repository as a new document using the Laserfiche app.

- Open a document that contains an attachment annotation.
- Press the attachment annotation on the document to select it.
- Press the Download button in the bottom toolbar to open it in the Document Viewer. From there, you can press the Export button at the top to export it to another app or save it to a repository.
- Press the Delete button in the bottom toolbar to delete the attachment annotation.
To view annotations
- Open a document.
- Press the Annotation button
in the bottom toolbar.
- Optional: Toggle the Annotations button to On to see the annotations on an imaged document, or Off to hide them. Annotation's will always be displayed in the Text pane.
- Press the List button
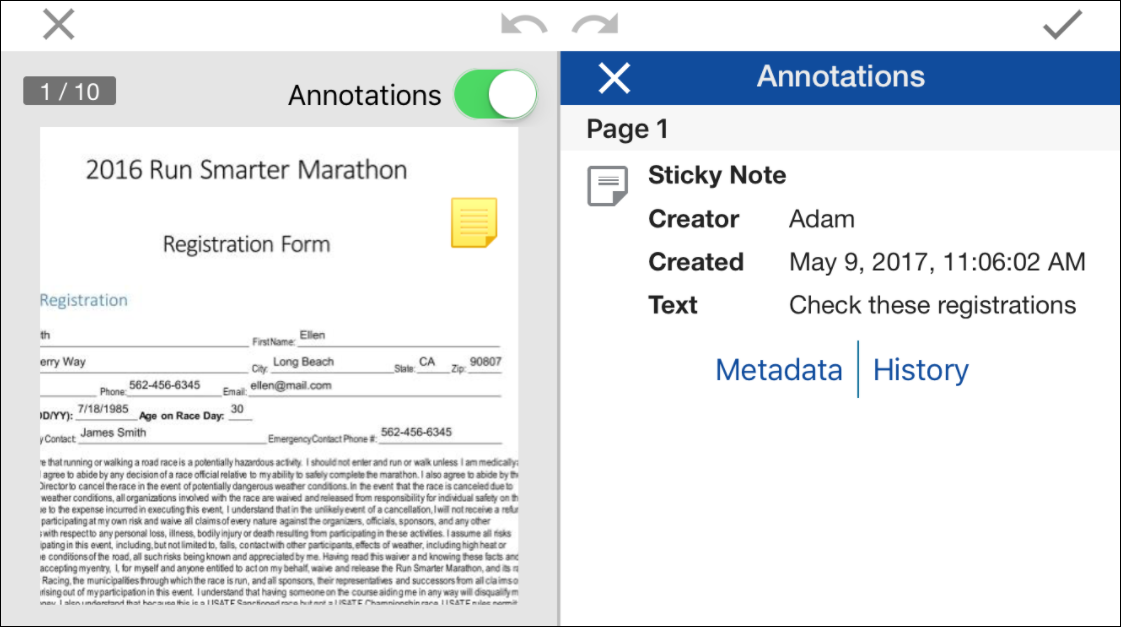
in the bottom annotation toolbar to view all annotations listed in the order in which they appear on the document. Included in the list is the type of annotation, the user who added the annotation, the time or date it was added, when it was modified, and any text in the annotation (e.g., the contents of a sticky note). Pressing on an annotation will take you to its location on the document. Swiping left on the annotation will give you the option to delete it.
- Press Metadata under the annotation to view the annotation's creator, when it was created, when it was modified, if a reason was selected (for redactions only), and any annotation comments. Select Private to ensure the annotation is only visible to its creator. Select Protected to ensure the annotation is only modified by its creator or document owner.
- You can track the history of a sticky note. Press History under the sticky note, and toggle the Track history button to On. When the text of the sticky note changes, it will be recorded under that sticky note's history. The sticky note history option can be configured in the Laserfiche Administration Console. If it's enabled in the Administration Console, users will not be able to disable it. If it's disabled in the Administration Console, users will be able to enable or disable it.
- Press the X to close the annotation list.
Note: Once annotations are on for one document, they will be on for all documents. Turn the Annotations button to Off to no longer display annotations.
