Configuring the Laser App Integration
Configuring the Laser App integration is a three-step process:
- An administrator must configure Laserfiche repository information for the Laser App web service.
- An administrator must create a template XML file for use with the Laser App Configuration File Download Page.
- Laser App users can then go to the Configuration File download page to download a .~ls file. Double-click the .~ls file to install the Save to Laserfiche integration for Laser App Enterprise.
Administrators
Configuring the Laser App import web service
- Browse to C:\Program Files\Laserfiche\Web Import Services\LaserAppListener\Config and open Config.xml with a text editor or XML editor.
- Next to <LaserficheServer>, specify your Laserfiche server host name.
- Next to <LaserficheRepository>, specify your Laserfiche repository name.
- Next to <LaserficheUserName> and <LaserfichePassword>, specify authentication information. The Laser App import web service logs in to the repository using this Laserfiche account and password. Leave these values blank to log in with Windows authentication using the identity of the LaserAppReceiverAppPool application pool in IIS.
- Optional: You can choose to encrypt the <LaserfichePassword> value using the LaserAppConfigEncryptionToggle utility. This utility is installed in the same location as the Config.xml file. The utility requires administrative rights; either run the utility from an administrator command prompt or right-click on the utility and choose the Run as administrator option. Run the utility again to decrypt the value in order to modify the password value.
- Configure the <Metadata> section to map Laser App information to Laserfiche fields. For example, <FieldValue name="Client's First Name">%(ContactRecord.ClientFirstName)</FieldValue> configures the integration to assign the Client's First Name field to the document and sets the value to the first name of a Laser App contact record. For a quick reference on available tokens, see Laser App Tokens.
- Next to <TargetFolder>, configure where you want to save the form in Laserfiche. You can specify a static folder, or use Laser App tokens to specify a dynamic path. For example, <TargetFolder>\*LaserAppUser\%(UserCustomData.LastName), %(UserCustomData.FirstName)</TargetFolder> configures the integration to retrieve the first name and last name of the Laser App user saving the form and creates a subfolder in the *LaserAppUser folder.
- Next to <TargetDocumentName>, configure the name of the document in the repository. You can use tokens to configure a dynamic name based on the form.
- Optional: Next to <LaserficheWebAccessURL>, specify the URL to your Laserfiche web client installation. After successfully saving to Laserfiche, the integration displays a confirmation page. Specifying a Laserfiche web client URL allows the confirmation page to include the Laserfiche web client links to the newly saved Laserfiche document.
- Optional: Next to <EnableApplicationLogging>, specify true if you want to log information in the Windows Event Log. <NotificationLevel> controls the amount of information you want logged in the Windows Event Log; valid options are:
- Error: Only log major errors.
- Warning: In addition to major errors, the integration also logs minor issues (e.g., field mismatch errors).
- Information: Verbose logging.
- None: No information is logged.
- Save your changes and close Config.xml.
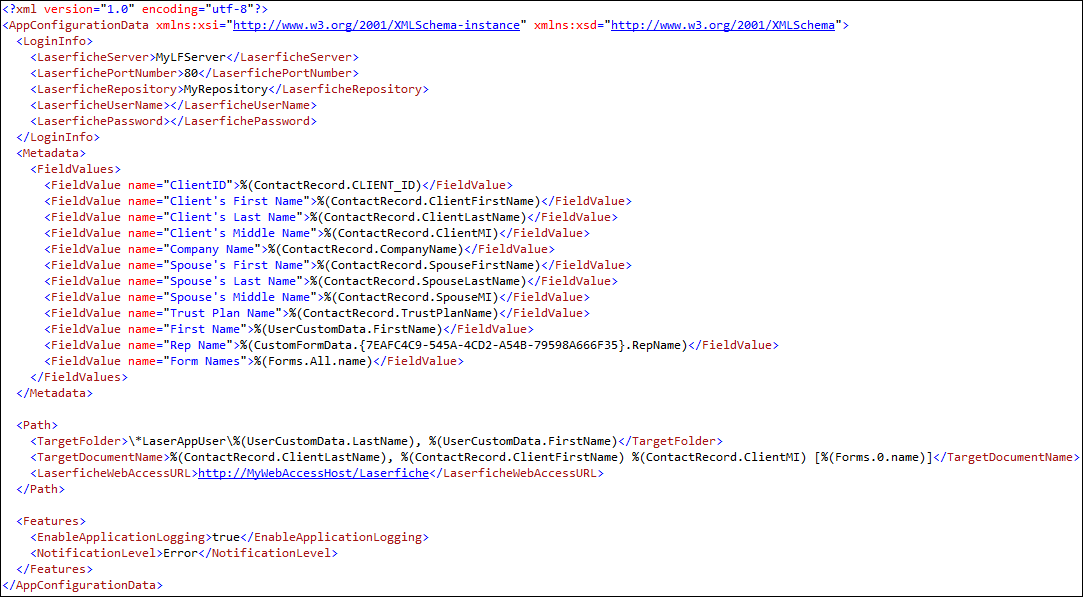
![]() Sample Laser App import web service Config.xml
Sample Laser App import web service Config.xml
Configuring the Laser App configuration file download page
Note: This step only affects the Laser App Enterprise desktop program and is not necessary when using Laser App Anywhere.
The Laser App Configuration File download page generates .~ls files that allow users to install the Save to Laserfiche option as a trusted application in Laser App. An administrator can configure the download page to generate optional settings:
- Non-Laser App custom field values that are available as tokens when saving forms to Laserfiche.
- Restricting the Save to Laserfiche option to certain Laser App forms.
To configure the download page:
- Browse to C:\Program Files\Laserfiche\Web Import Services\LaserAppListener\Config and open LaserAppTrustedApplicationConfig.xml with a text editor or XML editor.
- In the <FieldValues> section, add <FieldValue> elements to create custom fields not associated with Laser App form data. When users visit the configuration file download page, they can type in values for these fields. Their values are embedded into the .~ls Laser App configuration file that they download and run. These custom field values are included as tokens when saving to Laserfiche.
- In the <AllowedForms> section, you can limit the Save to Laserfiche option to only those forms that match the specified Laser App form ID. Leave the block blank if you do not want to restrict saving to Laserfiche.
displayName controls the label that users will see on the configuration page. customFieldName acts as the token name that will be available to the import web service. required controls whether users must specify a value before downloading the .~ls file.
Note: The Laser App form ID is available in Laser App by generating an XSLT stylesheet for the form.
![]() Sample LaserAppTrustedApplicationConfig.xml
Sample LaserAppTrustedApplicationConfig.xml

Laser App Users
Note: This step only affects the Laser App Enterprise desktop program and is not necessary when using Laser App Anywhere.
Adding the Save to Laserfiche option to Laser App Enterprise
The Laser App Configuration File download page streamlines the process of adding the Save to Laserfiche custom toolbar button to Laser App by automatically generating the required .~ls file.
To install the Laserfiche integration with Laser App Enterprise
- Open a web browser and visit http://MyWebServer/LaserAppReceiver/LaserAppUserConfig
- Type in required values.
- Click Download File and save the file to a temporary location.
- Double-click the newly generated Laser App configuration file (by default, LFTrustedApp.~ls) to add a Save to Laserfiche option under the Post All Forms toolbar button in Laser App.
Related Links