Settings
You can view and modify settings that will apply throughout Quick Fields Agent and to all schedules.
Note: You must be logged in as a System Administrator to see these settings.
To modify settings
- Click the name of the Quick Fields Agent Server in the left pane, then click Settings at the top right of the Contents Pane.
General
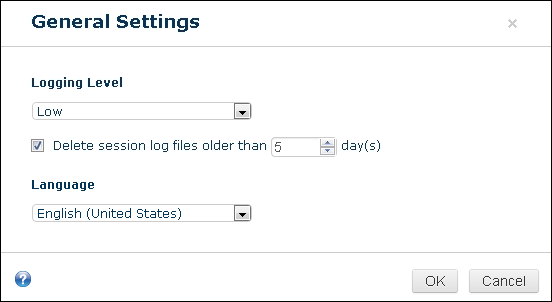
You can configure settings for how Quick Fields Agent logs will be retained. By default, the log files are saved to C:\Documents and Settings\All Users\Application Data\Laserfiche\Quick Fields Agent.

Logging
You can select the amount of detail the Quick Fields Agent Service will log to the Windows Event Log of the computer where it is installed (when the session started, the session it used, when the session completed, etc.).
Logging Level
The logging levels are cumulative. Each includes the information from the less detailed logging levels as well as the information described for each level.
- Critical: Includes only errors that prevent Quick Fields Agent from running.
- Low: Includes unexpected errors that may not necessarily prevent Quick Fields Agent from running.
- Medium: Includes warnings, which provide information about events and configurations that may be different from what the user expected.
- High: Includes informational messages about the running of sessions and the maintenance of the service.
- Diagnostic: Includes information about trivial errors that can generally be handled without user intervention but may be helpful when working with technical support.
- Diagnostic (Verbose): Includes detailed messages that may be repeated extremely frequently but may be helpful when working with technical support.
Log Retention
Quick Fields saves document processing information for each session it runs as a text file stored at C:\ProgramData\Laserfiche\Quick Fields Agent for Windows 10 and later). This information is displayed on the Instance History page and in the Event Viewer. It cannot be customized, but it can be retained in Quick Fields Agent. You can specify whether to delete these session log files after a certain number of days. The default setting is to delete log files older than five days.
To change the log retention settings
- To keep log files for a limited time: Select the checkbox next to Delete session log files older than and specify a number of days.
Service Language
If you have one or more Quick Fields Agent language packs installed, you can change the language the Quick Fields Agent Service will use to write log files and results. By default, log files will be generated in English even if you have language packs installed. Select another language from the Language menu.
Processing Settings
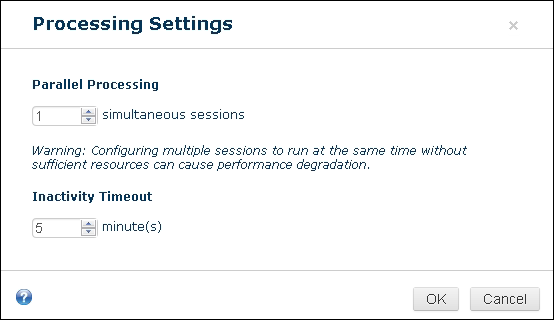
You can customize settings for how to run the scheduled Quick Fields Agent sessions to make the best use of available resources given your organization's particular sessions and needs.

Parallel Processing
Under Parallel Processing, you can specify whether sessions can run simultaneously. For each installation of Quick Fields, a maximum of two sessions can run per CPU on the machine running the Quick Fields Agent Service.
To change the parallel processing settings
- Select 1 to process one session at a time.
- Select 2 (or a higher number if available) to be able to process more than one session at a time.
Resource Use and Parallel Processing
While Quick Fields Agent can be configured to run multiple sessions simultaneously, the performance of sessions run with this setting will vary depending on the resources available on the machine where it is installed, the kinds of processes involved in the sessions, and when documents will be captured into each session. For example, if you have one session that conducts a great deal of OCR processing all day and another session that sorts and files a few documents at a time as they are added to an incoming folder, that combination may perform effectively for concurrent processing. If, on the other hand, you have one session conducting a great deal of OCR processing all day and another session that also performs resource-intensive processes on a great number of documents at once, attempting to run them concurrently may reduce the performance of both.
Inactivity Timeout
You can specify a number of minutes a session can be unresponsive before Quick Fields Agent will automatically stop it. There are several factors to consider when adjusting this setting. If there are a large number of sessions queued in Quick Fields Agent, a small number of minutes for the inactivity timeout can prevent one frozen session from causing a chain reaction that delays many further sessions. On the other hand, some complex processes, such as custom Lookup queries or elaborate Laserfiche Capture Engine filters, can cause a session to appear idle for some time, even though it is actually working as intended and will finish processing eventually. When you test your sessions, you can estimate the time needed for such complex processes and increase the number of minutes for the inactivity timeout accordingly, if necessary.
To change the inactivity timeout settings
- Adjust the number of minutes.
Email Notifications
Quick Fields Agent can be configured to send emails containing session information. These emails can contain the documents processed, time they were retrieved, errors encountered (with details), and warnings.
Note: Emails are configured for all sessions. They cannot be configured on a per session basis.
To configure Quick Fields Agent to send emails containing session results
- Click on the server in the left pane containing the sessions you want to configure emails for.
- To open the Email Notifications dialog box, do one of the following:
- In the Contents Pane, click Click To Set Up Email Notifications.
- Click Settings at the top right of the Contents Pane and select Email Notifications.
- The Email Notifications dialog box will open.
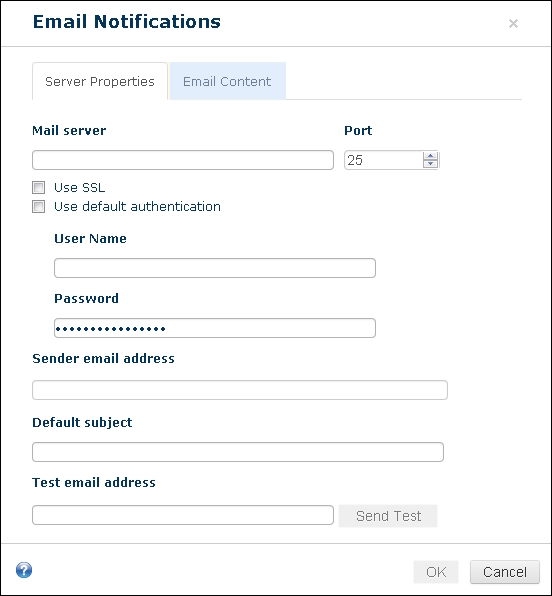
- Under the Server Properties tab, configure your email server, port, user name and password, sender email address, default subject, and a test email address if you want to test your email server configuration.

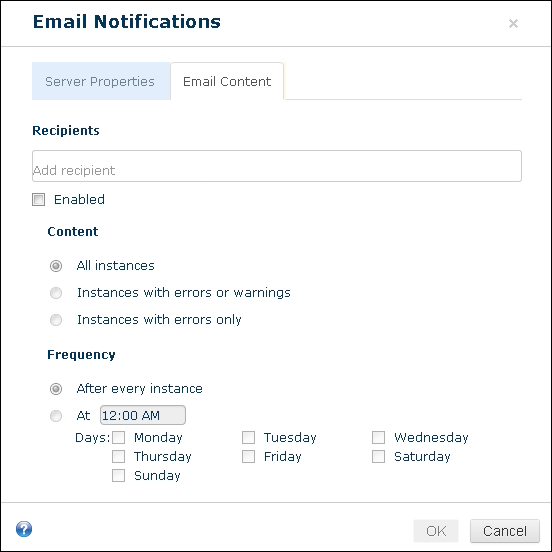
- Under the Email Content tab, configure the email recipients, whether or not you want this email feature enabled, the content that should be in the email (content on all instances, instances with errors or warnings, or instances with errors only). Also set how often you want the emails sent. You can select to have emails sent after every instance, at a certain time, or on a certain day.

- When finished, click OK.
Unregistering the Quick Fields Agent Server
To unregister the Quick Fields Agent Server, do one of the following:
- In the left pane, click the drop-down arrow next to the server name and select Unregister.
- Click Settings to the right of the server name inside the Contents pane, then click Unregister Server.