Working with a SAML Identity Provider
Laserfiche Directory Server supports SAML 2.0 tokens. You can add a SAML identity provider on the Laserfiche Directory Server administration site. This process lets you import SAML metadata and configure claim mappings for single sign-on support.
Configuring Single Sign-on (SSO) with SAML Authentication
- After you've specified the name, identity provider type, and host for your new SAML identity provider, select Enable SAML authentication.
- For quick configuration, import a metadata file for the SAML identity provider. Directory Server will attempt to automatically extract the issuer, endpoint, endpoint binding type, and certificate values from the metadata file.
Note: You can also manually enter values for Issuer, Endpoint, and Endpoint binding type, and manually select a certificate.
- For the Name ID format, the default value is:
urn:oasis:names:tc:SAML:1.1:nameid-format:unspecified
- For the Authentication context, specify the appropriate authentication method for your SAML identity provider. For example, if the SAML identity provider requires password authentication, the default value is:
urn:oasis:names:tc:SAML:2.0:ac:classes:PasswordProtectedTransport
If the identity provider requires certificate authentication, the value is:
urn:oasis:names:tc:SAML:2.0:ac:classes:X509
If the identity provider can require more than one authentication method, the value should be:
urn:oasis:names:tc:SAML:2.0:ac:classes:unspecified
Note: See the Authentication Context for the OASIS Security Assertion Markup Language (SAML) V2.0 standards document for a list of authentication context classes.
- Optional: Turn on the Always require re-authentication option to configure Directory Server to include the ForceAuthn="true" parameter in SAML requests. When set, the Identity Provider may require a user to sign in even if they have already signed in previously and their session is still valid. Note that not all identity providers support this option. You should verify that your SAML identity provider supports this option before enabling this option.
Note: It is recommended that administrators configure authentication policies within the SAML identity provider (i.e., Microsoft Entra ID, Okta, etc.) rather than within a SAML service provider (i.e., Laserfiche Directory Server). Identity provider authentication policies often provide useful conditionals, including risk-based ones.
- Optional: Depending on whether the selected certificate is located in the trusted root store, you can choose to Ignore certificate chain validation. By default, the issuer chain list must contain at least one issuer in the machine's root trusted store.
Warning: Laserfiche strongly recommends against enabling this option. This option is provided for troubleshooting purposes, as enabling this option can potentially weaken the security pattern. It is recommended to install all necessary certificate(s) in the machine "Trusted Root Certification Authorities" and "Intermediate Certification Authorities" certificate stores. For self-signed certificates, install the certificate itself in the "Trusted Root Certification Authorities" store to pass chain validation.
- Optional: Turn on Decrypt SAML assertions and provide decryption certificate information if your SAML identity provider is configured for encrypted SAML tokens. When enabled, this option means that Directory Server will only accept encrypted tokens from this identity provider. In addition to providing the thumbprint, you must also satisfy the following requirements:
- The Directory Server service user must have read permissions to the private key of the certificate.
- The SAML provider must include the signature in the encrypted assertion.
- Toggle Use machine store to Yes if the certificate is located in the current machine Personal store.
- Certificate must be trusted by the Laserfiche Directory Server computer. This can be done by adding the certificate, a copy of the certificate, or one of the issuer certificates to a trusted store.
- Store field is left at its default value Personal.
- Optional: Configure SAML Single Logout (SLO) Settings
- Optional: If you turn on the Sign authentication request option, you must provide the thumbprint (without spaces) of a certificate that satisfies the following requirements:
- The certificate must contain the private key for signing and the Directory Server service user must have read access to the private key. For instructions on setting private key permissions, see the following Laserfiche Knowledge Base article: https://support.laserfiche.com/kb/1014366.
- The certificate must be trusted by the Laserfiche Directory Server computer and pass certificate chain validation. You can check the trust status by opening the certificate, selecting the Certification Path tab, selecting each certificate in the chain, and verifying each has a certificate status of OK. If any certificates in the chain are not trusted, view the certificate and install the certificate in the appropriate certificate stores ("Trusted Root Certification Authorities" for root certificates and "Intermediate Certification Authorities" for intermediate certificates).
- The certificate must use the RSA signature algorithm.
- If you use a SAML discovery service, use the Hide identity provider button on sign-in page option to remove the default single-sign on button on the Directory Server sign-in page.
- Optional: If you are using Entra ID, you can configure Directory Server to use Microsoft Graph API to better handle processing users with more than 150 groups in their authentication token.
- In the Entra ID admin center, on the Overview page, take note of the Application (client) ID and Directory (tenant) ID values.
- In the Entra ID admin center, select the Laserfiche application and on the API permissions page, add application permissions that grants Laserfiche permission to read groups with Microsoft Graph.
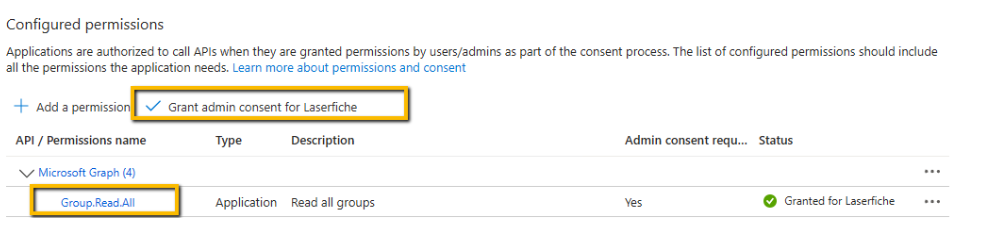
Important: The application needs at least User.Read.All and Group.Read.All in order to successfully get another user's memberships. Depending on your security configuration, it may be necessary to grant additional higher privileged permissions. Please see Microsoft's documentation for a list of additional potential permissions needed when working with Graph API .
- In the Certificates & secrets page, add a certificate or client secret for Laserfiche.
- Enter the above values in the Microsoft Graph API Settings section.
- On the computer hosting the Directory Server Security Token Service (STS), open the STS configuration site, by default, the address is: https://localhost/LFDSSTS/configuration
- Set the maximum number of minutes a session can remain idle before the user is signed out. These settings apply to all sessions that are authenticated through the STS instance being configured. You can configure different timeouts for whether a user selects This is a public computer checkbox on the sign-in page.
- Choose to show or hide certain elements on the sign-in page. The Hide Laserfiche Authentication option hides the Organization, Username, Password, and Sign in elements on the Directory Server sign-in page. The Hide Windows Authentication option hides the Windows Authentication button on the sign-in page.
Note: If both the Hide Laserfiche Authentication checkbox and Hide Windows Authentication checkbox are selected, the Directory Server sign-in page will be an empty page if you do not have AD FS authentication or SAML authentication turned on and configured for an identity provider.
- You can configure further settings for each licensing site you have on Directory Server. Select the Show organization drop-down list option to display a drop-down list of available organizations on the sign-in page. If you don't select Show organization drop-down list, or if the Directory Server licensing site is not configured to display the available organizations, the user will have to enter the name of their organization on the sign-in page.
- Select Enable automatic login if you want users to be automatically signed in with their identity provider account.
Note: To sign-in as a different user when Enable automatic login is enabled, users can sign out then type the alternate credentials on the sign in page.
- Select the organization that you want pre-selected (if you enable the organization drop-down list) or pre-entered (if you disable the drop-down list) on the sign-in page.
- Use the Customize Sign-in Page link to further configure a custom sign-in page that reflects your organization's branding and user experience standards.
- Configure an allowlist that restricts redirects to approved domains. Specify multiple domains by separating each domain with a space. When blank, Directory Server will default to allowing machines on the same domain as the STS.
- Click Update to apply your settings.
Configuring Single Logout (SLO) with SAML Authentication
When configured, Laserfiche Directory Server will end active application sessions upon receiving a logout request from a SAML provider. When applicable, SAML providers can also end their active sessions upon receiving a logout request initiated by Laserfiche Directory Server. (Only available for certain SAML Identity Providers)
Identity Provider Prerequisites
The SAML 2.0 specification identifies two types of single logout requests, depending on who initiates the requests:
- Service provider (SP-initiated): Directory Server is the service provider.
- Identity Provider (IdP-initiated): SAML Identity Providers (e.g., AD FS, Microsoft Entra ID, and Okta)
- AD FS and Microsoft Entra ID support both SP-initiated and IdP-initiated single logout requests.
- Okta supports SP-initiated single logout requests. (Okta support for IdP-initiated single log out requests is marked as "Early Access.")
Configure the identity provider for single logout:
- Entra ID: https://learn.microsoft.com/en-us/entra/identity-platform/single-sign-out-saml-protocol
- Okta: https://help.okta.com/en-us/Content/Topics/Apps/Apps_Single_Logout.htm
Directory Server Configuration
- After configuring Single Sign-on (SSO) with SAML Authentication, locate the
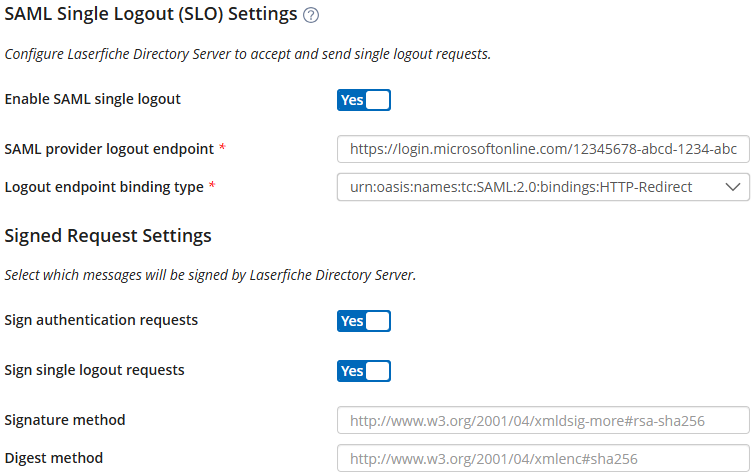
 SAML Single Logout (SLO) Settings section and select Enable SAML single logout.
- Either manually set the SAML provider logout endpoint and Logout endpoint binding type according to your appropriate SAML Identity provider or import a metadata file for your SAML identity provider. With a metadata file, Directory Server will attempt to automatically extract the appropriate endpoint value and binding type from the metadata file.
Note: Microsoft Entra ID currently supports redirect binding, see https://learn.microsoft.com/en-us/entra/identity-platform/single-sign-out-saml-protocol.
- Install the SAML certificate(s) in the Directory Server machine's "Trusted People" local certificate store. The SAML certificate(s) can be downloaded from your SAML identity provider.
- Optional: If you turn on the Sign single logout requests option, you must provide the thumbprint (without spaces) of a certificate that satisfies the following requirements:
- The certificate must contain the private key for signing and the Directory Server service user must have read access to the private key. For instructions on setting private key permissions, see Laserfiche Knowledge Base article 1014366.
- The certificate must be trusted by the Laserfiche Directory Server computer and pass certificate chain validation. You can check the trust status by opening the certificate, selecting the Certification Path tab, selecting each certificate in the chain, and verifying each has a certificate status of OK. If any certificates in the chain are not trusted, view the certificate and install the certificate in the appropriate certificate stores ("Trusted Root Certification Authorities" for root certificates and "Intermediate Certification Authorities" for intermediate certificates).
- The certificate must use the RSA signature algorithm.
- On the computer hosting the Directory Server Security Token Service (STS), open the STS configuration site, by default, the address is: https://localhost/LFDSSTS/configuration
- Add the domain of the SAML SLO endpoint for your identity provider to the list of Additional allowlist domains.
- For example, for a Microsoft Entra ID sample endpoint of https://login.microsoftonline.com/{guid}/saml2, add https://login.microsoftonline.com to the Allowed iframe hosts list.
Additional References
- https://learn.microsoft.com/en-us/entra/identity-platform/single-sign-out-saml-protocol
- https://www.identityserver.com/documentation/saml2p/config-idp/idp-initiated-slo/
Creating Claim Mappings
After registering the SAML identity provider, view the Claims tab to map SAML claims to Directory Server claims. Directory Server supports several pre-defined claims that will be applied to the user's profile. View your SAML identity provider's settings to find the corresponding claim.
- In the Laserfiche Directory Server administration site, click Settings.
- View the Identity Providers tab.
- In the left pane, select the name of your identity provider.
- Select the Claims tab.
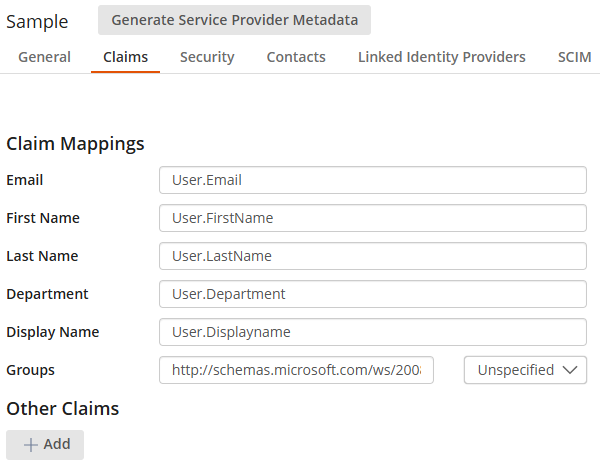
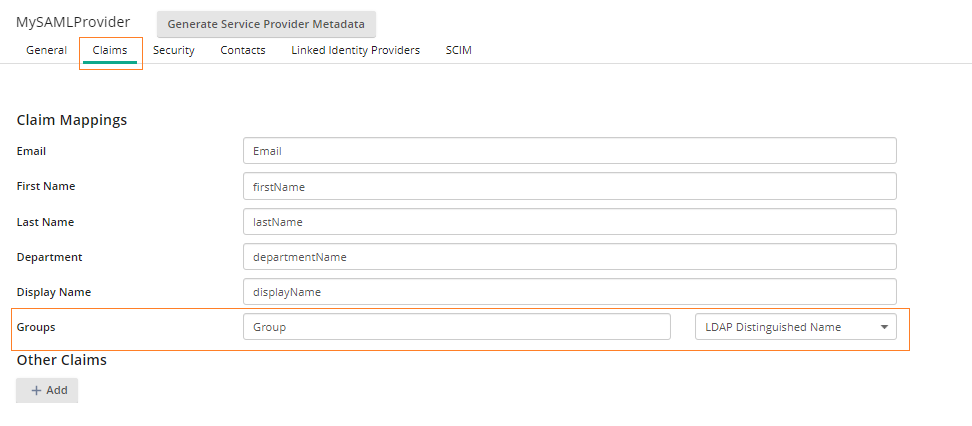
- In the Claim Mappings section, type the attribute names you configured in your identity provider's configuration site. For example, the following image shows sample attributes you may have in your identity provider:
- Click Save to finish.
Note: SAML attribute Name is needed for Directory Server claim mappings. SAML attribute FriendlyName will not work for claim mappings. To learn more about intercepting the SAML Response, navigate to Intercepting the SAML Response.
Note: For more information on claim mappings, navigate to configuration pages for your specific SAML identity provider: Okta, Salesforce, Shibboleth, and Microsoft Entra ID.
Note: Claims are automatically updated in Laserfiche Directory Server when a user signs in based on the SAML token.
Group claim mappings can be utilized for SAML group memberships to manage Laserfiche access or when configuring a linked identity provider.
If you want to add a SAML group to a Directory Server group you must configure the group claim mapping for the SAML provider. The group claim mapping allows Directory Server to find the group value in a SAML Response and interpret it so that the user can correctly inherit the Directory Server group.
To set up group mappings, follow these steps:
- In the Directory Server administration site, view Settings.
- Select the Identity Providers tab.
- In the left pane, click the name of your identity provider.
- Select the Claims tab. In the Claims tab, add the Groups claim.
The claim mapping should be the SAML token attribute Name. The SAML tokens may contain multiple Values, one for each group, that are under the same attribute.

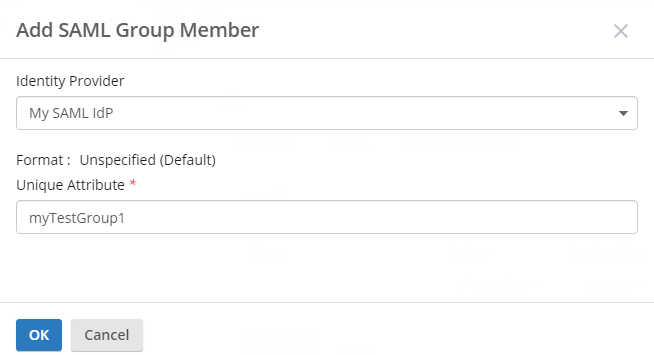
- Add SAML groups to Directory Server groups. When adding a SAML group, enter the name as it appears in the attribute Value. Unlike the attribute Name, the attribute Value will be unique to each group.
To add a SAML group, navigate to the Accounts tab in the Directory Server administration site. Click the Groups tab. Click the Group name. Under the Members tab, click the +Add button and select SAML Group.
Linked Identity Provider in Laserfiche Directory Server
Linked identity providers allow Active Directory and LDAP users to authenticate through SAML identity providers by adding the Active Directory or LDAP Identity Provider under the SAML identity provider. Primarily used for organizations transitioning from Windows authentication to SAML authentication.
Adding a Linked Identity Provider
Active Directory (AD) or Lightweight Directory Access Protocol (LDAP) identity providers can be configured as linked identity providers between Laserfiche Directory Server and a SAML identity provider.
- Add an AD or LDAP user to Laserfiche Directory Server. Check to make sure this user has not been registered in Laserfiche Directory Server under the SAML identity provider.
- Grant the AD or LDAP user access to a Laserfiche application by adding them to a Group with application permissions.
- In Laserfiche Directory Server, under the Identity Providers tab, choose the SAML identity provider that will be used to authenticate AD or LDAP users.
- In the Claims tab, add the Groups claim. There must be a group claim mapping set prior to adding a linked identity provider. See the image below for an example.
Note: The group value must be either AD SID or LDAP Distinguished Name (DN). Microsoft Entra ID has a minimum requirement for including the AD SID and does not support the LDAP DN.
- In the Linked Identity Providers tab, click Add Linked Identity Provider.
- Add the Identity Provider, Identifying Attribute, and Attribute Format. Once finished, click Save.
- Identity Provider: Choose an AD or LDAP identity provider.
- Identifying Attribute: The SAML provider determines the Identifying Attribute. SAML provider may not include this information by default.
Note: The SAML provider determines the Identifying Attribute. You can find this by looking at the SAML provider's configuration or intercepting the SAMLResponse generated for a SAML sign in to find the attribute name. The SAMLResponse is Base64 encoded. To learn more, navigate to Intercepting the SAML Response.
Note: All Active Directory (AD) or LDAP groups must be included on the SAML token or their membership will be ignored.
- Attribute Format: Select an attribute format from the drop-down menu.
- AD SID and AD SID - Base64 Binary are available for:
- Active Directory identity providers
- Active Directory LDAP identity providers that are retaining AD SIDs
- LDAP Distinguished Name is available for:
- Active Directory LDAP identity providers, regardless of AD SID retention
- UPN is available for:
- Active Directory identity providers
- AD SID and AD SID - Base64 Binary are available for:
- Navigate to the application's sign in page. Use the SAML provider to sign-in as the AD or LDAP user.
Configuring Specific SAML Identity Providers
The details of the configuration process depend on your SAML identity provider. The following resources highlight configuration information for some commonly used identity providers.