Options and User Preferences
The Options dialog box lets you configure a broad range of Laserfiche Scanning settings and preferences:
To open the Options dialog box
-
In the menu bar, select File, then choose Options.
- Select Standard Mode or Basic Mode.
Note: When opening Laserfiche Scanning from the Repository Web Client, there will be a Web section in the Options dialog box containing options specific to the web. The Web section will not be displayed in the Options dialog box if Laserfiche Scanning is opened from the Repository Desktop Client.
Standard Mode
 General

- Scan File Directory: The temporary location for scanned images before they are stored in a Laserfiche repository. Click the Browse button to browse to and select a location. Click default to restore the default location.
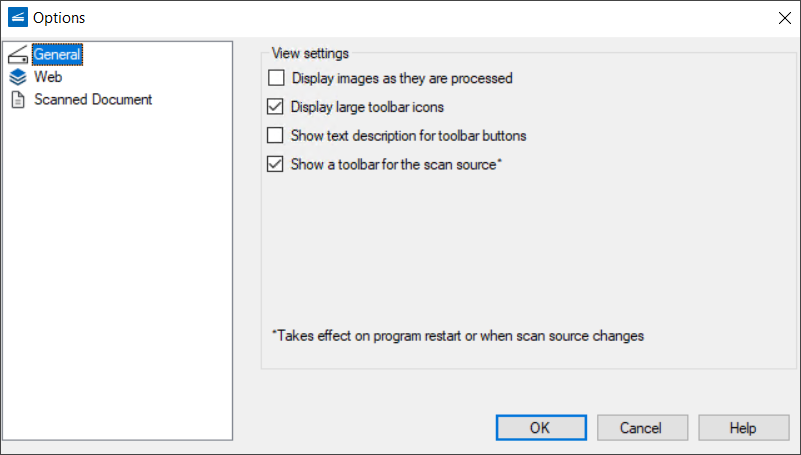
- Display images as they are processed: If images should be displayed as they are being scanned. This option may increase scanning duration.
- Store documents immediately after they are processed: If documents should be stored immediately afterthey are scanned and processed.
- Assign unique names to scanned documents: If unique names should be given to scanned documents.
Example: Two documents were named using the Date token. Both documents were scanned on 1/1/25. As a result, each document is named 1/1/25 in Laserfiche Scanning. If the unique name option is enabled, the first document scanned will be named 1/1/25 and the second document will be named 1/1/25(1). The number in parentheses will increase for each additional scanned document.
Note: Whether or not this option is enabled, documents with the same name in Laserfiche Scanning will be automatically renamed when stored in the Laserfiche repository.
- Select the first document of a new scan: If enabled, the first document in a newly scanned batch will be automatically selected. If this option is disabled, the item currently selected at the time of scanning will remain selected.
- Token value: Specify an initial value for the count token. To preserve the count when Laserfiche Scanning is closed, enable Save Token Value. If this option is disabled, the count token will reset to the client's current token value each time the application is closed.
Web

Prompts
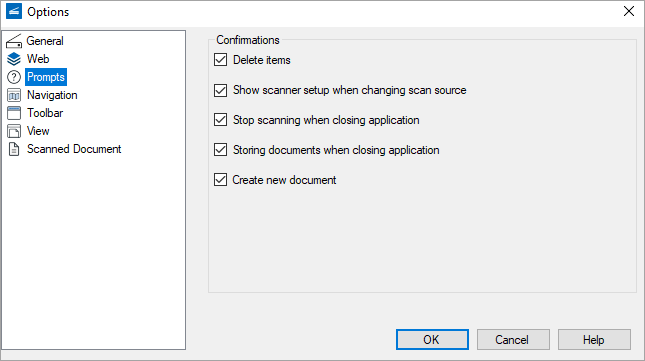
Select which prompts should be active:
- Delete Items: Confirms the deletion of a page, document, folder, image enhancement, or process.
- Show scanning setup when changing scan source: Automatically displays a scanning source's Scanner Setup dialog box when the source is enabled. This dialog box enables you to configure how a source will perform.
- Stop scanning when closing application: Scanning must be stopped before Laserfiche Scanning can be closed. If this option is enabled, closing Laserfiche Scanning while scanning will display a prompt, confirming your request to stop scanning. If this prompt is disabled, closing Laserfiche Scanning while scanning will automatically stop scanning, send all scanned documents to a Laserfiche repository, and close the application, all without displaying a prompt.
- Storing documents when closing application: Prompts you to store unsent documents when you attempt to close Laserfiche Scanning. If this option is disabled, unsent documents will be automatically discarded when the program is closed.
- Create new document: When you select Create Document from a thumbnail, you will be prompted to confirm that you want to create a new document from the selected page.
Navigation

- Show wizard the first time a process is selected: Wizards will only appear when you add a new enhancement or process.
- Always show wizard: The first screen of a wizard will always appear when an enhancement or process is added or selected, or when you edit an existing process.
- Automatically test processes: Enhancements will be automatically tested after they are added and configured.
- Select the document name: Inserts the cursor into the Document Name text box inside the Document Properties Pane.
- Select the current field: Inserts the cursor into the most recently edited field text box.
- Select the Scanning Explorer item: Inserts the cursor into the most recently edited field text box.
- Always show 'Fields' tab when navigating to a new document: The Document Properties Pane will always display the Fields tab when a new document is selected.
- Selecting a thumbnail updates the Display Pane: Enables you to navigate through a document's pages using the Left arrow, Right arrow, Up arrow and Down arrow keys. Also enables you to single-click a thumbnail to display the corresponding page in the Display Pane.
- When a Configuration Pane item is selected, begin editing its properties: Sets the Document Properties Pane as the active pane when an item is selected in the Scanning Explorer Pane.
- Fade properties window when changing selection: Enables fading between screens in the Document Properties Pane.
Toolbar
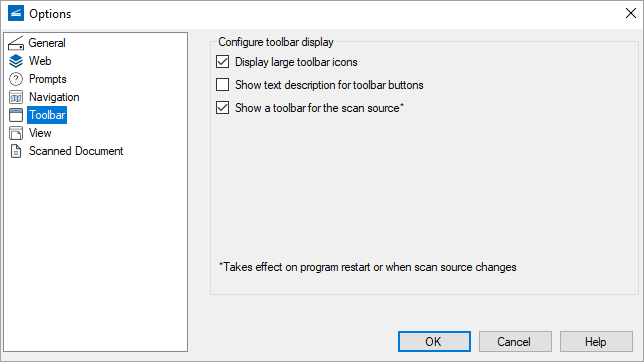
Note: These settings do not affect the Image or the Navigation toolbars.
- Display large toolbar icons: Large toolbar icons should be used.
- Show text description for toolbar buttons: Descriptive text should appear below toolbar buttons.
- Show a toolbar for the scan source: The toolbar specific to the scan source should be displayed.
View

- Click the Change Font button to open the Font dialog. Select the desired font, style, and size, and click OK to save your changes.
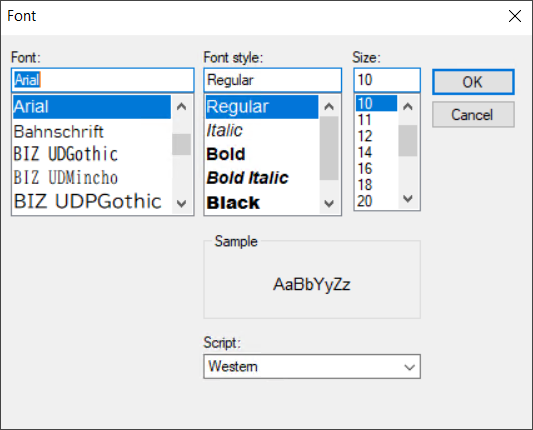
- To return to the default font, click Restore Default.
- Specify whether certain panes should be automatically displayed under relevant conditions.
- Click OK to save your changes.
- If the Output Log Pane should automatically appear when processing errors occur.
- If the Output Log Pane should automatically appear when processing warnings occur.
- If the Scanning Explorer Pane's Revision Pane should appear when a document is scanned. This setting only applies if the Revision Pane is currently hidden.
Scanned Document
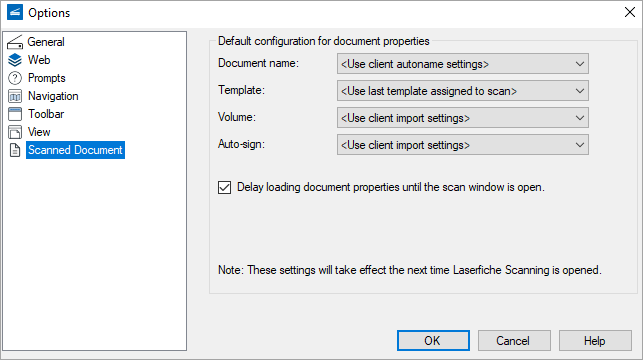
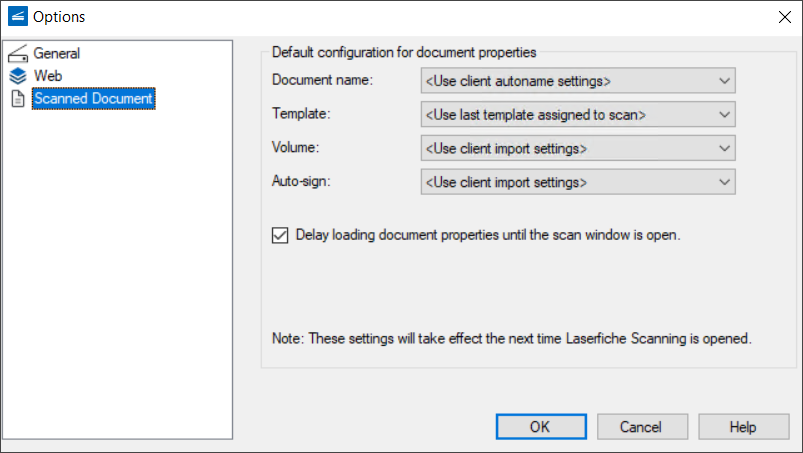
This section lets you define default properties for all future scanning sessions. If you encounter atypical scanning sessions and/or documents that should not inherit these properties, you can modify these values during the configuration and/or revision process. Additionally, the dialog box provides an option to defer loading document properties until the scan window is opened. This improves startup performance by postponing the loading of certain elements.
Document Name: Defines a default name for scanned documents.
-
Use client autoname settings: Documents will be named according to the default name defined in Tools, Options, Autoname, General in the Desktop Client.
- Use last scanned document name: Documents will inherit the name of the last document scanned. This setting is dynamic.
- Force user to input: The user must enter a document name.
- Custom: Assign a custom default name.
Template: Defines a default template for scanned documents.
- Use client import settings: Documents will be assigned the template defined in Tools, Options, New Documents, General in the Desktop Client.
- Use folder last scanned into: Documents will inherit the template of the Desktop Client folder that was last scanned into. If the folder has no template, documents will not be assigned a template. This setting is dynamic.
- Use last template assigned to scan: Documents will inherit the template of the last document scanned. If the last scanned document was not assigned a template, future documents will not be assigned a template. This setting is dynamic.
- No template assigned: Documents will not be assigned a template.
- Assign a custom template to scanned documents. Available templates will be listed.
Volume: Defines a default volume for scanned documents.
- Use client import settings: Documents will be assigned to the volume defined in Tools, Options, New Documents, General in the Desktop Client.
- Use folder default volume: Documents will inherit the default volume of the Desktop Client folder they are scanned into.
Tip: To define a default volume to a folder in the Desktop Client, right-click the folder, select Properties, select the Folder tab, and select a volume from the drop-down box. Ensure you have sufficient rights.
- Use last volume scanned to: Documents will inherit the last volume used by Laserfiche Scanning. This setting is dynamic.
- Assign a custom volume. Available volumes will be listed.
Basic Mode
General
- Display images as they are processed: If images should be displayed as they are being scanned; this option may increase scanning duration.
- Display large toolbar icons: Whether to display large toolbar icons. If this option is cleared, the icons will be smaller, which may give you more space to view documents.
- Show text description for toolbar buttons: Whether to display text descriptions on toolbar buttons.
- Show a toolbar for the scan source: Whether to show the toolbar for the scan source. If you seldom change the settings for the scan source, you might want to select this.
Web
Scanned Document
This section lets you define default properties for all future scanning sessions. If you encounter atypical scanning sessions and/or documents that should not inherit these properties, you can modify these values during the configuration and/or revision process. Additionally, the dialog box provides an option to defer loading document properties until the scan window is opened. This improves startup performance by postponing the loading of certain elements.
Document Name: Defines a default name for scanned documents.
-
Use client autoname settings: Documents will be named according to the default name defined in Tools, Options, Autoname, General in the Desktop Client.
- Use last scanned document name: Documents will inherit the name of the last document scanned. This setting is dynamic.
- Force user to input: The user must enter a document name.
- Custom: Assign a custom default name.
Template: Defines a default template for scanned documents.
- Use client import settings: Documents will be assigned the template defined in Tools, Options, New Documents, General in the Desktop Client.
- Use folder last scanned into: Documents will inherit the template of the Desktop Client folder that was last scanned into. If the folder has no template, documents will not be assigned a template. This setting is dynamic.
- Use last template assigned to scan: Documents will inherit the template of the last document scanned. If the last scanned document was not assigned a template, future documents will not be assigned a template. This setting is dynamic.
- No template assigned: Documents will not be assigned a template.
- Assign a custom template to scanned documents. Available templates will be listed.
Volume: Defines a default volume for scanned documents.
- Use client import settings: Documents will be assigned to the volume defined in Tools, Options, New Documents, General in the desktop client.
- Use folder default volume: Documents will inherit the default volume of the desktop client folder they are scanned into.
Tip: To define a default volume to a folder in the desktop client, right-click the folder, select Properties, select the Folder tab, and select a volume from the drop-down box. Ensure you have sufficient rights.
- Use last volume scanned to: Documents will inherit the last volume used by Laserfiche Scanning. This setting is dynamic.
- Assign a custom volume. Available volumes will be listed.