Connection
The Connection section on the Configuration page lets you connect the Laserfiche app to a repository and determine how users should authenticate to the repository. For each repository added, a default volume, domain name, and document location information can be configured. Additionally, you can add a Forms server and Laserfiche Directory Server. Forms servers contain forms that users can submit to start business processes. A Laserfiche Directory Server lets users take advantage of the single sign-on functionality, where signing into one web application signs into all. You can also import the Web Client Configuration page settings and create a link that will open and auto populate the app Sign-in page.
Import Web Client Configuration

If you have the web client and want to use the same web client connection information for the Laserfiche app, click this option to import the web client repositories, the Windows and/or repository users allowed or denied access to the repository, and the Laserfiche Directory Server settings onto the Laserfiche Mobile Server Configuration page.
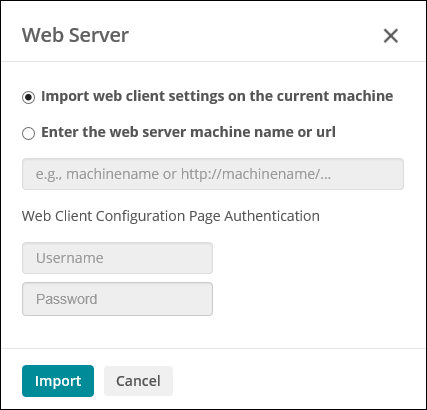
In the Web Server dialog box
- Select the first option to import the web client settings from your current machine.
- Select the second option to import the web client settings from another machine. Then, enter the web server machine name or URL in the top text box (For example, https://machinename/laserfiche), and the credentials to access the Web Client Configuration page.
- Press Import when finished.
Note: You must have the right to remote into the web server to import the web server configuration page settings.
Generate link to open and auto populate the app Sign-in page

To make it easier for users, you can create and send them a link, that when clicked, will open the Laserfiche app and auto-populate the Sign-in page.
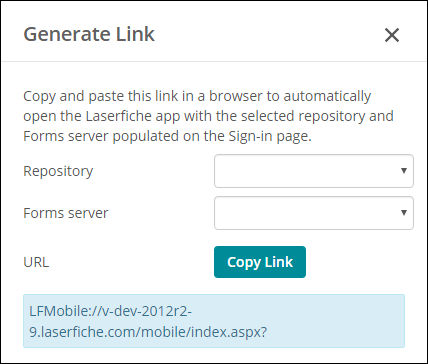
In the Generate Link dialog box
- Enter or select the repository you want automatically populated on the app Sign-in page.
- Enter or select the Forms server you want automatically populated on the app Sign-in page.
- The read-only link will be displayed at the bottom of the dialog box. Press Copy Link to copy the newly generated URL.
Repositories
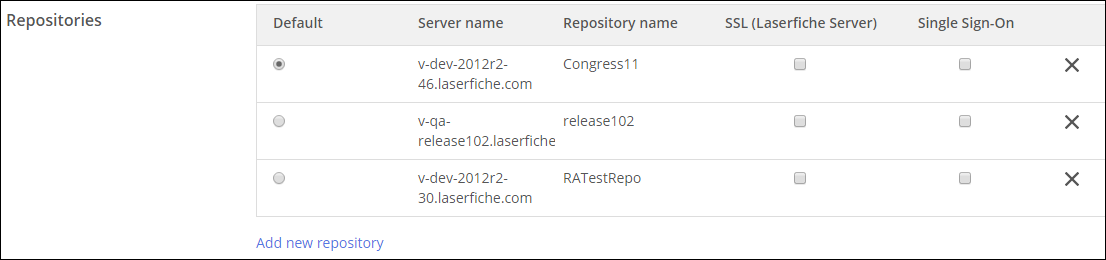
Click Add new repository to add a repository connection. Under New connection, do the following

- In the Server name box, type the name of the Laserfiche Server where the repository is located. When you start typing, a list of servers will auto-populate for you to choose from.
- Click in the Repository name box, and a list of repositories on the server will appear. Select the repository you want to connect to.
- Select the SSL checkbox if you want the Laserfiche Mobile Server to connect to the Laserfiche Server using an SSL connection. This will force users to always sign into the repository using SSL.
Note: To use SSL, the server name must be written as a fully qualified domain name (FQDN) such as mycomputer.laserfiche.com. For more information, see the Requirements for Using SSL/TLS with Laserfiche topic in the Laserfiche Administration Guide.
- Select the SSO checkbox if you want to sign into the repository using a Laserfiche Directory Server single sign-on account.
Note: If the repository's server has not been registered by the Laserfiche Directory Server and licensing site configured under the Laserfiche Directory Server section of this Configuration page, you will receive an error and not be able to sign in. You either need to clear the SSO checkbox and use password authentication to sign in, or configure the appropriate Laserfiche Directory Server and licensing site that registered the repository's server.
- Click Add to add the repository connection; click Cancel to cancel the addition of the repository connection; click the X next to the repository connection to remove it.
Note: Select the radio button next to the repository you want the Laserfiche app to connect to by default.
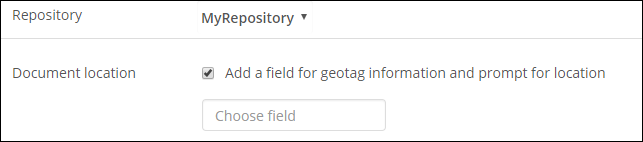
Repository Settings
Select a repository (added in the Repositories section above) from the drop-down menu to set up document location, a domain name, a default volume, and authentication for it.
Domain name

If users will use Windows or LDAP accounts to sign into the repository, type the domain name here so the users don't have to include it with their user name when they sign into the app. If a domain is configured and users want to sign in as a repository user, they will need to add a backslash before their user name when signing into a repository or forms.
Default volume

If default volumes have been configured for the repository, documents uploaded via the Laserfiche app will automatically be saved to their parent folder's default volume. If the parent folder does not have a default volume, uploaded documents will be saved to the volume specified here. If a default volume is not specified in either place, users will need to manually specify a volume when saving it to the repository. Android and Windows users can specify a volume by pressing the folder button when configuring a new document. iOS users will be prompted to specify a volume when saving.
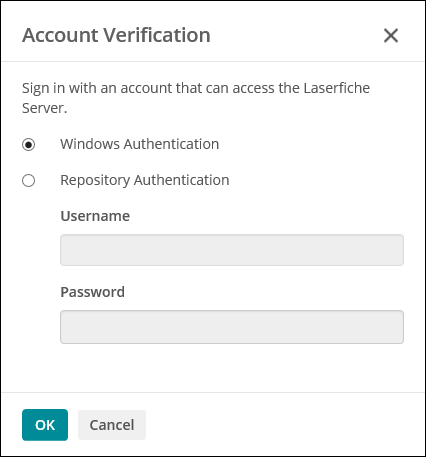
Note: Before you configure authentication, a default volume, or document location, you will be prompted to sign into the Laserfiche Server for security purposes.
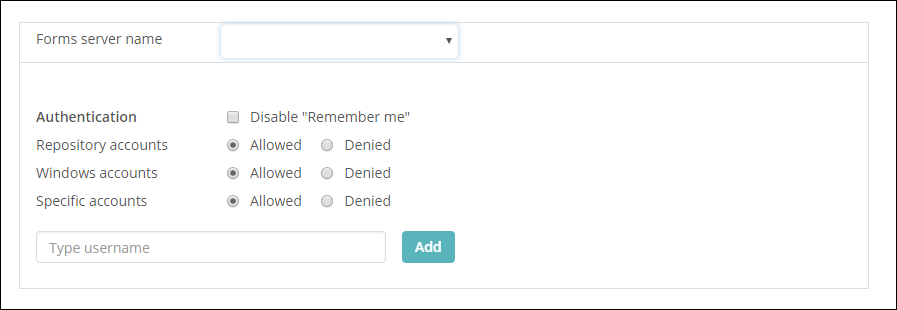
Authentication
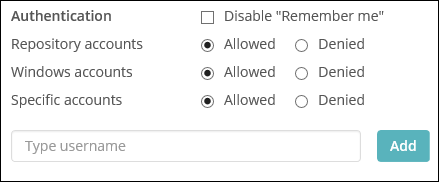
Administrators can explicitly deny or allow specific Windows or repository users access to a repository from the Laserfiche app. By denying an account, you will prevent anyone from using that sign in to gain access to the repository. This setting is configured per repository.
- Disable "Remember me": Select this checkbox to prevent Windows accounts and repository users from automatically signing into the repository via the Laserfiche app. If not selected, the user name and password will be saved for automatic sign in. It also saves the user name and password if the app closes unexpectedly or the server session disconnects. However, the password is cleared and only the user name is retained if the user signs out normally or the app session times out.
Note: The Disable "Remember me" option is only available for accounts not set up for single sign-on.
- Repository accounts: Select Allowed if you want all users signing in with repository accounts to have access to the repository. Select Denied if you want to deny all users with repository accounts. This option controls non-Laserfiche Directory Server accounts.
- Windows accounts: Select Allowed if you want all users signing in with Windows accounts to have access to the repository. Select Denied if you want to deny all users with Windows accounts. This option controls non-Laserfiche Directory Server accounts.
- Specific accounts: This option enables you to customize a specific list of users, whether repository or Windows accounts, and allow or deny them access. Type the user in the Type user name text box and select if you want these users Allowed or Denied. When finished, press Add. This option controls non-Laserfiche Directory Server accounts.
Note: If the repository selected from the drop-down menu uses Laserfiche Directory Server, the authentication section will be unavailable. You can configure authentication settings for Laserfiche Directory Server users under the Laserfiche Directory Server section.
Laserfiche Forms Server
In Laserfiche Mobile 9.2.1 and later, you can add multiple Laserfiche Forms servers containing forms that users can fill out and submit. These submitted forms are one step in a bigger business process.
Example: Nick fills out and submits a travel request form for his business trip to Chicago. An email is sent to two different people for approval. Once approved, Nick receives another email with a link to another form to fill out to receive a cash advance for the trip, and so on.
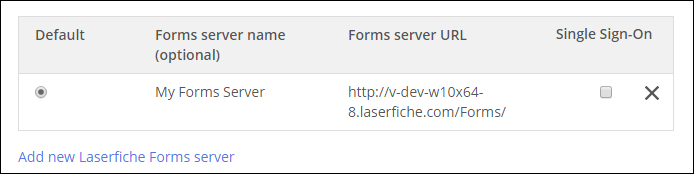
Press Add new Laserfiche Forms server to add a new Forms server. Under New connection, do the following

- In the Forms server name (optional) box, type an alias for the forms server you are adding.
- In the Forms server URL box, type the URL for the Laserfiche Forms server where the forms are located.
http://LaserficheFormsServer/Forms where LaserficheFormsServer is the name of the Laserfiche Forms server containing the forms you want users to have access to. Be sure to enter http:// or https://, a fully qualified domain name (FQDN), and a forms virtual directory (i.e., http(s)://FQDN/FormsVirtualDirectory or http(s)://mycomputer.laserfiche.com/Forms).
Example: http://myforms.laserfiche.com/Forms
You can use a different virtual directory or port if desired.
Example: http://LaserficheFormsServer:PortNumber/VirtualDirectory
Note: You can use https:// to use SSL and secure your connection.
- If the Forms server added has been configured to use Laserfiche Directory Server, you must select the SSO checkbox and ensure the Forms server has been registered by the Laserfiche Directory and licensing site configured under the Laserfiche Directory Server section of this Configuration page
- Once the Forms server details are configured, press Add. To remove a Forms server, press the x.
Note: Select the radio button next to the Forms server you want the Laserfiche app to connect to by default.
Laserfiche Forms Server Settings
Administrators can explicitly deny or allow specific Windows or repository users access to a Forms server from the Laserfiche app. By denying an account, you will prevent anyone from using that sign into gain access to the Forms server. This setting is configured per Forms server.
- Disable "Remember me": Select this checkbox to prevent Windows accounts or repository users from automatically signing into the repository via the Laserfiche app. If not selected, the user name and password will be saved for automatic sign in. It also saves the user name and password if the app closes unexpectedly or the server session disconnects. However, the password is cleared and only the user name is retained if the user signs out normally or the app session times out.
- Repository accounts: Select Allowed if you want all users signing in with repository accounts to have access to the Forms server. Select Denied if you want to deny all users with repository accounts. This option controls non-Laserfiche Directory Server accounts.
- Windows accounts: Select Allowed if you want all users signing in with Windows accounts to have access to the Forms server. Select Denied if you want to deny all users with Windows accounts. This option controls non-Laserfiche Directory Server accounts.
- Specific accounts: This option enables you to customize a specific list of users, whether repository or Windows accounts, and allow or deny them access. Type the user in the Type user name text box and select if you want these users Allowed or Denied. When finished, press Add. This option controls non-Laserfiche Directory Server accounts.
Note: Authentication settings for Laserfiche Directory Server users using single sign-on can be configured under the Laserfiche Directory Server section.
Laserfiche Directory Server
Configuring the Laserfiche Directory Server section lets users take advantage of the single sign-on feature. If the Laserfiche Server, Laserfiche Forms, and the Laserfiche app have all been registered to the same Laserfiche Directory Server, signing into one application will automatically sign into all.
Laserfiche Mobile 10.3
In Laserfiche Mobile 10.3, you can set up an alternate service. Setting up an alternate service, for example, can facilitate when a Laserfiche Mobile Server and an instance of the Security Token Service is installed in the DMZ with Directory Sever itself residing in the internal network.

- Next to Server name, enter the name of the machine where the Laserfiche Directory Server is installed.
- Optionally, set up an alternate service.
Alternate Service
To configure the Laserfiche Mobile Server on the DMZ to communicate with the Laserfiche Directory Server on the internal network, first, verify the DMZ environment has been set up with certificates on both the Laserfiche Directory Server and Laserfiche Mobile Server machines. These certificates need to be issued by the same root. The certificate on the Laserfiche Mobile Server machine should be placed in the Local Machine Personal Certificate Store and the Laserfiche app needs permission to this certificate.
To give the Laserfiche app permission to the certificate
- Right-click on the certificate and select Manage Private Keys.
- Click Add.
- Enter IIS AppPool\MobileAppPool and click Check Names.
- Select the MobileAppPool user and select the Allow checkbox next to Read.
- Reset IIS.
Set up the alternate service on the Laserfiche Mobile Configuration Page
- Click Use alternate service next to Server name.
- Enter the Laserfiche Directory Server name and select the certificate from the certificate drop-down menu.
- Press Save.
Note: Setting up the alternate service will clear your Laserfiche Directory Server connection.
- After entering a Laserfiche Directory Server name, the Licensing site drop-down menu will be populated with licensing sites on that specific server. Select the desired licensing site. This option is required.
- After selecting a Licensing site, the Organization drop-down menu will be populated with organizations associated with the selected licensing site. If an administrator selects an organization, it will show up as the default organization for users as they authenticate using the app. However users will still be able to select other organizations within the Laserfiche Directory Server licensing site.
Note: If users are not in the selected organization, they will not be able to interact with Laserfiche Forms via the Laserfiche app.
Laserfiche Mobile 10.3.1
If your Laserfiche Mobile Server has been registered using the Laserfiche Directory Server, you can enter the Directory Server STS URL that integrates with the Laserfiche Directory Server for Laserfiche Rio user and license management to take advantage of the single sign-on feature. If the Laserfiche Server, Laserfiche Forms, and the Laserfiche app have all been registered to the same Laserfiche Directory Server, signing in to one application will automatically sign into all.
You also can set up an alternate service. Setting up an alternate service, for example, can facilitate when a Laserfiche Mobile Server and an instance of the Security Token Service is installed in the DMZ with Directory Sever itself residing in the internal network.

- Next to Directory Server STS URL, enter the Directory Server STS URL in the following format: https://MyServerName/example.com/LFDSSTS.
- Next to Service user's principal name, enter the Laserfiche Directory Server's user principal name. If you change the service user, you must also change the user entered here.
- Optionally, set up an alternate service.
Alternate Service
To configure the Laserfiche Mobile Server on the DMZ to communicate with the Laserfiche Directory Server on the internal network, first, verify the DMZ environment has been set up with certificates on both the Laserfiche Directory Server and Laserfiche Mobile Server machines. These certificates need to be issued by the same root. The certificate on the Laserfiche Mobile Server machine should be placed in the Local Machine Personal Certificate Store and the Laserfiche app needs permission to this certificate.
To give the Laserfiche app permission to the certificate
- Right-click on the certificate and select Manage Private Keys.
- Click Add.
- Enter IIS AppPool\MobileAppPool and click Check Names.
- Select the MobileAppPool user and select the Allow checkbox next to Read.
- Reset IIS.
Set up the alternate service on the Laserfiche Mobile Configuration Page
- Click Use alternate service next to Server name.
- Enter the Laserfiche Directory Server name and select the certificate from the certificate drop-down menu.
- Press Save.
Note: Setting up the alternate service will clear your Laserfiche Directory Server connection.
Laserfiche Mobile 10.4
If your Laserfiche Mobile Server has been registered using the Laserfiche Directory Server, you can enter the Directory Server STS URL that integrates with the Laserfiche Directory Server for Laserfiche Rio user and license management to take advantage of the single sign-on feature. If the Laserfiche Server, Laserfiche Forms, and the Laserfiche app have all been registered to the same Laserfiche Directory Server, signing in to one application will automatically sign into all.
You also can set up an alternate service. Setting up an alternate service, for example, can facilitate when a Laserfiche Mobile Server and an instance of the Security Token Service is installed in the DMZ with Directory Sever itself residing in the internal network.
Additionally, you can allow or deny specific Laserfiche Directory Server users mobile access to the repository and Forms server.
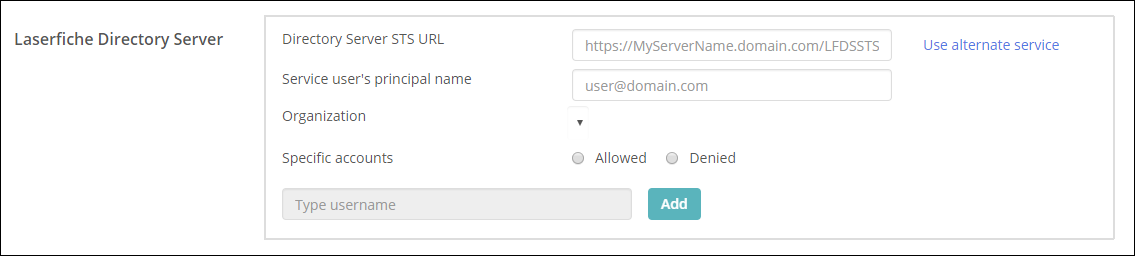
- Next to Directory Server STS URL, enter the Directory Server STS URL in the following format: https://MyServerName/example.com/LFDSSTS.
- Next to Service user's principal name, enter the Laserfiche Directory Server's user principal name. If you change the service user, you must also change the user entered here.
- Optionally, set up an alternate service.
Alternate Service
To configure the Laserfiche Mobile Server on the DMZ to communicate with the Laserfiche Directory Server on the internal network, first, verify the DMZ environment has been set up with certificates on both the Laserfiche Directory Server and Laserfiche Mobile Server machines. These certificates need to be issued by the same root. The certificate on the Laserfiche Mobile Server machine should be placed in the Local Machine Personal Certificate Store and the Laserfiche app needs permission to this certificate.
To give the Laserfiche app permission to the certificate
- Right-click on the certificate and select Manage Private Keys.
- Click Add.
- Enter IIS AppPool\MobileAppPool and click Check Names.
- Select the MobileAppPool user and select the Allow checkbox next to Read.
- Reset IIS.
Set up the alternate service on the Laserfiche Mobile Configuration Page
- Click Use alternate service next to Server name.
- Enter the Laserfiche Directory Server name and select the certificate from the certificate drop-down menu.
- Press Save.
Note: Setting up the alternate service will clear your Laserfiche Directory Server connection.
- Optionally, you can allow or deny specific Laserfiche Directory Server users access to the repository and Forms server.
- Select the organization the user belongs to from the Organization drop-down menu.
- Select Allowed if you want the user to have access and Denied if you the user to not have access
- Enter the user's name in the Type username box and press Add.
- To remove the user after adding them, click the X next to the user's name that was added.
Laserfiche Mobile 10.4.2
If your Laserfiche Mobile Server has been registered using the Laserfiche Directory Server, you can enter the Directory Server STS URL that integrates with the Laserfiche Directory Server for Laserfiche Rio user and license management to take advantage of the single sign-on feature. If the Laserfiche Server, Laserfiche Forms, and the Laserfiche app have all been registered to the same Laserfiche Directory Server, signing in to one application will automatically sign into all.
Additionally, you can allow or deny specific Laserfiche Directory Server users mobile access to the repository and Forms server.
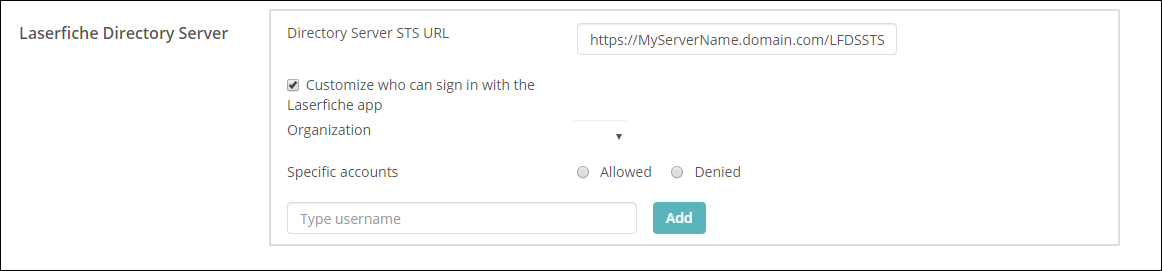
Next to the Directory Server STS URL, enter the Directory Server STS URL in the following format: https://MyServerName/example.com/LFDSSTS.
The Laserfiche Mobile Server will no longer be used to authenticate to a Forms server. The app will sign in to Forms directly. This makes configuring the Laserfiche Mobile Server in a DMZ much simpler. Administrators configure the externally accessible Forms endpoint URL the apps will use to communicate with Forms and enter it into the Directory Server STS URL box.
If the user is signing in to both the repository and Forms thru SSO using the app, the app relies on Forms to redirect to the Laserfiche Directory Server Sign-in page, get the session key, and pass it to the Laserfiche Mobile Server to authenticate with the Laserfiche Server.
Users not using SSO will sign in to the repository and Forms separately.
Follow these steps if you want to configure who can sign in with the Laserfiche app:
- Select the checkbox next to Customize who can sign in with the Laserfiche app.
- Select the organization the user belongs to from the Organization drop-down menu.
- Under Specific accounts, select either Allowed or Denied.
- Enter the usernames of the users that are either allowed or denied access, pressing Add after each one.
When finished configuring your connection settings, press Save on the left.