Uninstalling and Cleaning Up Workflow Components
Uninstalling Workflow with the Laserfiche Installer
- Launch the Laserfiche Installer.
- Select the checkbox(es) for the items you wish to uninstall.
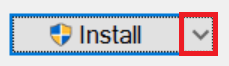
- Click the drop-down arrow next to Install button.
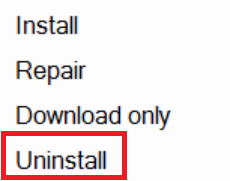
- Select Uninstall.
- If prompted by User Account Control, select Yes to run the installer with elevated privileges.
- The selected items will uninstall.
- A green check
 will appear next to installed items and a red X
  will appear next to items that have not been uninstalled.
Uninstalling Workflow with Add or Remove Programs
- Open Add or Remove Programs.
- Select Laserfiche Workflow Designer and Laserfiche Workflow Services from the list of programs.
- Click Remove or Uninstall, depending on your Windows version.
Deleting User Settings Files
To remove all Workflow user setting files from your computer after uninstalling, delete the following directories.
Note: Default user settings will not be removed when uninstalling. This ensures that user settings are retained in case you choose to reinstall Workflow. More information.
- C:\Users\user name\AppData\Roaming\Laserfiche\WF
- C:\Users\user name\AppData\Local\Laserfiche\Laserfiche.Workflow.Desig_StrongName...
- <Install Directory>\Laserfiche Workflow (for example, C:\Program Files\Laserfiche\Laserfiche Workflow)
Note: This folder is used by Workflow Server to store generated files such as PDF forms and Word documents for workflow activities. This folder is not removed during uninstallation and should not be deleted if you plan to reinstall Workflow.
Note: This folder name may contain a unique, automatically generated string of characters.
Tip: The AppData folder is often hidden by default. To display this folder, click Organize in the file browser, and select Folder Options. Select the View tab, and select Show hidden files, folders, and drives. Click OK. (In Windows 8, select View and the Hidden Items checkbox.)