Signing In to Laserfiche
Options
- Windows Authentication: Log in to the repository using Windows authentication. The Windows account for the user currently logged in to Windows will be used to connect to the repository.
- Password Authentication: Log in to the
repository using a Laserfiche user account or LDAP user account.
Note: If you are logging in as an LDAP user account, you will need to provide your LDAP name in the format "Common Name@ServerProfile", and in the Password option you will need to provide your LDAP account password.
- User name: The name of the user that will be used to connect to the repository.
- Password: The password corresponding to the user under User name.
- Sign in with Laserfiche Directory Server: If your installation is configured to allow single sign on using Laserfiche Directory Server, select this option. You will be redirected to a Laserfiche Directory Server sign in page, where you can provide your user name and password or select Windows Authentication. (This option is only available with Laserfiche Rio installations.)
- Automatically sign in in the future: Automatically log the user in to the repository by storing the specified login information. If the login information is valid, this dialog box will not appear when logging in to a repository through the Laserfiche Administration Console.
Once you have logged in, you can change to a different user by selecting the repository and choosing Change User. This will change the user for the currently-selected repository, and if you sign in using Laserfiche Directory Server single sign-on the new user will be used for any repositories that you subsequently open, but any other existing connections will retain their original user credentials until you log out and log back in.
If you need to reset your password (for example, because your password policy is configured for periodic password expiration, or because an administrator has reset your password), you will be prompted to change your password at your next sign in.
Signing In to Laserfiche Web Applications
Default Application URLs
-
Repository Web Client and Repository Administration: https://machinename.example.com/Laserfiche
-
Repository Web Client configuration page: https://machinename.example.com/Laserfiche/Configuration
-
-
Forms and Forms app: https://machinename.example.com/Forms
-
Forms configuration page: https://machinename.example.com/FormsConfig
-
-
Administration Hub: https://machinename.example.com/AdminHub
-
Administration Hub configuration: https://machinename.example.com/AdminHubConfig
-
-
Laserfiche Directory Server: https://machinename.example.com/LFDS
-
Laserfiche Directory Server Security Token Service Configuration: https://machinename.example.com/LFDSSTS/Configuration
-
-
WebLink site: https://machinename.example.com/WebLink
Note: If you have multiple repositories with WebLink, the link above will take you to the repository you designated as default. You can sign in to an alternate repository using the following URL: http://machinename/WebLink/Login.aspx?dbid=# where # is the database ID of the desired repository.
-
WebLink Designer: https://machinename.example.com/Designer
-
-
Distributed Computing Cluster configuration: https://machinename.example.com/WebAdmin/DCC
Signing In to Laserfiche Desktop Applications
Signing into the Laserfiche Forms App
Download and install the Laserfiche Forms app from the App Store. If you are using a self-hosted installation of Laserfiche and are outside your organization's local network, you may need to sign into your organization's VPN before opening the Laserfiche Forms app.
The Forms app supports the following types of authentication:
- Laserfiche Directory Server (LFDS)
- Windows credentials
- LDAP
- Active Directory Federated Services (AD FS)
- Microsoft Azure Active Directory
- Okta
To sign in
- Ensure you tap Sign in to Self-Hosted and enter your Forms server URL into the Server URL box (e.g., https://machinename.example.com/Forms). If you have signed in before, you can use the drop-down menu to select a server you previously connected to. The Forms server must be configured to use SSL. https:// will be appended to the front of the URL if the user does not enter it.
- Tap Sign In
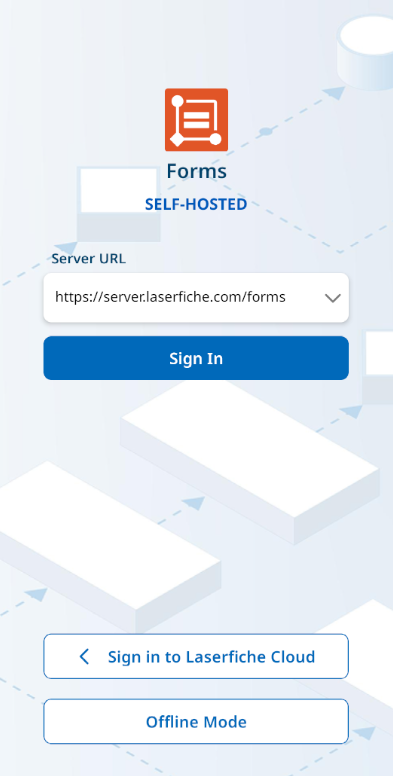
- Enter your username and password or click on your SAML provider. For Windows users:
- If your organization uses Laserfiche Directory Server (LFDS), sign in using the format specified by LFDS. Depending on the configuration, LFDS may require either the DOMAIN\username format or the UPN format username@domain.com.
- If your organization uses Windows authentication through Forms to access Laserfiche, sign in by manually entering your Windows username and password: DOMAIN\username.
- When signing in for the first time, you will be asked if you want to allow notifications and if you want to use biometrics (if the device has biometrics enabled). Biometrics lets you use a fingerprint (Touch ID) or your face (Face ID) to sign in. If you choose not to use biometrics for signing in, you will enter your username and password to sign in. You can enable biometrics in the app's Settings. If there are too many failed Touch ID or Face ID authentication attempts, you will be asked to enter your username and password. Learn more about biometric authentication limitations.
- To sign out, tap the Settings icon on the home page, scroll to the bottom, and tap Sign Out.
Important: Laserfiche does not control the functionality of Touch ID or Face ID and does not have access to your fingerprint(s) or facial recognition. If you use Touch ID or Face ID to sign in to Laserfiche, any user who has saved a fingerprint or their face on the device will also be able to sign in to Laserfiche.
Note: When authenticating with LFDS, biometric sign‑in (Face ID/Touch ID) requires the latest LFDS version.
Note: If a user's session remains idle for an extended period, a warning message is displayed informing them that they will be signed out in five minutes unless they choose to continue their session. This session timeout is configured in Account Administration. By default, the feature is enabled, and the idle timeout period is set to 15 minutes.