Laserfiche Server and Repository Redirect Node
This node, under Server Configuration in the Workflow Administration Console, lets you configure how Laserfiche Server and Repository name changes will be handled.
To open this node
- In the Workflow Administration Console's Console Pane, expand the Server Configuration node.
- Expand the Redirects node.
- Select Laserfiche Server & Repository Redirects. The node will list the Laserfiche Server redirects configured for your Workflow Server.
Tip: You can refresh this list to reflect recent changes by clicking the Refresh link in the Actions Pane. Alternatively, right-click the Laserfiche Server & Repository Redirects node and select Refresh.
To create a Laserfiche Server and Repository redirect
- In the Console Pane, select the Laserfiche Server & Repository Redirects node.
- Click Add Redirect in the Actions Pane. Alternatively, right-click the Laserfiche Server & Repository Redirects node or an existing holiday and select Add Redirect.
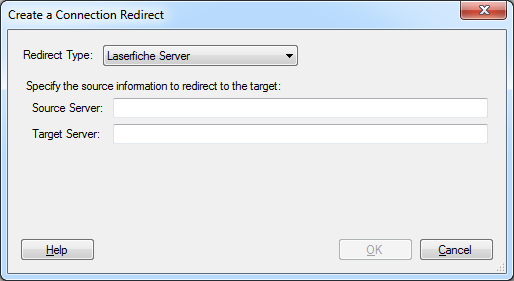
- In the
 Create a Connection Redirect dialog box, use the Redirect Type drop-down list to select the type of redirect. Select Laserfiche Server when there is only a server name change. Select Laserfiche Server and Repository if there are changes to both the Laserfiche Server name and repository name.
 - Next to Source Server, specify the Laserfiche Server you are creating a redirect for.
- Next to Source Repository, specify the Laserfiche repository you are creating a redirect for.
- Next to Target Server, specify the new Laserfiche Server name.
- Next to Target Repository, specify the new Laserfiche repository name.
- Click OK.
To export the contents of this node in a .csv, .xml, or .txt file
- Select the node in the Console Pane.
- Select View from the main menu.
- Click Export Contents.
- In the Export data dialog box, name the exported file.
- Select CSV File, XML File, or Tab Delimited Text File from the drop-down menu.
- Click Save.