Main Menu Options
The main menu appears above the toolbar in the Workflow Administration Console. This menu provides a variety of options for managing the details of your workflow and business process definitions.

The main menu has several options divided into five categories. Click one of the categories to see a drop-down menu of its contained options.
File: This option allows you to exit the Workflow Administration Console.
Action: Most of these editing options are also available on the toolbar.
- Properties: Selecting Properties will open the Advanced Server Options dialog box.
- Refresh: Refreshes the contents of the console.
Tools: This node contains the Manage Business Process Instances option, which allows you to delete or dissociate business process instances from entries in the Laserfiche client applications.
View: This main menu option allows you to customize the view of your Workflow Administration Console.
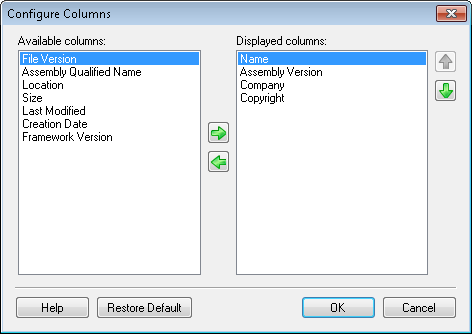
- Select Columns: This option will open the Configure Columns dialog box, which allows you to select which columns will or will not be displayed in the Details Pane of the Workflow Administration Console.
- Auto Refresh: To allow the Workflow Administration Console to refresh automatically, select this option.
- Windows: By pointing to this option, you can select what is displayed in the Workflow Administration Console.
- Export Contents: This option lets you export the content of the Workflow Administration Console as a Comma Separated Value File (CSV), Extensible Markup Language File (XML ), or Tab Delimited Text File (TXT).


Help: Access help and view information about the Workflow Designer.
- Help: Click to view the Workflow online help.
- About: View information about your Workflow Administration Console installation.
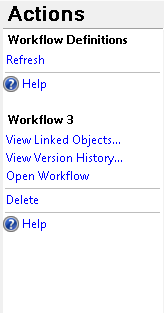
The Workflow Administration Console's Actions Pane lets you perform functions associated with the items currently selected in the Console and Details Panes. By default, this pane appears on the right edge of the Workflow Administration Console.

The Actions Pane has two sections, each with a bold heading. The top section lists the actions available for the node selected in the Console Pane. The bottom section lists the actions available for the item(s) selected in the Details Pane.
Example: The screenshot above shows that when the Conditions node is selected, you can Enable All Rules, Disable All Rules, or Refresh the node. When you select the starting rule "Rule1" in the Details Pane, you can Enable the Selected Rule(s) or Delete the rule. These options are also available in the context menu when you right-click each item.
Note: The Help option is available in both sections for whatever node or item is selected. Click Help to open the Workflow Administration Console's help files.
Details Pane
The Details Pane in the Workflow Administration Console is the center pane that displays the contents of the node selected in the Console Pane.

The options available for an item selected in the Details Pane will appear in the Actions Pane and in the context menu when you right-click an item.
The Console Pane appears, by default, on the left edge of the Workflow Administration Console. This pane contains a tree of nodes. These nodes provide a variety of tools that let you monitor and modify information for each Workflow Server the console is connected to.

You can expand or collapse root nodes by double-clicking the node. Alternatively, you can click the minus button to collapse the node or the plus button to expand the node.
Configuring Columns
You can customize and organize the columns displayed for each node in the Workflow Administration Console.
To show or hide columns
- In the Console Pane, select the node whose columns you want to configure.
- Select View from the main menu.
- Click Select Columns.
- To show a column, select a column name in the Available columns section of the Configuring Columns dialog box. Click the blue arrow pointing to the right
 .
. - To hide a column, select a column name in the Displayed columns section, and click the blue arrow pointing to the left
 .
. - Click OK.

To reorder columns
- In the Console Pane, select the node whose columns you want to configure.
- Select View from the main menu.
- Click Select Columns.
- In the Configuring Columns dialog box, select a column name in the Displayed columns section.
- Click the blue up arrow
 to move that column to the left in the display. Click the blue down arrow
  to move that column to the right in the display.
 - Click OK.
Note: You can also reorder columns by clicking on the name of a column in the Workflow Administration Console and dragging it to a new position. As you drag the column, the blue insertion bar indicates where it will be inserted.
To revert to the default column layout
- In the Console Pane, select the node whose columns you want to restore to their default layout.
- Select View from the main menu.
- Click Select Columns.
- In the Configuring Columns dialog box, click Restore Default.
- Click OK.
Manage Business Process Instances
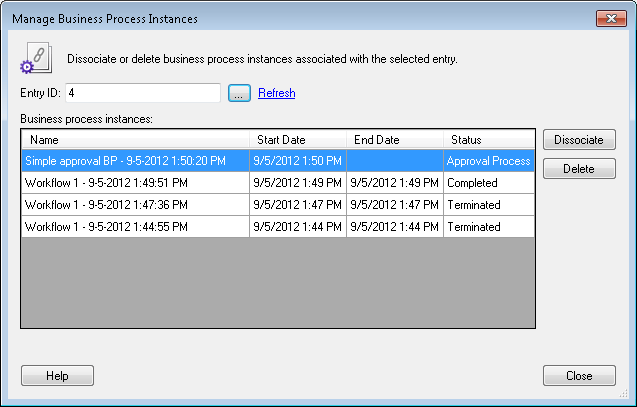
This dialog box allows business process instances to be either dissociated from a specific entry or completely deleted from the Laserfiche repository.

To delete or dissociate a business process instance
- From the main menu in the Workflow Administration Console, select Manage Business Process Instances from the Tools drop-down menu.
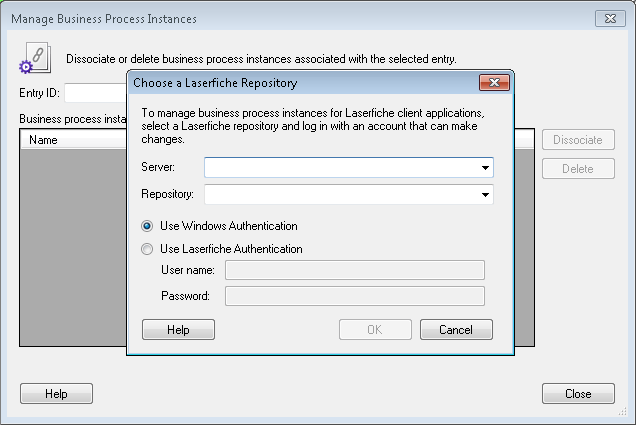
- The Choose a Laserfiche Repository dialog box will open, login to the repository you want to modify using an account with sufficient privileges. Learn more.

- The Manage Business Process Instances dialog box allows you to define an entry and delete or disassociate business process instances that are associated with it.
- Entry ID: Type the entry ID number or click the ellipsis button
 to browse for the entry you want to modify.
 - The Business process instances table will list the business process instances associated with the selected entry.
- Select the business process instance that you want to delete or dissociate from the entry, and click either the Delete or Dissociate button.
Note: Deleting a business process instance will permanently remove it from the Laserfiche Server; however, the instance on the Workflow Server remains unaffected.
Dissociating or deleting a business process instances is irreversible. Once a business process instance is deleted, its information will be permanently removed from all entries in the repository; dissociating the instance will only remove its information from the selected entry. If a business process instance is deleted while it is in progress, any activity from that running instance that attempts to run will return an error and terminate.
- Click Close to exit the dialog box and return to the Workflow Administration Console.
Tip: If you suspect that entries in the Laserfiche repository have changed (i.e., business processes have been started) since this dialog box was opened, click the Refresh link to update its contents.