Forms Multi-Server Configuration Utility
Overview
This document outlines how to configure Forms in a DMZ using the FormsMultiServerConfigurationUtility.exe included with Forms. The four methods outlined in Hosting Forms In A Perimeter Network (DMZ) will be outlined here:
- A standard configuration with two Forms servers and public access to Forms.
- A version of the standard configuration: two Forms Servers with two Laserfiche Directory Server Security Token Service (STS) Instances.
- A high-security variation on the standard configuration: two Forms Servers and two SQL Servers.
- A configuration with only one Forms server.
The utility also enhances and/or simplifies the following configuration processes:
- The connection between the DMZ Forms server and internal Forms server will always be secured using one of two types of security credentials:
- Certificate
- Windows Authentication
- If the Directory Server Security Token Service is in use, no modifications to the Forms configuration files are necessary. Configuring the Directory Server Security Token Service address in the Forms configuration site is required.
Firewall Considerations
Firewall exceptions may be necessary to ensure proper communication between services on the DMZ Forms server and internal Forms server. Refer to DMZ Manual Configuration for further information.
Certificates
Configure what certificates are used to secure Windows Communication Foundation (WCF) communication between the internal Forms server and the DMZ Forms server when using certificate authentication.
Internal Forms Server
Prepare a valid certificate for the internal Forms server. Certificate requirements include:
- Key Usage should include the Server and Client Authentication extensions.
- The internal Forms server will have the private key to its certificate and read rights will be granted to the service and the IIS App Pool user(s).
- If the Forms App Pool or routing service is not running under the system user, grant permissions to manage the private key of the certificate to the appropriate user.
- In the Certificates (certmgr) mmc snap-in, expand Personal and select Certificates, then right click the appropriate certificate, select All Tasks and Manage Private Keys to access the user assignment area.
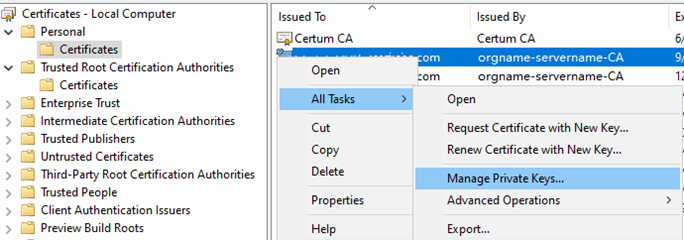
- In the Certificates (certmgr) mmc snap-in, expand Personal and select Certificates, then right click the appropriate certificate, select All Tasks and Manage Private Keys to access the user assignment area.
- If the Forms App Pool or routing service is not running under the system user, grant permissions to manage the private key of the certificate to the appropriate user.
- The certificate needs to be issued to the fully qualified domain name (FQDN) of the internal Forms server.
DMZ Forms Server
Prepare a valid certificate for the DMZ Forms server. Certificate requirements include:
- The Key Usage should include the Client Authentication extensions.
- The DMZ Forms server will have the private key to its certificate and read rights will be granted to the IIS App Pool user(s).
- If the Forms App Pool is not running under the system user, grant permission to manage the private key of the certificate to the appropriate user. See instructions under Internal Forms Server above.
- The client certificate can be issued with any value - the only requirement is that the server trusts the certificate.
Standard DMZ Configuration: Two Forms Servers, One SQL Server
Option 1 – Using a Certificate for Authentication
1. Configuring the Internal Forms Server
Step 1: Use the configuration site to configure Forms.
- Open the configuration site for the internal Forms server (for example - https://machinename/formsconfig).
- On the Database tab, configure the internal Forms server to connect to your internal Forms SQL database.
- Complete any other required configuration for a functional Forms server instance.
Step 2: Use the Forms Multi-Server Configuration Utility to update the configuration for DMZ use.
- On the internal server, open the FormsMultiServerConfigurationUtility.exe located in the Forms\bin directory of the installation path. By default, this path is C:\Program Files\Laserfiche\Laserfiche Forms\Forms\bin\FormsMultiServerConfigurationUtility.exe.
- In the Mode section, select the Configure internal Forms option.
- In the Credential type section, select the Certificate option.
- In the General configuration section:
- The utility will attempt to detect the appropriate Forms installation path and the Laserfiche Notification Service installation path values. Edit these values only if necessary.
- Optional: If inbox real-time notification is not needed or the Laserfiche Notification Service is not installed, clear the Update Laserfiche Notification Service checkbox.
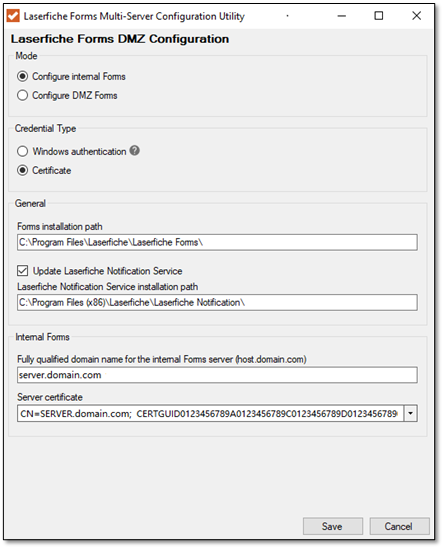
- In the Internal Forms section:
- Enter the fully qualified domain name of the internal Forms server.
- Select the appropriate certificate prepared for the internal Forms server from the Server certificate dropdown.
- Click Save to save your changes. The final configuration should resemble the example in the image below.
Note: The Laserfiche Forms Routing Service will be restarted automatically to make the configuration effective. If the Update Laserfiche Notification Service checkbox is selected, the Laserfiche Notification Hub Service and Laserfiche Notification Master Service will be also restarted.
2. Configuring the DMZ Forms Server
Step 1: Use the configuration site to connect to the Forms database.
- Open the Forms configuration site on the DMZ Forms server.
- On the Database tab, configure the DMZ Forms server to connect to the internal Forms SQL database.
- On the Forms Server tab, verify that the configuration matches the internal Forms server configuration.
Step 2: Use the Forms Multi-Server Configuration Utility to update the configuration for DMZ use.
- On the DMZ server, open the FormsMultiServerConfigurationUtility.exe located in the Forms\bin directory of the installation path. By default, this path is C:\Program Files\Laserfiche\Laserfiche Forms\Forms\bin\FormsMultiServerConfigurationUtility.exe.
- In the Mode section, select the Configure DMZ Forms option.
- In the Credential type section, select the Certificate option.
- The utility will attempt to detect the appropriate Forms installation path. Edit this value only if necessary.
- In the DMZ Forms section,
- Enter the fully-qualified domain name of the internal Forms server.
- Select the certificate prepared for the DMZ Forms server from the Client certificate dropdown.
- Optional: To execute a lookup rule using the internal Forms server’s routing service, select the Use internal Forms server as proxy to execute lookup rule checkbox.
- Optional: To upload files using the internal Forms server’s routing service, select the Use internal Forms server as proxy to execute upload files checkbox.
- Test connectivity between the DMZ Forms server and the internal Forms routing service by clicking on the Test button. Click Save to save your changes. The final configuration should resemble the example in the image below.

Note: The Laserfiche Forms Routing Service, Laserfiche Notification Hub Service and Laserfiche Notification Master Service will be disabled automatically on the DMZ based Forms server.
Option 2 – Using Windows Authentication
1. Configuring the Internal Forms Server
Step 1: Use the Configuration Site to configure Forms.
- Open the Forms configuration site on the internal Forms server.
- On the Database tab, configure the internal Forms server to connect to your internal Forms server SQL database.
- Complete any other required configuration for a functional Forms server instance.
Step 2: Use the Forms Multi-Server Configuration Utility to update the configuration for DMZ use.
- On the internal Forms server, open the FormsMultiServerConfigurationUtility.exe application located in the Forms\bin directory of the installation path. By default, this path is C:\Program Files\Laserfiche\Laserfiche Forms\Forms\bin\FormsMultiServerConfigurationUtility.exe.
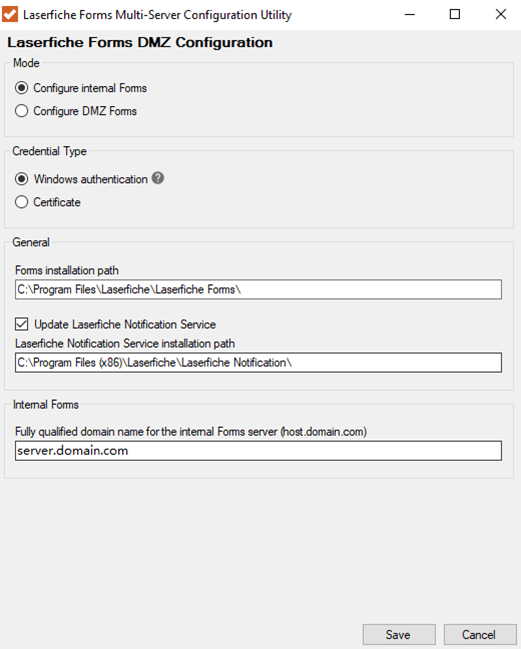
- In the Mode section, select the Configure internal Forms option.
- In the Credential Type section, select the Windows authentication option.
- In the General configuration section,
- By default, the utility attempts to detect the appropriate Forms installation path and the Laserfiche Notification Service installation path values. Edit only if required.
- If real-time email notification or the Laserfiche Notification Service is not installed, deselect the Update Laserfiche Notification Service checkbox.
- In the Internal Forms section, enter the fully qualified domain name of the internal Forms server.
- Update the configuration by clicking the Save button. The final configuration should resemble the example in the image below.
Step 3 (Optional): Change the Service Account used for the Laserfiche Forms Routing Service.
The default service account for the Laserfiche Forms Routing Service is the LocalSystem account, which is a completely trusted machine account, even more so than the Administrator account. It has extensive privileges on the local computer and acts as the computer on the network.
For greater security, change this user to a specific service account that has been granted the minimum access required by following these steps:
- Press the Windows + R keys simultaneously. Type services.msc. Press OK or hit Enter to open the Services mmc snap-in.
- Right click on the Laserfiche Forms Routing Service and select Properties.
- View the Log On tab.
- Under Log on as: select This account and then click Browse to find and choose the appropriate account.
- Click OK and then restart the service.
- Follow the instructions at Configuring the Minimum Rights to Run Laserfiche Forms to grant only the minimum required access for the service account.
Note: If real-time email notification is needed and the Laserfiche Notification Service is installed, you can repeat steps 1-5 above to configure the Laserfiche Notification Master Service. In step 2, use the same user account as the Laserfiche Forms Routing Service.
2. Configuring the DMZ Forms Server
Step 1: Use the configuration site to point the Forms database.
- Open the Forms configuration site on the DMZ Forms server.
- On the Database tab, configure the DMZ Forms server to connect to the internal Forms server SQL database.
- On the Forms Server tab, verify that the configuration matches the internal Forms server configuration.
Step 2: Use the Forms Multi-Server Configuration Utility to update the configuration for DMZ use.
- On the DMZ server, open the FormsMultiServerConfigurationUtility.exe application located in the Forms\bin directory of the Forms installation path.
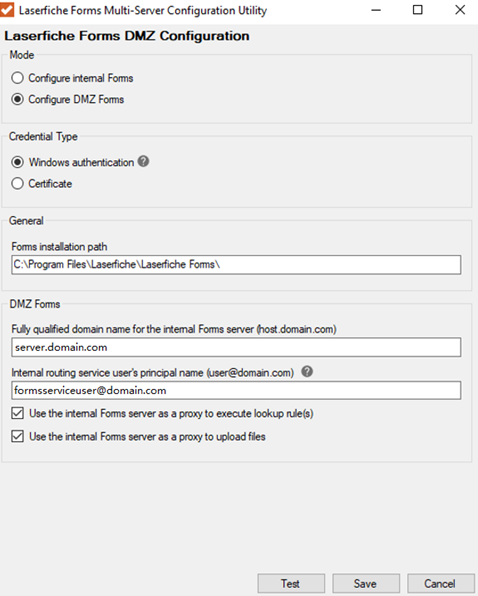
- In the Mode section, select the radio button to Configure DMZ Forms.
- In the Credential Type section, select the Windows authentication option.
- In the General configuration section, the utility attempts to detect the Forms installation path. Edit only if required.
- In the DMZ Forms section,
- Enter the fully qualified domain name of the internal Forms server.
- Under the Internal routing service user's principal name (UPN), do one of the following:
- Leave this field empty if a service user has not been configured.
- Type the UPN of the internal Forms server’s Laserfiche Forms Routing service’s service user.
- To execute lookup rules using the internal Forms server's Laserfiche Forms Routing service, select the Use internal Forms server as proxy to execute lookup rules checkbox.
- To upload files using the internal Forms server's Laserfiche Forms Routing service, select the Use internal Forms server as proxy to execute upload files checkbox.
- Test connectivity between the DMZ Forms server and the internal Forms server Laserfiche Forms Routing service by clicking the Test button. Click Save to save your changes. The final configuration should resemble the example in the image below.
- Test the connection before saving any changes.
Two Forms Servers with Two STS Instances
1. Configuring the internal Forms server
Follow the steps outlined for the standard internal configuration.
2. Configuring the DMZ Forms server
Step 1: Use the configuration site to set up the Forms database and authentication.
- Open the Forms configuration site on the DMZ Forms server.
- On the Database tab, configure the DMZ Forms server to connect to the internal Forms server SQL database.
- On the User Authentication tab, select Use a Laserfiche Directory Server for Single Sign-On authentication and set the Directory Server STS URL to the address of the Laserfiche Directory Server STS located in the DMZ. For more information on having a separate STS, see Laserfiche Directory Server configuration.
Step 2: Use the Forms Multi-Server Configuration Utility to update the configuration for DMZ use.
Follow the steps outlined for the standard DMZ configuration.
High-Security Variation: Two Forms Servers, Two SQL Servers
1. Configuring the internal Forms server
Follow the steps outlined for the standard internal configuration.
2. Configuring the DMZ Forms server
Step 1: Create the DMZ Forms SQL database.
Follow the steps in Manually Configuring Forms in a DMZ.
Step 2: Use the Forms configuration site to configure Forms.
Follow the steps outlined for the standard DMZ configuration, altering Step 1 to connect to the DMZ Forms SQL database.
Step 3: Use the Forms Multi-Server Configuration Utility to update the configuration for DMZ use.
Follow the steps outlined for the standard DMZ configuration.
One Forms Server in DMZ
The configuration matches the manual configuration instructions, except the use of the Directory Server EndpointUtility.exe utility is unnecessary for updating the Forms configuration. For further information, please refer to the manual configuration instructions.
Miscellaneous Information
This utility includes a logging system to aid in troubleshooting. Log files are stored in C:\ProgramData\Laserfiche\Forms\Logs\DMZConfigurationLogs by default .
Common Issues and Solutions
Certificate Issue
If you receive the following message when testing a connection:
Connection test failed. ERROR: Attempting to connect to 'net.tcp://<serverFQDN>:8168/lfrouting' failed
This issue is usually caused by a certificate that is not trusted. To correct the issue, after creating the certificates:
- On the internal machine, import both the internal server and DMZ server certificates to the trusted root.
- On the DMZ machine, import the certificate from the internal server to the trusted root.