Creating Lookup Rules to Populate Fields with Database Entries
Lookup rules specify if information should be retrieved from an external database to populate fields. Lookup rules match a field value with a database value and populate other fields with values from the database. You can create lookup rules that work with database tables or SQL stored procedures.
Before you can create a lookup rule to pull information from a database, that database must be added as a data source for that business process on the Data Sources page. Learn more about adding a data source.
Note: Any match fields (specified in When conditions) that contain auto-suggested values imported from a process in Laserfiche Forms 9.1.1 or earlier are not retained in Laserfiche Forms 10 or later. You will need to update your lookup rule manually if you want to include a Fill statement that specifies the source for the auto-suggestion options.
To create a lookup rule to pull data from a table
- Click the Lookup Rules tab to open it.
- Click New Lookup Rule.
- In the first drop-down menu, select the database you want Forms to get data from.
- In the next drop-down, select Table/View.
- In the Name drop-down, select the name of table.
- In the Sorted by drop-down, select which table column you want to sort the data by and then choose if the data will be sorted in ascending or descending order. The sort order is applied when you're filling a drop-down field with options or when you're filling a table or collection from a database.
- In the drop-down list next to When, select the form field that should match a column in the table in the database. Specify the data source column in the data source column drop-down. Click the plus sign to add a condition or x to remove a condition.
- You can use the built-in _(Current_User) token to help secure sensitive data. The value of the token is retrieved on the server side and can not be manipulated by the end user to alter returned results.
- You can remove the conditional (When) part of a lookup rule. If a rule doesn't have a condition, it will automatically fill the specified fields with values from the database. See the next section for more information.
- If you have multiple When conditions that must be met before filling out a field, an Auto fill button will appear on the form next to the field specified in the second condition. Click this button to run the lookup rule and fill the field. You may want to put some instructional text in the form to alert users to click this button as not everyone who fills out the form will be familiar with this behavior.
- If you are matching a drop-down field to a database column, it will match the values assigned to each choice in the list instead of the choices themselves. If no value is assigned to a choice, the choice will be used instead. Learn more about assigning values to choices.
- Next to Fill specify the form field that should be filled in with a value from the data source. Specify the data source value for this field in the drop-down next to data source value.
- Click the plus sign to fill multiple fields or x to remove a rule definition.
- To add another When/Fill statement, click the + Add rule link at the bottom.
- When finished, click Save.
Tip: Fill statements can stand alone if you delete the When part of the condition. A stand-alone Fill statement will auto-suggest values from the data source for the specified field.
Note: If your When condition requires a table's field being filled in, the Fill condition must be for another field within the same table. Fill conditions for fields outside the table will not run.
Tip: You can reorder rules by clicking the arrows above and below the rule number on the left, and you can reorder conditions by clicking the up and down arrows to the right of the conditions.
Tables, collections, and lookup rules
If you're using a lookup rule to fill a table or collection, you can choose between having the data source values appear as auto-suggestions for fields or having the data source values automatically add rows or sets to the table or collection.
Note: Lookup rules used in tables or collections to fill another table or collection perform on only one row/set at a time. One row to one row lookup, not one row to multiple rows. It is not possible to have a single lookup populate multiple rows in a table or collection.
Lookup rule examples
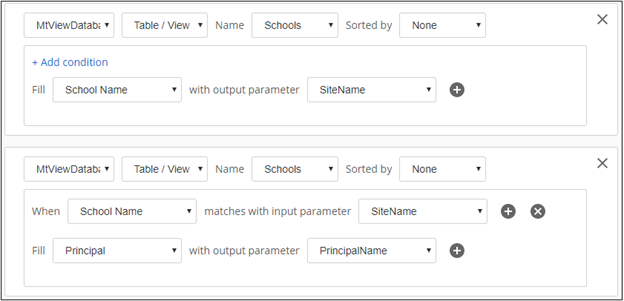
Example: The Mountain View school district oversees a dozen different schools. When supervisors click in the "School Name" field of the "Site Visits" form, they should immediately see a list of all the schools in the district. Once they choose a school, the name of the school's principal will be automatically placed in the "Principal" field. To configure the "School Name" field so it shows a list of schools when clicked, the district configured the lookup rule like this:
Example: Teachers in the district must fill out a form to update their benefits. When a teacher types his or her employee ID in the "Employee ID" field, several other fields should be filled out with the teacher's personal information. It would be a privacy breach if teachers could access each other's IDs (and thus their personal information), so the "Employee ID" field should not auto-suggest all the IDs in the database. The school district configured their lookup rule as shown below:

Disabling Lookup Rules
In Laserfiche Forms 10.3.1 and above, you can turn off lookup rules with the Enable lookup rule option. This allows you to turn off a lookup rule in order to save incomplete lookup rules that do not validate successfully. This also allows Forms to retain invalid lookup rules from an uploaded process. Imported rules will be turned off, allowing you to go into the process to update database and table names.

Working with Stored Procedures
A stored procedure is a collection of SQL statements used to access data. Stored procedures take input parameters, perform logic, and return a result set.
Note: Stored procedures are stored in the database. You'll need to create one there, add that data source to forms, and grant the appropriate business processes access to it before you can use it in lookup rules.
Using a lookup rule with a stored procedure, you can:
- Fill a form field with a number and increment the number in the database.
- Use complex logic to return a more precise result set than would be possible with a simple lookup rule using a table.
To create a lookup rule to pull data from a stored procedure
- Click the Lookup Rules tab to open it.
- Click New Lookup Rule.
- In the Available Sources drop-down menu, select the database Forms will get data from. In the next drop-down, select Stored Procedure and, in the Name drop-down, select the name of the stored procedure to use.
- If there are input parameters for the stored procedure, they'll appear directly below the source information for the rule. Specify the form field to use for each input parameter.
- In the drop-down next to Fill, select the Form fields that will be filled with the value of each result set column. In the text box next to result set column, enter the name of the result set columns used to fill the form field.
- To fill other fields with other result set columns, click the plus sign and repeat step 5.
- When finished, click Save.
Example: auto-incrementing number
Generating an auto-incremented number for a form involves three steps:
- Create a SQL Sequence. A sequence is a user-defined schema-bound object that generates a sequence of numeric values according to the specification with which the sequence was created. Learn more about sequences
- Create a stored procedure to retrieve the next number in the sequence.
- Call the stored procedure in a lookup rule to insert the value into a form field.
Creating a SQL Sequence for the number
Run this SQL script to create the sequence:
CREATE SEQUENCE [dbo].[CountBy1]
START WITH 1
INCREMENT BY 1 ;
GO
Creating a stored procedure to increment the number
- Expand Programmability under the database where you just created the sequence.
- Right-click Stored Procedures and click New Stored Procedure....
- In the new stored procedure template that opens, delete all of the text so that the template is blank. Then, paste the following lines into the template.
- Click Execute. After refreshing the Object Explorer, the stored procedure will appear in the Stored Procedures folder.
CREATE PROCEDURE [dbo].[GetNumber]
AS
BEGIN
SELECT NEXT VALUE FOR [dbo].[CountBy1]
END
GO
Using the stored procedure in a lookup rule
- Sign in to Laserfiche Forms and, if necessary, add the database as a data source and give the appropriate processes access to it. Learn more about giving processes in Laserfiche Forms access to an external database.
- Open the form that will use this stored procedure in the form designer. Click Lookup Rules.
- Click New Lookup Rule or, if there are already lookup rules for the form, click Add Rule.
- Select the data source from the Available Sources drop-down. In the second drop-down list, select Stored Procedure. Then, in the Name drop-down list, select the stored procedure.
- Next to Fill, specify the field that will be filled with the number from the stored procedure. Next to result set column, enter the name of the result set column where the number will be stored. Using the stored procedure from this example, you'd enter Number.
- Click Save.
Example: Returning sorted values
You can use a stored procedure lookup rule to return a sorted list of values from a column in your database table. This example uses a database called Test, and a table called dbo.Inventory.
Creating a stored procedure to return sorted values number
- Expand Programmability under the database where your table is.
- Right-click Stored Procedures and click New Stored Procedure....
- In the new stored procedure template that opens, delete all of the text so that the template is blank. Then, paste the following lines into the template.
USE [Database Name]
GO
/****** Object: StoredProcedure [dbo].[uspSimple] Script Date: 02/04/2014 11:42:46 ******/
SET ANSI_NULLS ON
GO
SET QUOTED_IDENTIFIER ON
GO
CREATE PROCEDURE [dbo].[sp_sortedItemName]
AS
BEGIN
SET NOCOUNT ON;
SELECT [Item Name] FROM dbo.Inventory
ORDER BY [Item Name] ASC
END - Rename the stored procedure by replacing [dbo].[sp_sortedItemName] with the name of your choice.
- Replace DatabaseName with the name of the database you're creating this stored procedure in. Replace dbo.Inventory with the appropriate table name and Item Name with the column you want to sort.
- Click Execute. After refreshing the Object Explorer, the stored procedure will appear in the Stored Procedures folder.
Using the stored procedure in a lookup rule
- Sign in to Laserfiche Forms and, if necessary, add the database as a data source and give the appropriate processes access to it. If you added the stored procedure to an existing data source, be sure to update that data source. Learn more about giving processes in Laserfiche Forms access to an external database.
- Open the form that will use this stored procedure in the form designer. Click Lookup Rules.
- Click New Lookup Rule or, if there are already lookup rules for the form, click Add Rule.
- Select the data source from the Available Sources drop-down. In the second drop-down list, select Stored Procedure. Then, in the Name drop-down list, select the stored procedure.
- Next to Fill, specify the field that will be filled with the sorted values. Next to result set column, enter the name of the result set column where the number will be stored. The example stored procedure returns the Item Name column, so you'd enter that here. Or, if your stored procedure returns a different column, specify its name here.
- Click Save.
Related Topics