Monitoring Process Instances
The Monitor page contains details each time a business process runs (i.e., each instance of a business process) and all related form submissions. Click an instance to see more details, including actions taken in previous steps and the values for field and process variables. Note that the Monitor page in Laserfiche Forms has options to filter by process at the top and by instance or task status, start date, started by, and with Forms 11 Update 5 or later the presence of an error log on the left. In Forms 11 Update 2 and later, process owners and forms administrators now have the ability to manage saved drafts.
Working with Process Instances
The Monitor page lists instances that you have permission to view. You can see the instances name, current status, who started it, the start date, and more.
To view a specific instance's action history and variable values
- Double-click the instance that you want to view more information about. the History tab will be displayed with information about each step in the process. A toolbar provides actions that can be performed on the instance or step. The options available from left to right are: Refresh, View error log, Retry, Skip, Interrupt, Stop, Edit process, and Reports.
- Refresh checks for changes and refreshes the instance details.
- View error log displays the instance details along with a list of what errors occurred to cause the instance to suspend or otherwise become stuck.
- Retry opens a dialog that allows you to retry any steps that are eligible for this action.
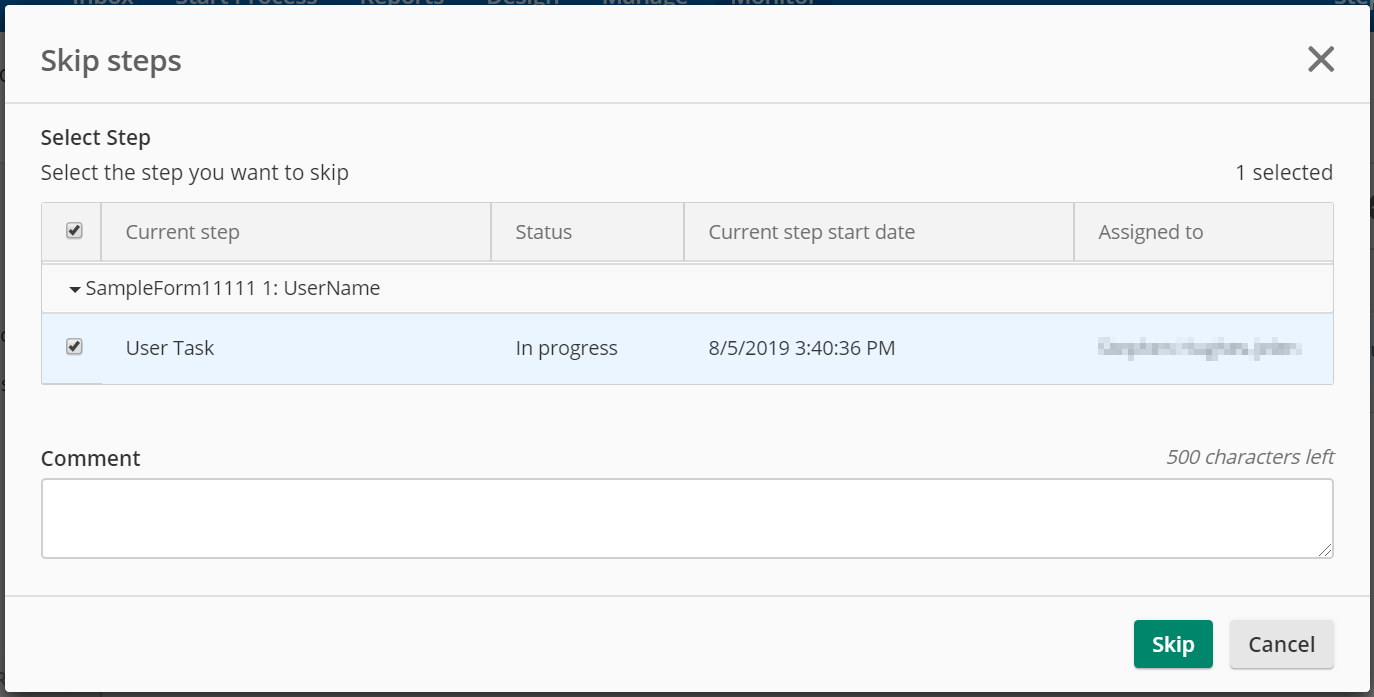
- Skip opens a dialog that will display any steps that may be skipped, allowing you to move past a stuck step if required.
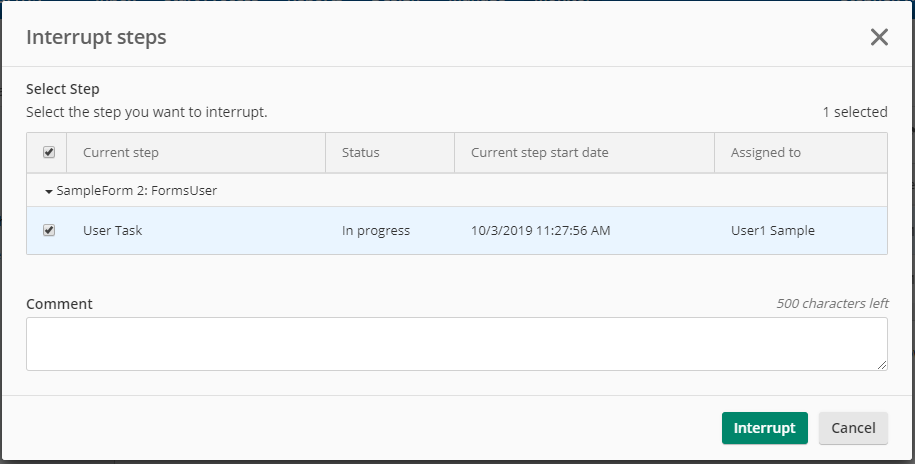
- Interrupt opens a dialog and allows you to interrupt a step.
- Stop stops the instance.
- Edit process opens the process diagram for editing.
- Reports opens the process Reports page.
- Select the Variables tab to see a list of all the field variables in the process and their values. If an instance is suspended or in progress, an Edit button will be displayed. Click this to open the Update Variable Value dialog. This dialog only displays variables that allow editing.
- If a service task is suspended, you can retry it by clicking the Retry button on the toolbar and selecting the specific step, or clicking the more menu
 and selecting Retry. Step names that appear as links open a copy of the form submitted on that step.
 - Expand any user tasks to see their history and who the task was assigned to. Click the step name to see the form associated with the step.
- Click any workflow service tasks that received output parameters from Workflow to see a list of the variable and output parameter pairings.
Editing Instance Variable Values
Important: Any changes made in the Update Variable Value dialog will not be checked for validity. Use this feature with caution, and be sure to use values that are compatible with the fields they belong to.
To change an instance variable value
- Locate the variable item you wish to change by either scrolling through the list, or typing part of the variable name in the search box. Using search will filter the list based on partial matches.
- Enter the desired value in the Value field(s) for each variable to be altered.
- [Optional] Enter a comment to explain the reason for the change.
- Click Save to save your changes to the instance and exit the dialog.
The ability to edit the values of an in progress or suspended instance allows an administrator of that process to correct errors that may have been made by the user completing a form. For instance, a miss-typed address or phone number.
If additional values need to be added to a checkbox, use the following format:
<checked>value_1,value_2<unchecked>value_3<other>value_4
The values for <checked> and <unchecked> must match the checkbox settings.
When uploading new files to file upload variables, file size and type will be verified at upload for allowances.
Working With Tasks
To reassign user tasks
- Click the instance that has the task you want to reassign.
- Click the more button
 next to the task or in the form, and select Reassign.
 - In the Reassign Task dialog, select to reassign the task to one or more users or to an entire team.
- If you only specified one user, the task will be assigned to that user. It will appear in the list of assigned team tasks and will appear in the Open Tasks section under My Tasks.
- If you specified more than one user or a team, the task will appear in the Unassigned Tasks section for the users and the team. A manager can then reassign the task to an individual user (effectively assigning the task to them) or a user can assign the task to themselves.
- Optional: Type a comment describing why you are reassigning the task. This message will appear in the task's action history.
- Click Reassign.
To change the due date or priority of a task
- Click the instance that includes the task you want to change the due or priority of.
- Click the more menu
 next to the task and select Edit due date or Edit priority.
 - Configure a new due date or priority and click OK.
To Retry a step in the process
- Select the instance or instances that you want to retry at the suspended step or in progress steps.
- Click the retry button
 in the top right of the page to retry the process.
 - Click Retry in the confirmation dialog.
To Skip the next event or task in the process
- Select the instance containing the stuck step you want to skip.
- Click the skip step button
 in the top right of the page to skip the step.
 - In the Skip steps window, select the step(s) or action(s) you want to skip
- Optional: Write a comment about the reason for the skip.
- Click Skip to skip the step(s).
Note: Before skipping a converging gateway, skip or interrupt each active branch to achieve the desired outflow.
Working With Instances
- Select the instances you want to interrupt. All in progress and suspended processes can be interrupted.
- Click the interrupt button
 in the top right of the page.
 - In the Interrupt steps window, select the step(s) or action(s) you want to interrupt.
- Optional: Write a comment about the reason for the interruption.
- Click Interrupt to interrupt the step(s).
Note: If the last active step in a process instance is interrupted, the instance will be listed as Completed in the status report.
Restart a user task to resume instance flow
If an instance becomes stuck at a user task that has been completed, terminated, or stuck, the user task can be restarted.
- Select the instance on the Monitor page.
- Open the instance History view.
- If necessary, scroll the page to the far right. If a user task is eligible to be restarted, there will be a three-dot menu (More) to the right of the Submission IP address column.
- Click the three dots and select Restart.
Note: If there are still active steps in the instance, the status of those steps will not be affected. To revert the instance to the desired user task step, stop the instance, and then restart the desired user task.
Only a process admin can restart a user task from the instance details and only when the task status is in progress, suspended, terminated, completed, or canceled.
User tasks in sub-processes can not be restarted.
Using Skip and Interrupt Effectively
Skip and Interrupt allow a Process Administrator or Business Manager to handle cases when a step will not be completed in a timely manner, as when an user task is assigned to someone who is not available and the task can not be reassigned. If there are multiple paths through the process via gateways, then there is the possibility that the incomplete task may be skipped or interrupted to allow completion of the rest of the process. However, under certain conditions, this could result in later steps to be triggered multiple times.
To avoid this, ensure all tasks that precede a converging gateway have been completed, skipped, or interrupted prior to skipping the gateway. If the gateway is skipped, and a step is later completed or skipped, then the gateway will trigger following steps again.
Note: The major difference between skip and interrupt is that skip proceeds onto the next step in the process instance. Interrupt stops processing of the branch at that point, as if the step was a End step. If the interrupted step is at the end of the process or there are no other paths to follow, the process instance will be completed.
Process Elements that support Retry, Skip and Interrupt
The table below illustrates which process elements can be affected by the commands above.
| Function | In Progress and Suspended Signal or Timer Events | In Progress and Suspended Service Tasks | In Progress and Suspended User Tasks | In Progress Parallel and Inclusive Gateways |
|---|---|---|---|---|
| Retry | Yes | Yes | Yes | Yes |
| Skip | Yes | Yes | Yes | Yes |
| Interrupt | Yes | Yes | Yes | Yes |
To stop instances listed in the results
- Select the instances you want to stop or retry. To select all instances, select the checkbox in the top row.
- Click the stop button
 in the top right of the page to stop the instances.
 - Forms 10.4.3 and newer: Provide a comment for the reason the instance was stopped and click Stop.
To delete terminated instances
- Select the instances you want to delete.
- Click the delete button
 in the top right of the page.
To view an operational report on an instance
- Select the instances on which you want to view a report.
- Click the View operation report button
 in the top right of the page.
To interact with instances that run workflows
The Workflow service task lets you start workflows at strategic points in your process. Learn more.
If the Workflow service task received output parameters from workflow, you can see those parameters by clicking on the service task name in the instance details.
Managing Saved Drafts
In Forms 11 Update 2, administrators (process admin for specific processes and/or system admin for all processes) can monitor and manage drafts from the Monitor page. The system administrator can see all drafts for the server, while a process admin can only see drafts for processes to which they have rights to manage.
Drafts are created when a user chooses to save an in progress form or user task in order to return later to complete the form or task. If users do not return to complete their forms or tasks, an administrator may need delete abandoned or outdated form or task drafts. A system administrator may also choose to set auto draft cleanup through the Data Maintenance panel.
Working with Drafts
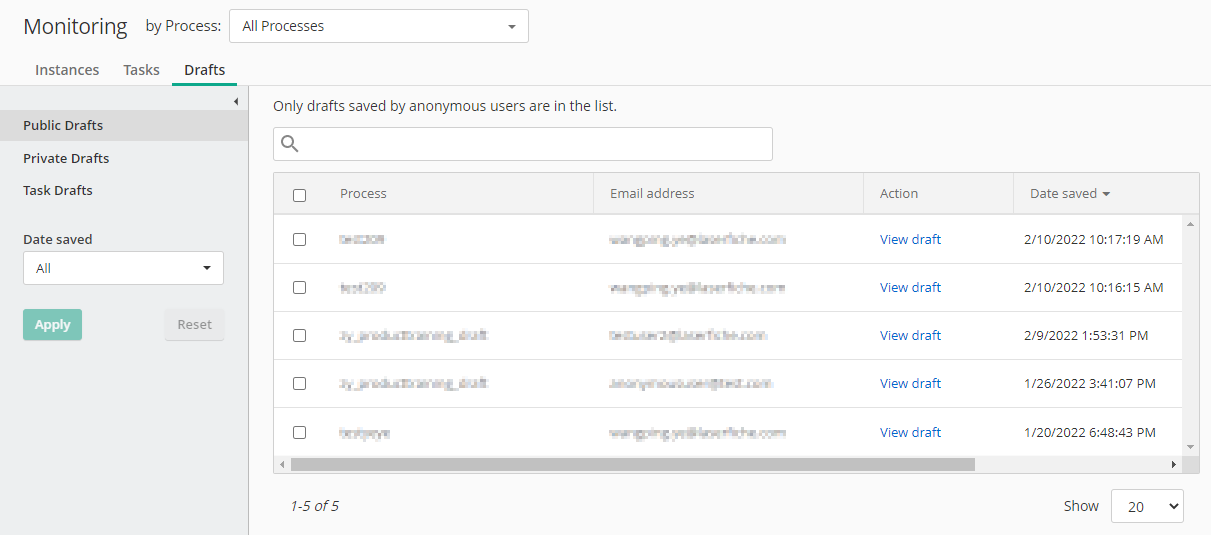
Click the Drafts tab to access the drafts lists.

Drafts are separated into three categories:
- Public Drafts: Saved by anonymous users from a message start event form.
- An admin can view the public drafts list to see the email address and IP address of the anonymous user who saved draft, as well as the time at which the draft was saved.
- The list can be filtered by date in the left panel.
- Available actions after selecting one or more drafts:
- An admin can view individual draft content with View draft button in the row.
Note: This allows an admin to check for valid data intended for further submission.
- An admin can update the email address of a single selected draft in cases where the user may have entered an incorrect address and is unable to access the draft. To update the email address, the admin can select the pencil icon in the toolbar.
- With one or more selected drafts, an admin can Resend email notification from either the toolbar or context menu.
Note:This can be used to remind an anonymous user that they have saved a partial form if they have forgotten or lost the form information.
- With one or more selected drafts, an admin can Delete draft either the toolbar or context menu.
Note: This allows an admin to clean up long-lived drafts or ones with potential risk.
- An admin can view individual draft content with View draft button in the row.
- Private Drafts: Saved by authenticated users from a message start event form.
- An admin can view the private drafts list to see the user name and IP address of the user who saved draft, as well as the time at which the draft was saved.
- The list can be filtered by the date saved and the user the draft was saved by in left panel.
- Available actions after selecting one or more drafts:
- With one or more selected drafts, an admin can Delete draft either the toolbar or context menu.
- Task Drafts: Created from user task events.
- An admin can view the task drafts list to see the user name and IP address of the user who saved draft, as well as the time at which the draft was saved, and the relevant instance and user task.
- The list can be filtered by the date saved and the user the task was saved by in left panel.
- Available actions after selecting one or more drafts:
- With one or more selected drafts, an admin can Delete draft either the toolbar or context menu.


