User Tasks
User tasks represent actions by participants in a business process. For example, a manager approving a form submission or a user revising a previously submitted form would be represented with user tasks.
Why use a user task?
Use a user task if someone needs to take action in the business process. If a user should be notified but will not take action, use an email service task. Public users cannot participate in user tasks.
Configuring User Tasks
The General tab
- Double-click the user task on the canvas to open its properties window.
- In Name, enter a name for the user task. You can also add variables in the task name.
- Under Assign to, select the team or users to whom you want to assign the user task. Tasks can be reassigned during the process.
- Team: Assign the tasks to an entire team. You can select a team, or you can create a team by selecting Create new team. You can also add filters to assign the task to specific members of the team.
- Team based on variable: Assign the tasks to a team using variables. You can also add filters to assign the task to specific members of the team.
- Users: Assign the tasks to many users. Click the variable button to assign the task based on a field value or process variable. Learn more
- Under Assignment Options, select from the following:
- Allow the task to be reassigned: Allow users and team managers to reassign the task after it has been assigned. If selected, users have a Reassign option to let users assign the task to other users or teams. If cleared, users can only assign the task to themselves, not to anyone else.
- Email users when this task is: Select whether to send users an email when they are assigned, reassigned, or either assigned or reassigned the task. Click Edit to set up the email.
- Fill in the From, Send to, Subject, and Body fields. Learn more about using the rich-text editor to fill the Body field.
- You can also fill the From, CC and BCC fields. Click Show From/CC/BCC to display these fields.
Note: Variables may be used in the From field.
- Click the Insert Variable button
 to insert a placeholder for process or field information such as the name of the person who started the process, the submitter, any user task actions or comments, and field values.
 - If you want a specific name to appear next to "To" when someone receives an email from this service task, format the email addresses like this: "Friendly Name" <email@email.com>.
- You can also fill the From, CC and BCC fields. Click Show From/CC/BCC to display these fields.
- Optional: Add an additional attachment to the email.
- Optional: Select whether a form submission should be attached to the email, and the source of the form.
- Optional: Click the checkbox for Include action history to attach a PDF of the last 10 completed steps of action history in the email. The number of steps included can be changed on the Advanced Options tab of the Forms Configuration page.
- Optional: Customize the Action history section title if desired. Specify the Action history location.
- By default, the action history will be placed Before the form, or you can select to place the history After the form or As a separate document.
- Fill in the From, Send to, Subject, and Body fields. Learn more about using the rich-text editor to fill the Body field.
- Round robin task distribution: Assigns the task to a team member randomly, when the task has not been assigned to a team member before. This option is not available when you select Users in step 3.
- Optional: Under Action History Access, select Hide action history when viewing this task to prevent the user from seeing the process history when viewing the task unless assigned to the Process Admin or Business Manager roles.
- Optional: Under Due Date, select by when you want to have the task completed. You can define an exact due date, a relative due date based on a variable in your process, or no due date at all.
Example: Records requests must be filled within three days of the request being received. Since submitting a record request starts the process, the due date is configured as follows:

Example: When a Project Proposal form is submitted, a Project Scope form must be submitted at least eight days before the Financial Report is due to give the Accounting department enough time to factor the new project into the report. The Project Proposal form includes the Financial Report due date, so the Project Scope form's due date can be set based on that field value. The due date is configured as follows:

Example: The Human Resources department created a form for organizing the company's summer picnic. The due date for filling this form is July 16th, which is a week before the picnic.

- Under Priority, select a priority level for this task. A task's priority appears in the My Tasks section in the inbox and helps call attention to the task.
- In the drop-down list next to the priority level, select Always if the priority should always be set to that level, or When if the priority should be set to that level only when certain criteria are met.
- If you select Always, only one priority level can be specified for the task.
- If you select When, click in the Conditional Expression box to create a conditional expression that will be evaluated to determine whether the task priority will be set. Learn more about creating conditional expressions.
- Under Task Sequence, select the option if the next user task in the process is assigned to the same individual as this task and if you want the next user task's form to appear immediately after the user submits this user task's form.
Note: This option will only automatically load tasks if the tasks are assigned to the same user. It will not automatically load tasks if the tasks are assigned to a group of users or team, even if the user completing the task is in both groups or teams.
The Form tab
- Go to the Form tab to select the form.
- Under Form, choose to use a specific form or select the form dynamically based on the value of a variable.
- Select a form: Use the drop-down to choose the specific form you want users to fill out.
- Form based on variable: Use the text box and variable picker to specify the name of the form you want the user to fill out. For example, you can create a form for students to complete. If the student indicates that the student is a mathematics major, the student will be prompted with one form after submission, that differs from the form that a chemistry major gets after submission. The value of the variable helps to identify whether to use the mathematics form or the chemistry form.
- If there are no matching forms: A form with the variable name may not exist. In this situation, you must indicate how you want the instance to resolve the conflict. You can specify a default form, or you can terminate the instance.
- Under the form selection, select from the following form options:
- Make form read-only for users the task is assigned to: Allow the users to see the document only, not edit the document. Note that when you select this option, the form does not display a default value, formula value, or lookup rule value, and it only shows carried over values. When the form does not contain carried over values, the field is blank.
- Collect Payment: Include a payment gateway on the form. When you select this option, the Direct Approval option at the bottom is disabled automatically.
- Under Save as Draft, select from the following options:
- Show Save Draft button when viewing the task: Allows users to save the form as a draft using a Save Draft button. The draft is placed in the Draft section in the inbox.
- Allow user to save form offline in the Laserfiche app: Allow users to download a form or task to their phones. A user can complete and submit the form or task offline and, when the user is back online, the form is submitted automatically.
- Under Action Buttons, select the types of action you want the user to be able to perform and the label using the text box on the right. Create custom action buttons for use in conditional processing with more options.
- Click Add Button.
- Complete the Button CSS Class and Button Label fields.
- Select the Direct Approval option to allow users to perform this task by replying to the email notification with the button name ("Approve", "Reject", "Submit" or the custom label). When users get the task notification, they can reply to the email with the exact name of the action button to complete their task. If the user responds with the wrong action name, he or she will receive an email notifying them action does not exist. Learn more
The Outflows tab
- Go to the Outflows tab to set up the outflow settings. Outflow settings let you specify when a particular pathway in your process should run. For example, after a user task in which a manager approves or denies a form, outflow settings let you designate one course of action for an approved form and another course for a denied form. Learn more
The Reminders tab
- Go to the Reminders tab to set up task reminders. Reminders can send an email to remind the user(s) that a task is due or past due for action.
- Click Add reminder to add a new reminder.
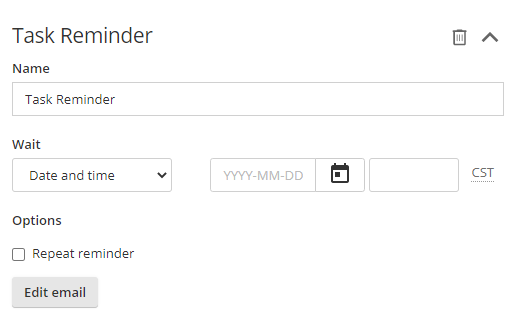
- Provide a Name for the reminder.
- Select an event to Wait for. Options include a specific Date and time, a specific time span After task creation, a number of days before or after a Variable based time value, a time span After due date or Before due date.
- Complete the specifics required for the selected wait interval.
- If the reminder should not be triggered on a weekend, select Exclude weekends.
- If the reminder should repeat after the first instance, select Repeat reminder, specify the desired Interval, specific the number of times to repeat using the End after option, and again determine whether the reminder should Exclude weekends.
- To remove a task reminder, click the trashcan icon.
- Click Edit email to create or edit the task reminder email to be sent.
- Fill in the From, Subject, and Body fields. Learn more about using the rich-text editor to fill the Body field.
- You can also fill the From, CC and BCC fields. Click Show From/CC/BCC to display these fields.
Note: Variables may be used in the From field.
- Click the Insert Variable button to insert a placeholder for process or field information such as the name of the person who started the process, the submitter, any user task actions or comments, and field values.
Note: You can send an email to an entire team by entering the name of the team as the recipient of the email. The email will be sent all team members, but not to the team administrator or team manager. If you also want the team administrator or team manager to receive the email, you should add them separately.
Warning: If you enter a variable in the From, CC, or BCC fields, and the variable matches both a team name and a user name, the email will only be sent to the team. To prevent this from happening, ensure team names do not match any existing user names.
- You can also fill the From, CC and BCC fields. Click Show From/CC/BCC to display these fields.
- Optional: Add an additional attachment to the email.
- Optional: Select whether a form submission should be attached to the email, and the source of the form.
- Optional: Click the checkbox for Include action history to attach a PDF of the last 10 completed steps of action history in the email. The number of steps included can be changed on the Advanced Options tab of the Forms Configuration page.
- Optional: Customize the Action history section title if desired. Specify the Action history location.
- By default, the action history will be placed Before the form, or you can select to place the history After the form or As a separate document.
Note: If Hide action history... has been selected on either the task or in configuration, this option will be ignored.
- Fill in the From, Subject, and Body fields. Learn more about using the rich-text editor to fill the Body field.
Click the Save button to save all changes.