This section discusses steps to ensure SCIM is properly configured in Okta.
SCIM 2.0
- Sign into Okta and navigate to the Administrator Dashboard.
- Click the General tab.
- Select Applications.
- Select Laserfiche Directory Server as your on premises application.
- Click the General tab. Click the Edit button under Settings.
- Select the checkbox for Enable SCIM provisioning.

- Click the Save button to enable the provisioning tab for the application.
- Click the Provisioning tab. In the Connector Configuration section, specify the following and click Save when finished.:
- SCIM connector base URL: Paste the Base SCIM URL from Laserfiche Directory Server into the SCIM connector base URL field. For example:
https://sample.hostname.com/LFDS-SCIM
- Unique identifier field for users: Type userName.
- Select Push New Users and Push Profile Updates.
- Set the Authentication Mode option to HTTP Header and paste a bearer token generated from the Laserfiche SCIM Service Configuration Utility.
- Test the connection and click Save.
- SCIM connector base URL: Paste the Base SCIM URL from Laserfiche Directory Server into the SCIM connector base URL field. For example:
- Click the Provisioning tab, view the To App page, and click Edit.
- Select the Enable checkbox next to Create Users, Update User Attributes, and Deactivate Users.
- Click Save.
SCIM 1.1
Follow these steps to enable on premises provisioning for Okta
- Sign into Okta and navigate to the Administrator Dashboard. Verify your on premises provisioning agents are connected to Okta by navigating to Dashboard, then Agents.
- Click the General tab.
- Select Applications.
- Select Laserfiche Directory Server as your on premises application.
- Click the General tab. Click the Edit button under Settings.
- Select the checkbox for Enable on-premises provisioning.
- Click the Save button to enable the provisioning tab for the application.
Note: To learn more about creating an instance on Okta, see Provision on-premises applications.
- Click the Provisioning tab. In the Connector Configuration section, specify the following and click Save when finished.:
- SCIM connector base URL: Paste the Base SCIM URL from Laserfiche Directory Server into the SCIM connector base URL field.
- Authorization type: Select Basic Auth.
- Basic Auth Credentials: Copy and paste the username and password you specified as the Laserfiche Directory Server Basic Authentication credentials.
- Unique user field name: Type userName.
Note: The Username attribute must have Variable Name value userName. Okta checks that the user exists on the SCIM server with the filter=userName parameter. The filter must check an attribute that is unique for all users in Laserfiche Directory Server. For more information, see Okta and SCIM Version 1.1.
- Optional: Click the Directory tab, select Profile Editor. Click edit Profile button next to your Directory Server app name to create attribute mappings. The attribute mappings will be used when creating or updating user profiles in Directory Server. For an example, see the image below:
Note: User profile attribute in Directory Server are also updated when users sign in using the settings under Claims Mapping for the identity provider in Directory Server.
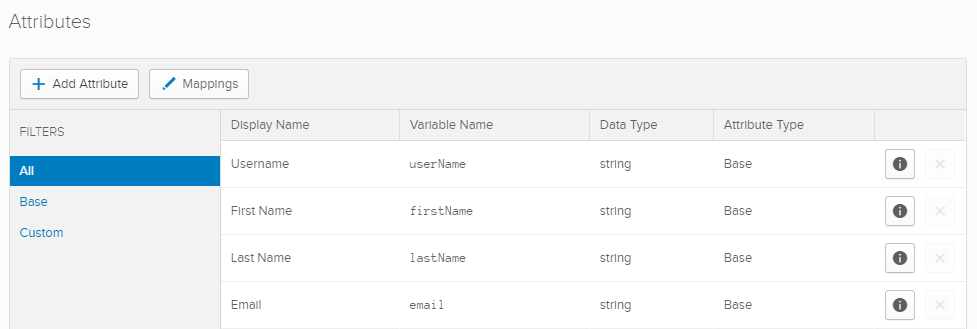
Note: When creating attribute mappings in Okta, the Username attribute must have Variable Name value userName. This is required for proper SCIM client integration with Laserfiche Directory Server.
Note: Claims mappings and SCIM attributes are managed separately and should be configured to match. The First Name, Last Name, Display Name, Email, and Department attributes must have the values firstName, lastName, displayName, email, and department as the Variable Name for the respective attributes for proper SCIM client integration with Laserfiche Directory Server. To learn more about managing claim mappings in Directory Server, see Creating Claim Mappings page.
- Optional: To test the Okta agent's connection to Laserfiche Directory Server, navigate to the Provisioning tab in Okta. Click the Test Connector Configuration button.
Note: To learn more about troubleshooting SCIM, please see Troubleshooting System for Cross-domain Identity Management (SCIM).
Note: For the next step in configuring SCIM, please see Configure SCIM in Laserfiche Directory Server.