The ![]() Laserfiche Repository step in the standard document class wizard enables you to select the repository where documents in this document class will be stored and the login information that will be used to connect to the repository.
Laserfiche Repository step in the standard document class wizard enables you to select the repository where documents in this document class will be stored and the login information that will be used to connect to the repository.
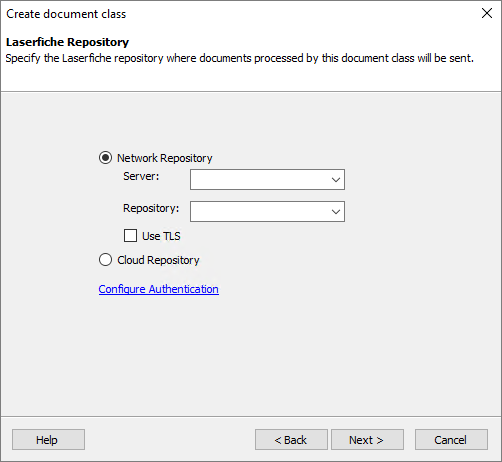
To configure the Laserfiche network repository connection for the document class
- Select the Network Repository option.
- For Server, enter the name of your Laserfiche Server.
- For Repository, select the repository where you want documents from the class to be stored.
- To configure Quick Fields to use secure network communications when connecting to Laserfiche, select the Use TLS checkbox.
Note: If you do not use the fully qualified domain name (i.e., servername.laserfiche.com) when entering the server name, you will not be able to authenticate using TLS. You will receive an Internal SSL error when attempting to validate the connection.
- Click Configure Authentication to specify the sign-in credentials the document class will use to connect to Laserfiche.
- Select Windows authentication to log in using the Windows credentials associated with the user running the session.
- Select Laserfiche authentication to enter credentials associated with a Laserfiche account.
- Optionally, select the Laserfiche Directory Server tab to sign in using Laserfiche Directory Server.
- Enter your Laserfiche Directory Server username and password.
- Click Windows Authentication and sign in using your Windows account.
- Sign in using SAML authentication.
Note: Laserfiche Webtools Agent lets Quick Fields and Quick Fields Scanning connect to a Laserfiche repository with Laserfiche Directory Server authentication using a longer session so you will not have to enter credentials continuously to stay connected.
- To ensure the sign-in credentials you have provided are valid, click Validate. If the information is valid, click Next proceed to the Document Metadata step.
Note: The user specified must have rights to perform all the actions the session calls for. For example, if the user cannot create documents in the repository, the session will not be able to store processed documents.
To configure the Cloud Repository connection for the document class
- Select the Cloud Repository option.
- Click Configure Authentication to specify the sign-in credentials the document class will use to connect to Laserfiche.
- If your Laserfiche Cloud account ID and click Next. You can find the ID in Account Administration under the Plan tab (if you are signed in as an administrator) or in Repository Administration under Summary (if signed in as a user with appropriate access).
- If single sign-on (SSO) has been configured, you can sign in using your identify provider or enter your Laserfiche Cloud username and password and click OK.
Note: Windows authentication cannot be used to connect to Laserfiche Cloud.
Note: The Laserfiche Cloud session connection will only be connected for a certain amount time. After this time period, users will have to authenticate the session connection again.
- Click OK.
- Click Next to proceed to the Document Metadata step.