Once you open a session or create a new workspace in Quick Fields Scanning, the next step is to scan documents.
To scan using the session or document class originally configured when the session or workspace was created, click the ![]() Scan button in the top left corner.
Scan button in the top left corner.
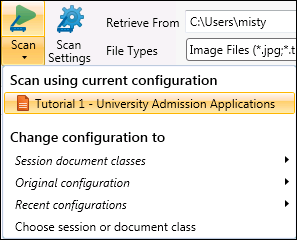
To edit the session or document class being used to identify and process the documents, click the ![]() drop-down arrow below the Scan button.
drop-down arrow below the Scan button.
In ![]() this menu, you can select to
this menu, you can select to
Scan using current configuration: The session or document class displayed here will be used to identify and process scanned documents. This can be the original configuration set when the session or workspace was created, or a new configuration you have recently selected.
Change configuration to: Change the session or document class used to identify and process the scanned documents.
- Session document classes: If a session is defined under Scan using current configuration, and the session has document classes linked to it, you will be able to choose a document class under this option. For example, an Applications session has three different document classes linked to it: Marketing, Sales, and IT. If you are only scanning Marketing applications, it would be more efficient to identify and process the scanned applications using the Marketing document class, instead of the entire Applications session that includes extraneous document classes.
- Original configuration: If the document class or session originally configured to identify and process scanned documents is modified, this option lets you revert to the original session or document class.
- Recent configurations: If you experiment with different document classes and sessions to identify and process your scanned documents, you will be able to view and select a recent document class or session you selected.
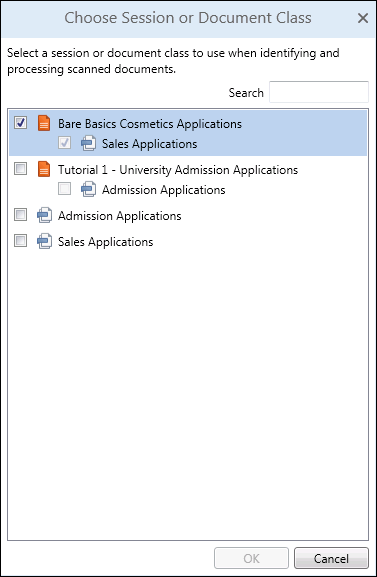
- Choose session or document class: This option lets you select a specific session or document class to use to identify and process your scanned documents. Select the desired session or document class in the
 Choose Session or Document Class dialog box. You can search for a specific session or document class using the Search box at the top of the dialog box. When finished, click OK.
You can save any changes made as a local workspace using the Save button  at the top right of Quick Fields Scanning. Any changes made to the session will not be updated on the server.
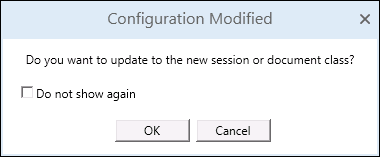
If a session or document class is updated in Quick Fields while you have it open in Quick Fields Scanning, clicking Scan will ![]() prompt you to update to the new session or document class. This ensures you are working with the most up-to-date session information.
prompt you to update to the new session or document class. This ensures you are working with the most up-to-date session information.
After clicking Scan, documents will start scanning and appear in the Document List Pane. The documents will be identified and processed using the session or document class selected in the Scan drop-down menu under Scan using current configuration.
You will see information about the pages scanned in the Messages Pane.
Note: The Scan button will turn into a Stop button when documents are being scanned into Quick Fields Scanning.
Temporary Scanned Documents
In Quick Fields, you can specify a temporary location for scanned images to be stored before they are sent to the repository in the Options dialog box under Quick Fields>Advanced. This same option can be configured in Quick Fields Scanning by modifying a specific configuration file.
To specify a temporary location for scanned images in Quick Fields Scanning
- Navigate to the Quick Fields installation folder (e.g., C:\ProgramFiles\Laserfiche\Quick Fields).
- Open the QuickFields.Scanning.exe.config file in a text editor.
- Search for the appSettings element.
<appSettings>
</appSettings> - Add batchdirectory and a location inside the <appSettings> element.
<appSettings>
<add key="batchdirectory" value="C:\StorageLocation" />
</appSettings>
Enter the actual storage location after the equals sign and between the value quotation marks. If the batchdirectory does not exist, Quick Fields Scanning will create it for you.


