Recycle Bin
When documents, folders, pages, and electronic files are deleted, and the recycle bin is active, they are moved to the recycle bin. The recycle bin is an intermediary hold area to prevent permanent deletion.
Once an item is in the recycle bin, you can restore the document unless it has been permanently purged, by an administrator or on a schedule. If you have been granted the appropriate rights, you can also permanently purge the item yourself.
If a document is deleted, the document along with all of its contents will be sent to the recycle bin. If a folder is deleted, the folder and all of its contents will be sent to the recycle bin. Shortcuts cannot be moved to the recycle bin. If a shortcut is deleted, it cannot be restored. In addition, if a document version is deleted from the version history, it will be immediately deleted and will not go to the recycle bin.
To move an item to the recycle bin, the recycle bin must be activated by an administrator, and then the item must be deleted. You can determine whether the recycle bin has been activated by opening the Laserfiche Windows client and expanding the folder tree. If the recycle bin has been activated, you will see the recycle bin at the bottom of the folder tree. If the recycle bin is not visible, it has not been activated, and deletions will be permanent.
To send an item to the recycle bin, you need to delete it while the recycle bin is active. For more information, see Deleting Documents, Folders and Shortcuts, Deleting Pages, or Deleting Electronic Files.
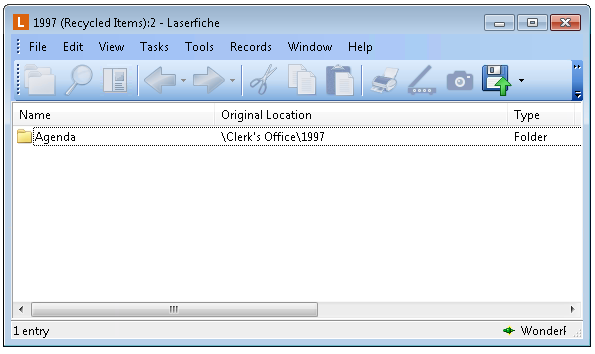
You can also view a list of what folders, documents, electronic files, and pages have been recycled from a specific folder or document without opening the recycle bin. This allows you to quickly check for deleted components of your document, or to see what has been deleted from within a folder.
Note: The recycle bin needs to be activated by an administrator from the Laserfiche Administration Console. For more information, see the Laserfiche Administration Guide.
To view the recycle bin
 In the Laserfiche Windows client
- Click the recycle bin in the Folder Pane.
- In the Contents Pane, review the information for your deleted items. (You cannot open items from the recycle bin. You must restore them to open them and view their contents.) You can view the following information:
- Name: The name of the document or folder, or the name of the source document or folder if the deleted item is a page or electronic file.
- Original Location: The original folder location.
- Type: The type of deleted item (document, folder, page, or electronic file)
- Date Deleted: The date the item was deleted.
- Entry ID: The entry ID of the deleted item.
- Creation Date: The date the item was originally created.
- Deleted By: The user who deleted the item.
To restore an item from the recycle bin
 In the Laserfiche Windows client
- Click the recycle bin in the Folder Pane.
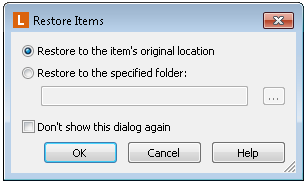
- In the Contents Pane, right-click the item you want to restore and select Restore. This will open the
 Restore Items dialog box (for deleted entries or electronic files) or the Insert New Pages dialog box (for deleted pages):

- Deleted Entries: Choose either Restore entry to the original location or Restore entry to the specified directory. If you have selected more than one entry and choose Restore entry to the specified directory, all the entries will be restored to that directory; however, Restore entry to the original location will restore the entries to their correct original locations even if those locations differ. Click OK to restore the entry or entries.
- Deleted Electronic Files: The Restore to the item's original location option will be pre-selected. You cannot restore electronic files to locations other than their originating document. Click OK to restore the entry or entries.
- Deleted Pages: Select Before First Page to restore the page to the beginning of the document or After Last Page to restore to the end of the document. To specify a different location, select After page and then choose the page to insert the deleted page after. To attempt to restore to the original location, select To the original page location. Click OK to restore the page or pages.
Note: If the document's pages were rearranged, or other pages were removed from the document, restoring the page to its original location may not be able to restore to exactly the same position it came from. If this is the case, you may want to verify the page's position after you restore it.
To permanently purge an item in the recycle bin
 In the Laserfiche Windows client
- Move the entry, page or electronic file to the recycle bin.
- Click the recycle bin in the Folder Pane and select the item in the Contents Pane you want to permanently delete.
- Right-click the item and select Purge.
- To purge all items in the recycle bin, right-click and select Purge All Entries.
To view the list of recycled items for a document or folder
 In the Laserfiche Windows client
- Select the document or folder whose recycled items you want to view.
- Open the Tasks menu and select Recycled Items.
- The
 Recycled Files dialog box will open. Review recycle bin items, or you can purge or restore entries by right-clicking them and choosing Purge or Restore from the context menu.
- When you're finished, close the window.
Note: When viewing the list of recycled items for a folder, the list will display only the folder's immediate children that have been recycled. It will not display recycled items in subfolders.
Related Topics
![]() In the Laserfiche Windows client
In the Laserfiche Windows client
![]() In the Laserfiche Windows client
In the Laserfiche Windows client
![]() In the Laserfiche Windows client
In the Laserfiche Windows client
![]() In the Laserfiche Windows client
In the Laserfiche Windows client

