Prerequisites
Workflow is installed using the Laserfiche Installer. Before proceeding, ensure you have:
- The installation code (See Installing the Laserfiche Installer.)
- Administrator privileges to approve installation prompts.
- If additional prerequisites are missing, the installer will prompt you to install them.
Installation Options
Using the Laserfiche Installer, you can install or upgrade one or both of the following:
Workflow Designer Components
- Workflow Designer: The component you will interact with the most. This component is where you build and publish your workflow definitions.
- Workflow Administration Console: This console provides a variety of tools that let you monitor and modify information for each Workflow Server the console is connected to. For example, you can see a list of your currently running workflows and business processes, view a history of when workflow and business process modifications were made, monitor starting rules and wait conditions, update your Workflow Web service, and configure security settings. This console is an optional install.
- Workflow SDK: A toolkit for customizing and extending the functionality of the Workflow product suite. Using the SDK, users can create their own activities for use in Workflow and integrate directly with the Workflow Server (including the ability to start workflows programmatically).
- Legacy Laserfiche Server Objects (LFSO) Libraries: Libraries that formerly supported Workflow’s interaction with the Laserfiche repository. Maintained for legacy compatibility.
Workflow Server Components
- Workflow Server: The component that runs workflows. The Workflow Server receives notification from the Workflow Subscriber when a change is made to a Laserfiche entry that satisfies a starting rule or wait condition. See Choosing a Workflow Server.
- Workflow Subscriber: This component acts as a link between the Workflow Server and the Laserfiche Server. The Workflow Subscriber receives notification from a Laserfiche Server when a change is made to a Laserfiche entry. It evaluates the event to determine if a starting rule or wait condition is satisfied. If so, the Workflow Subscriber notifies the Workflow Server.
- Workflow Web Service: The Workflow Web Service allows Workflow business processes to be run by other applications, such as the Laserfiche Windows client, web client, and Laserfiche Forms. Laserfiche Workflow Web allows you to browse workflows and business processes using a Web browser.
- Legacy Laserfiche Server Objects (LFSO) Libraries: Libraries that formerly supported Workflow’s interaction with the Laserfiche repository. Maintained for legacy compatibility.
Installation Steps
- Launch the Laserfiche Installer.
- Input the installation code.
- Select the desired component(s):
- Workflow Designer
- Workflow Server
- Click Install and accept the End-User License Agreement.
- If prompted by User Account Control, select Yes to grant permissions.
- If prerequisites are missing, click Install prerequisites to continue.
- Installation will proceed, displaying a green check
 for installed items and a red exclamation
  for failed installations.
 -
If installing Workflow Server, you may be prompted to launch Workflow Configuration Manager where you can configure the Workflow Server, Subscriber, Monitored Repositories, Email Servers, Trustee Directories, and the Workflow Web Service).
- Test Workflow Web Services within Workflow Configuration Manager > Workflow Web Service. Ensure the Web Application directory is a Fully Qualified Domain Name for https (e.g. https://WorkflowWebServiceMachine.example.com/Workflow).
- If HTTPS fails, ensure SSL certificates and IIS bindings are correctly set.
- Go to IIS > Default Web Site > Click bindings > edit for HTTPS binding > ensure the SSL certificate is selected.
- Then go to IIS > Default Web Site > Workflow and use the same account for WorkflowWebServicesAppPool.
- If HTTPS fails, ensure SSL certificates and IIS bindings are correctly set.
Important: If prompted with "You must restart your computer, or some applications may not work properly", please restart your computer.
Upgrading Workflow Components
Before upgrading Workflow Server, record the following settings for post-upgrade reconfiguration:
Workflow Server Login
- Launch Workflow Configuration Manager.
- Click Configured for Workflow Server.
- Click Next to go to the 'Workflow Server Login' wizard.
- Record the information on the wizard, then click Cancel to close the dialog.
Workflow Subscriber Login
- Launch Workflow Configuration Manager.
- Click Configured for Workflow Subscriber.
- Click Next to go to the 'Workflow Subscriber Login' wizard.
- Record the information on the wizard, then click Cancel to close the dialog.
IIS WorkflowWebServicesAppPool Account
- Go to IIS.
- Record the account information for WorkflowWebServicesAppPool found under Sites > right-click Workflow > Manage Application > Advanced Settings...
Upgrade Steps
- Launch the Laserfiche Installer.
- Input the installation code.
- Select the component(s) to upgrade:
- Workflow Designer
- Workflow Server
- Click Install and accept the End-User License Agreement.
- Follow the same Installation Steps outlined above.
After Upgrading Workflow Server
- Use Workflow Configuration Manager to reconfigure saved settings.
- Test Workflow Web Services (see Installation Steps for details if needed).
Additional Laserfiche Installer Functions
Download
Workflow Server and Workflow Designer can be downloaded using the Laserfiche Installer.
- Launch the Laserfiche Installer.
- Select the checkbox(es) for the items you wish to download.
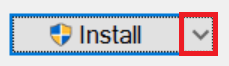
- Click the drop-down arrow next to Install button.
- Select Download only.
- If prompted by User Account Control, select Yes to run the installer with elevated privileges.
- Browse to the folder where the download will be saved and click OK.
- The selected items will download.
- A green check will appear next to installed items and a red exclamation will appear next to items that have not been downloaded.
Repair
Workflow Server and Workflow Designer installations can be repaired using the Laserfiche Installer.
- Launch the Laserfiche Installer.
- Select the checkbox(es) for the items you wish to repair.
- Click the drop-down arrow next to Install button.
- Select Repair.
- If prompted by User Account Control, select Yes to run the installer with elevated privileges.
- The selected items will be repaired.
- A green check will appear next to installed items and a red exclamation will appear next to items that have not been downloaded.
Uninstall
To uninstall Workflow components, please see Uninstalling and Cleaning Up Workflow Components.