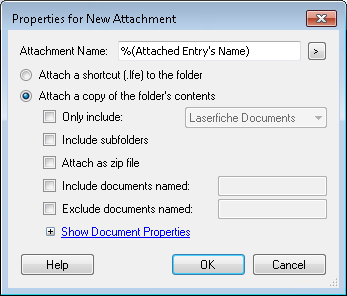
The Folder Attachment Properties dialog box configures advanced options for an attachment for the Email activity.
Using the Folder Attachment Properties dialog box for folders- In the Attachment Name box, the default token, %(Attached Entry's Name), is replaced with the name of the entry in the repository. To use another name, manually enter a name, or click the Token button (right arrow)
 to use tokens.
 - Specify whether you want to attach a shortcut or a copy of the folder.
- To attach a shortcut, select Attach a shortcut (.lfe) to the folder. This option attaches the shortcut as an .lfe file, which allows the recipient to launch the Laserfiche Client and jump directly to the folder in the repository.
- To attach a copy of the folder's contents, select Attach a copy of the folder's contents.
- Optional: If you chose to Attach a copy of the folder's contents, you can configure
 attachment settings.
 - Only include: Specifies whether the attachment should only include Laserfiche documents or Electronic documents. Use the drop-down menu to choose a type. To include both, clear this option.
- Include subfolders: Includes subfolders and their contents in the attachment. The attachment includes the folder's contents, the subfolders and their contents, and folders within those folders, and so on until the end of the folder tree.
- Attach as zip file: Collects all the files that make up this attachment (all pages, text, and/or electronic files included in the folder's contents) and includes them in a single zip file, which are then attached.
- Include documents named: Limits the attachment to only include documents with a certain name. Use * to include more documents. Use semi-colons to list a variety of documents to include.
- Exclude documents named: Limits the attachment to exclude documents with a certain name. Use * to exclude more documents. Use semi-colons to list a variety of documents to exclude.
- Click Show Document Properties to view and configure the Document Attachments Properties dialog box for documents contained within the specified folder.
Note: If you are attaching the folder as a shortcut or zip file, the name in the Attachment Name box becomes the name of the shortcut or zip file. If you are attaching the folder as a folder, the Attachment Name box renames each document attachment with the specified name. Therefore, we recommend to leave the name set to the default token if you are not attaching the folder as a shortcut or zip.
Note: The Laserfiche shortcut format, .lfe, contains a pointer to a particular document or folder in Laserfiche. When a user clicks the .lfe shortcut, the shortcut attempts to open the Laserfiche Client and take them to the specified document or folder. This is the recommended way to share documents with other users who have access to your repository and have the Laserfiche Client installed, because it respects auditing and security settings and allows the user to see all elements of the document, including metadata. However, this format should not be used to share documents with people who do not have access to the repository, as it will not work for them.
Note: If the folder contains many documents, we strongly recommend using this option.
Example: Select this option and type "Report" to include only documents named "Report", or type "*John*" to include only documents whose name contains the word "John." Alternatively, type "*Report*; *John*" to include documents with the word "Report" or documents with the word "John" in their names.
Example: Select this option and type "Agenda" to exclude documents named "Agenda", or type "*Sally*" to exclude documents whose name contains the word "Sally." Alternatively, type "*Agenda*; *Sally*" to exclude documents whose names contain "Agenda" or "Sally."
Note: If Include documents named and Exclude documents named refer to the same documents, then the documents is excluded. ![]() See an example.
See an example.
- Click OK.
